Showing posts with label Halloween. Show all posts

Thursday, January 31, 2013

Happy New Year!

I can still say, "Happy New Year" right?  There are still 3 hours left of January!  Well, have you missed me over these past 4 (four!) months?  A LOT has been going on around here.  The biggest thing is that we bought a house & moved at the beginning of November.  It was, of course, crazy moving with 3 kids, but I think we are feeling pretty settled in now.  We also really enjoyed spending the holidays with our family & friends.  Every year the holidays just seem to come & go even faster.  And then we began 2013 with a round of a nasty stomach bug followed 2 weeks later by all of us passing around a yucky head cold.  Ugh!  But most of us are feeling better now & hopefully we can leave the illness behind in January & enjoy a much healthier February!  Anyway, I was scrolling around my photo library trying to see if I've done anything crafty over the last few months that I could share with you.  I did find a few things.

First, look how big my babies are getting:
Whew!  They are keeping me busy, busy lately!  But I love them so much!

So earlier in 2012 I had decided that I wanted to make my girls poodle skirts for Halloween.  In August I bought the felt & poodles & I even made Kaylee's skirt.  Then we found this house, put an offer on it, opened escrow, started packing, etc.  But since I had already started making the skirts I wanted to finish them in time for Halloween.  Luckily these skirts are so easy to make!  Honestly, a circle skirt is probably the easiest & best skirt to start with if you are a beginner to sewing.  I loved how the skirts turned out!  And my girls loved twirling around in them!

Here's Kaylee:

And Aidynn:

And Quinn:

Even though we had just moved, we hosted Christmas dinner at our house this year.  I had gotten the free download for my Silhouette machine for the holiday photo props & thought it would be really fun to have out on Christmas.  They were super easy to put together (Thank you Silhouette!) & they turned out very cute!  Everyone had a blast using the photo props & taking some pictures.

Mommy kissing Santa Claus:

My oldest girlies:

I also made some sugar cookie place cards for Christmas dinner.  I love making sugar cookies.  Growing up we made them quite often & I love making them with my girls now too.  I kept it simple for the place cards & just used a scallop circle cookie cutter & then wrote everyone's names on them.  Then we put them in a little treat bag, tied them up with some twine & set them on every plate.  They turned out pretty cute:


I cannot believe that our youngest baby just turned 1!  This past year just went by way too fast!  I made her a teeny tiny cake for her first birthday party.  It turned out pretty cute for my first time hand piping on a cake.  Luckily it was a tiny cake!  I thought I had a picture of it on my phone, but I guess I don't & I didn't feel like uploading the gazillion photos from my camera right now.  But you can sort of see it there.  
This girl did not waste any time smashing up her little cake:

 I also made a big cake for everyone else to eat & I tried that scallop technique I've seen a dozen times on Pinterest.  I love how it turned out!  I love that it looks great & it was super fast & easy to frost like this.  
Pretty & pink of course:

I also made a couple of tooth fairy pillows for my hubby's partner at work.  They have a little boy & a little girl so they wanted 2 different ones.  Having 3 girls over here I actually had a hard time picking some fabric out of my stash that was boy-ish & a decent print for this small pillow.  But I really love how it turned out.  I definitely dig the teal & green together.

Here's the boy pillow:

And the girl version:

Well, hopefully we can stay healthy over here & I can actually do a little crafting soon!  
Fingers crossed!

Wednesday, October 12, 2011

Mama's Halloween Costume

Did you see this post over at Make It and Love It last year? Ashley made her own darling skeleton Halloween costume complete with a baby skeleton in the tummy since she was pregnant. It was so cute! I saw this iron-on vinyl on Mamabargains a week or so ago & bought it right away since this year I am pregnant for Halloween. All I did was to grab an old black maternity shirt & ironed the vinyl on. Easy! Then I copied Ashley & added a little pink bow to the baby's head just because it makes it even cuter! And with another baby girl on the way it works perfectly! I was thinking how could you make it cuter if you're expecting a baby boy? Maybe add a little blue bow under the baby's head like a bow tie? Anyway, what a great, simple Halloween costume this is for Mama!

Here I am all dressed up:
Just don't mind the no makeup! At least I had showered & dried my hair though! :)

Friday, November 5, 2010

My Cute Cowgirls

I hope you all had a fun Halloween. We sure did! This year my girls were cowgirls & they were just so stinkin' cute. Not that I was able to get a decent picture of the two of them together, of course. But, still, even the shots we did get are pretty cute & we will always be able to remember our girls just as they are right now. I love this photo because it captures Kaylee's silliness & Aidynn's constant throwing of her hat! And I used the antique effect on my computer & I think it's fitting with their costumes. I guess I've been doing a lot of digital projects lately so here's another digital scrapbook page for you, & this one is really simple. Sometimes simple really is better.

Also, I noticed today that this is post #440 here on my little craft blog. Wow! I can't believe I've been blogging here for that long. So I am thinking that when I hit post #450 I should have a little giveaway, yes?

Friday, October 29, 2010

Halloween Birthday Card

My niece is turning 5 tomorrow! Yes, she was born the day before Halloween & tomorrow she is having a Halloween birthday party. How fun! So I decided to make her a Halloween birthday card. I am still lovin' this cute little sock monkey stamp. And I love that you can accessorize him any way you want. I gave him a party hat, cupcake & a cute little pumpkin all in Halloween colors. I really like how this one turned out. Happy Birthday, Ashlyn!

Thursday, October 7, 2010

Halloween Cupcakes

Back at the beginning of September I was searching for some cute Halloween cupcake ideas & I came across this photo on Cupcakes Take The Cake:
To see the post about these cupcakes click here. I think they're originally from Bakerella.

Anyway, I thought these were just so stinkin' cute & decided that I would try to make some myself this year. I wasn't planning on making some until a little bit closer to Halloween, but it's been raining here for 3 days now (yes, in sunny Southern California) so we've started going a little stir-crazy at our house. I thought that today was the perfect day to do a little baking & cupcake decorating! My older daughter loves to help me with every step of the process so it's some good mommy & me time plus it keeps her occupied for a while.

Ok, well here's my version of the Halloween cupcakes:
I thought they turned out pretty darn cute too! And they were really easy to make & Kaylee & I had so much fun! It was a great rainy day activity!

Monday, October 4, 2010

Halloween Linky Party


So the ladies over at eighteen25 are having a really fun Halloween linky party right now. Go check it out to see all of the great Halloween ideas!

Tutorial: Ribbon Board


Today I thought I would share a tutorial with you (my very first "official" tutorial here on the blog) for making these super cute ribbon boards. These are fairly inexpensive & are so quick & easy to make! These are great to make & give as gifts too. Ribbon boards are a fun way to show off your favorite photos or to hold notes, cards, or whatever else you might want to stick in a safe spot!

I have a large square one that I made for a huge wall in my kitchen. Every few months I have to sort through & reduce the amount of stuff on our ribbon board because it just gets a little crowded, but that's the fun of it too, being able to change it up whenever you want! This is what it looks like after a few months of adding stuff onto it:

Here it is all cleaned off:


I even made one a couple years ago that I put up with our Christmas decorations. I've found that fabric with a small print on it works the best for these boards. This ribbon board we use to display all of the photos we receive in holiday cards:

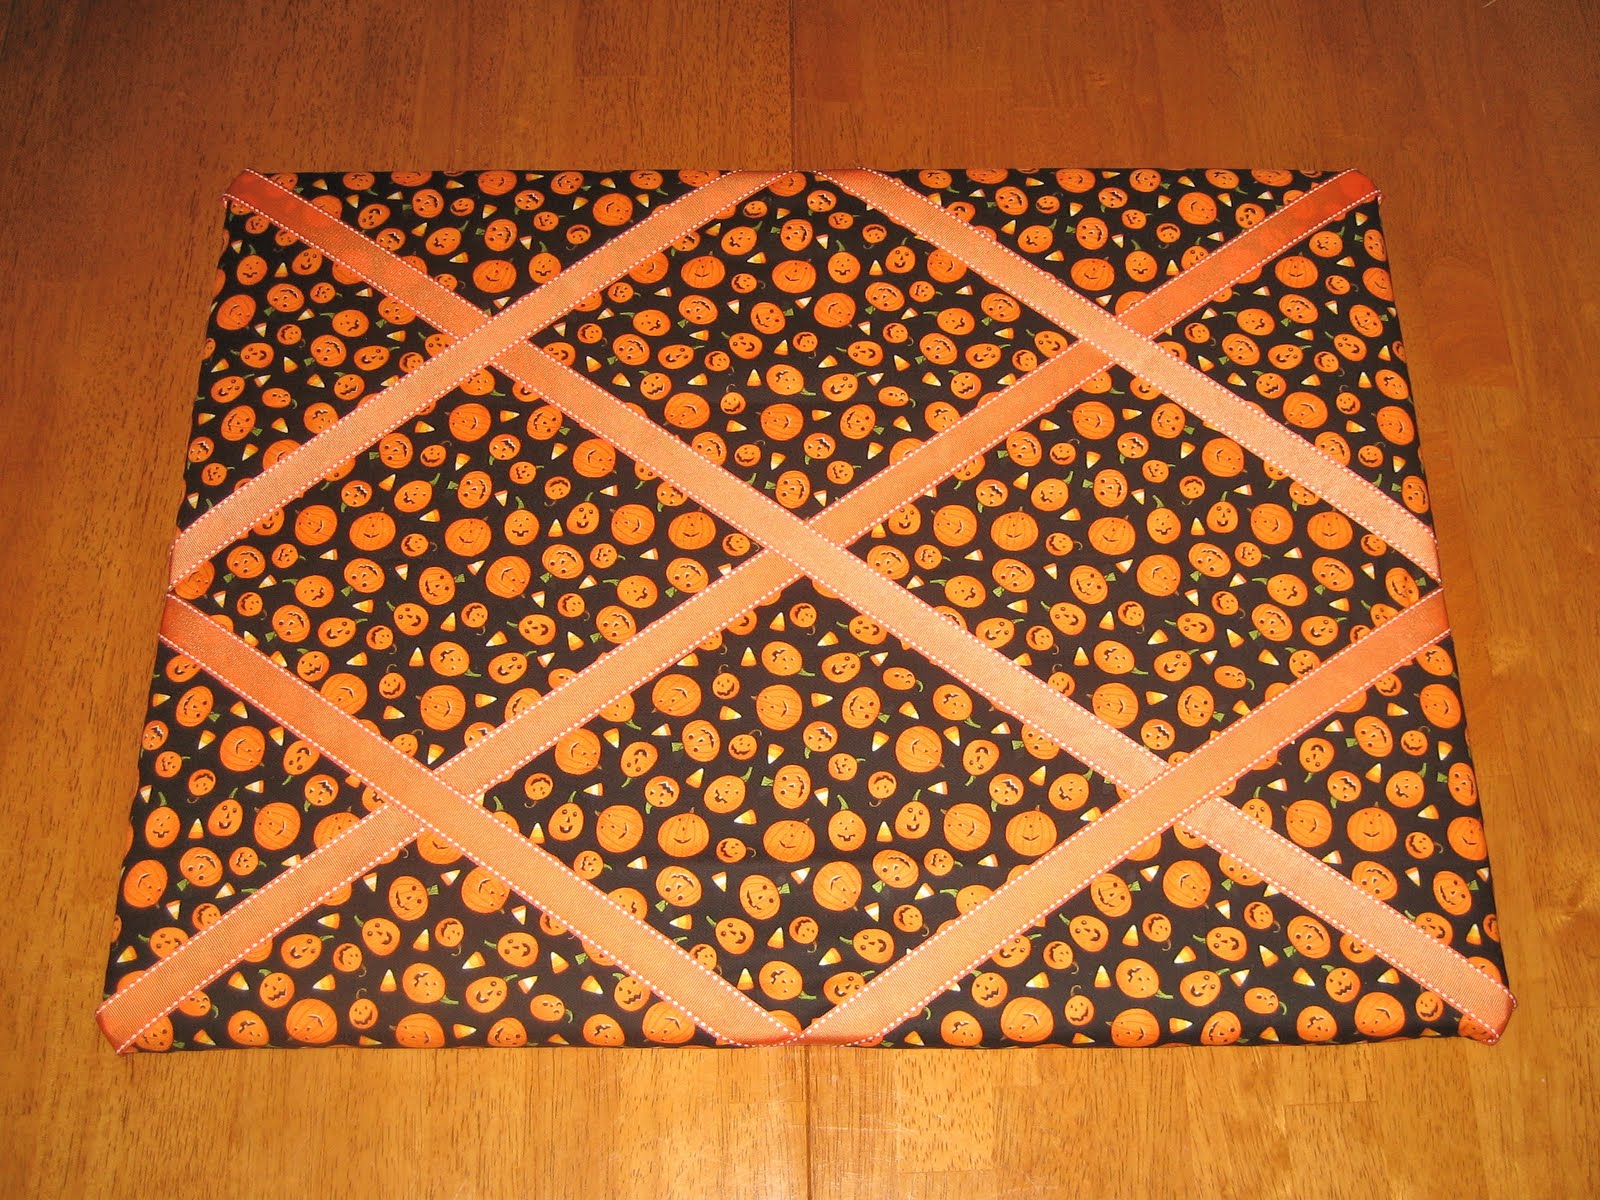
I've been wanting to make a Halloween-themed ribbon board that I could put up for the month of October, just to add some more Halloween decor to our house. So this is the one I am sharing with you today.

First, here's what you'll need before you get started:

Canvas (mine is 18" x 24"-just the cheapest I can find)
Batting (depends on the size of your canvas, I used a little less than a yard)
Fabric (again, depends on canvas size, I bought 1 yard)
Ribbon (approximately 4-1/2 yards, I bought a spool of 5 yards)
Buttons (5)
Embroidery Floss
Needle
Fabric scissors
Staple gun


Start with your canvas:

Lay your canvas upside down on the fabric & cut around the canvas about 2 inches out (the great part is your cutting doesn't have to be perfect or even straight since this will be on the back of the board):

Next, lay the fabric you've cut on top of the batting & cut the batting out the same size as the fabric:

Now lay the canvas upside down on top of the batting you just cut. I like using a layer of batting on the ribbon boards because it adds a nice puffiness to the board. You're going to "wrap" the canvas with the batting. Just start at one side & wrap the batting around the edge of the canvas & use your staple gun to staple the batting into the wood frame of the canvas:

When you get to a corner, cut off any parts of batting that will overhang onto the back because you don't want it to be too thick:

Your corner doesn't have to be perfect & then just keep stapling the batting around the canvas, moving around the edges until the entire canvas is covered with batting:

Here's what it will look like when you've covered your canvas with the batting:

Next lay your batting covered canvas upside down on top of the wrong side of your fabric & start wrapping the fabric around the edges & use your staple gun to attach the fabric to the wood frame as well:

When I get to the corners with my fabric I just fold it nicely, almost like I'm wrapping a present, & then staple it down. Remember, you're not going to see the back of the board, so if it looks a little sloppy that's okay! Here's what the canvas looks like when it's covered in the fabric:

Now it's time to cut the ribbon. I just lay the ribbon out, hanging over the edges a couple of inches & then cut. I start with the longest pieces, going from corner to corner first:

Then I cut the rest of the ribbon. You'll need 4 other pieces. These will start at the middle of each side & go to the middle of the side next to it. Did that make sense? I hope this photo helps:

I start by attaching the longest pieces first, from corner to corner. I just wrap the ribbon around the edge & staple it down on the back:

Once both of the longest pieces are stapled down I attach the other smaller pieces. Just pick one of the sides, lay the ribbon down first, then flip the board over & staple the ribbon on the back:

So here is what the ribbon will look like on the back after you've stapled a few pieces down:

Here's a photo showing you how I add the ribbon, just meeting the ends of the ribbon up in the middle of each side:

And here's the board with the ribbon all stapled down:
This is how it looks on the back, usually I trim the ends of the ribbon a little:
Now it's time to add the buttons. The buttons are not only super cute, but they attach the ribbon to the board which is how you are then able to stick photos or papers onto the board without them falling out. Wherever 2 pieces of ribbon cross you'll want to sew a button. So you'll have 5 buttons total. I always start with the button in the center:
I just sew it on with a needle & embroidery floss. After you add the buttons your board will have a nice puffy look to it now too. And it is so easy to attach the buttons because the needle goes through the canvas really easily:
Once you're done sewing all of the buttons on you'll have to figure out how you want to hang your board. The easiest way I've found is to attach some yarn to the sides on the back of the canvas. This way I can hang the yarn on a nail in the wall & just slide it back & forth until it hangs straight.
Now you're done with your adorable ribbon board so find a good spot to hang it up & show it off! I hung my Halloween ribbon board in my kitchen with a cute Happy Halloween vinyl lettered board above it:
I love it!

If you have any questions, leave a comment or email me.
And I would love to see any ribbon boards you've made too!

Saturday, October 2, 2010

Halloween Week: Pumpkin Magnets

Yep, I used my Big Shot again for another Halloween project! Honestly, I know that the Big Shot is expensive, but I have already made so many awesome projects with that thing, it was definitely worth the money. It is so handy! I love that it cuts through almost anything too. Ok, so my project for today is pumpkin magnets. This takes 5 minutes tops! Stampin' Up! sells magnetic sheets that you can run through your Big Shot. I've found that it's easiest & saves you more magnet sheet if you cut out small pieces with scissors to the size you need for the shape you are die cutting. With a thick material like the magnet sheets it's best to only use one layer at a time with the Big Shot. Then I just ran the magnet pieces through the Big Shot using the Pumpkins #2 die. I also ran some orange with teeny tiny white polka dots designer paper through the same die (I know my picture isn't great so it's hard to see the designer paper). Then I just peeled off the paper on the magnet pumpkin shapes to expose the adhesive & stuck my orange paper right onto the magnet. I also ran some black card stock through for the faces of the pumpkins & then glued them right onto the orange paper. Now our fridge is even decorated for Halloween! My girls love seeing these pumpkins up there too! These would be fun to make if you had a large magnet board or something like that too for October.

To see other magnets I've made click here.

This is my last post of Halloween Week too. I hope you enjoyed stopping by & maybe you were even inspired to get a little crafty for Halloween! I just might have a couple more Halloween ideas to show you too this month so check back soon!

Friday, October 1, 2010

Halloween Week: Candy Countdown Jar

Here at our house we love countdown projects that help us to countdown the days until a big holiday or someone's birthday. And we love chocolate. This year I decided to make a candy countdown jar for my older daughter. I just grabbed one of my small Ball jars & filled it with 31 Halloween-colored Hershey Kisses. This way starting today my daughter can eat one Hershey Kiss every day & she will know it's getting closer to Halloween as the jar empties out. This will hopefully help with all of the "How many days until Halloween?" questions I usually get every year too. Then I tied some of my favorite orange striped ribbon around the top of the jar & added a hand stamped pumpkin tag. I love this little pumpkin with the "Got treats?" saying-so cute! And this project is easy enough & inexpensive enough to where you could make one for each child in your family. I should have made one for my hubby too, I don't know how we'll keep him out of Kaylee's jar!

Here's a close-up:
Yummy!

To see another holiday countdown project I've made click here.

Thursday, September 30, 2010

Halloween Week: Paper Pumpkins

This is probably my favorite project of Halloween Week. I have been seeing all sorts of super cute fabric or paper pumpkins out there & had been wanting to give it a try. Then I got my Stampin' Success magazine in the mail (a magazine that Stampin' Up! demonstrators receive monthly) & they had some paper pumpkins right on the cover. And they even gave you a few tips for making them yourself. I decided to try them out. They were very easy & I love how they turned out. I used some old Halloween & Autumn designer papers I had. I love the fall colors & will be able to leave these out for a couple of months through November.

Here's a close-up of the teeny pumpkin:
The only thing I'm not crazy about is that my designer paper was double-sided & so the inside of each pumpkin is white with some design on it. But you can really only see that up close anyway. These would be cute with solid card stock though too & then it would be the same color inside as well.