I really wish I had thought to take a "before" picture of this! I stumbled across this old metal recipe box a couple of weeks ago & it was a dingy brown color. But I thought it was pretty cool & very simple & I knew I could vamp it up a little. So I just grabbed a pretty blue colored spray paint at Home Depot & gave this recipe box a few coats. Then I used my Silhouette machine to cut out the label with some black vinyl & the word "recipes" with some white vinyl. Then I stuck them on! Easy & it gave this old metal recipe box a whole new look. And it's another small way to add a little more of this pretty aqua color into my kitchen! I {heart} spray paint!
Showing posts with label Vinyl Designs. Show all posts
Thursday, May 31, 2012
Sunday, March 4, 2012
Easter Silhouette Canvases
Last week my girls & I decided that we wanted to put away the Valentines decorations & get out some Spring ones. Well, we realized don't have any decorations for St. Patrick's Day. Maybe I can come up with some next year. And we noticed don't have much for just Spring in general. We don't even really have many decorations for Easter. Yikes! So I decided to make a quick craft for our mantle for Easter. Since we have a newborn & a crazy schedule around here I needed something fast & easy.
Here's what I came up with:
Easter Silhouette Canvases
These were so, so easy! I just bought some 5x7 sized blank canvases & some Spring-colored acrylic paints at JoAnn's. I painted the canvases, I used about 3 coats on each one so they're nice & bright. Then I used my Silhouette machine to cut out the four different Easter silhouettes with some white adhesive vinyl. Then after the paint on my canvases was dry I stuck the vinyl silhouettes on them. And then I set them out on my mantle. They stand up really well by themselves which is perfect.
I love how bright & cheery these make our mantle! And now we have a little Easter decor!
Thursday, April 21, 2011
Princess/Arts & Crafts Birthday Party
I know, where have I been? Well, I had been planning & preparing for a fabulous princess/arts & crafts party! My first-born turned 5 yesterday & we celebrated with a birthday party for her last Saturday. This was the first year that she really wanted to have a party with some of her friends. And what better way to celebrate than to combine two of her favorite things-princesses & arts & crafts! What I loved about this party was that it was really easy to put together & a lot of the stuff we already had at home.
{Beware-this post is a long one!}
To start I made the invitations through Shutterfly. I had an awesome coupon code for 10 FREE cards & I needed 9 invitations so it worked out perfectly!
And they even had this darling princess crown design:
(Don't mind the smudges, I just blurred out our address & phone number!)
We were hoping for nice weather because we wanted to do the party in the backyard & it couldn't have been a more beautiful day-warm, but not too hot!
Here is how we set it up:

We used some paper from our Ikea easel & painted a birthday banner:
I just covered the ugly folding tables with some cheap plastic {pink!} tablecloths. I only wish I had something I could have covered the ugly folding chairs with, but oh well! I had bought a large generic princess coloring book (11" x 14") months ago & thought this was the perfect time to use some of those coloring pages. We put one at each seat to serve as a placemat, plus the girls could color on it while we were waiting for all of our guests to arrive. We did put a little piece of masking tape on the back of each corner to hold them in place on the tablecloth. Sometimes we get a little breeze in the afternoons. We also put some crayons in paper cups for them to use on their placemats:
A close-up of one of the spots:
We got some clothesline rope & used our staple gun to attach it to different areas of the fence & put a bunch of clothespins on it so that the girls could hang their finished paintings up to dry:
It also made for some really cute decorations when they started hanging them up there:
{Painting was, by far, the favorite activity for all of the girls & I love seeing their creativity in each painting!}
I also made each party guest an apron. This was the first craft we did. The girls colored on the apron using fabric markers (which I bought using my coupons for JoAnn's which saved $$). The fabric markers were great because they were easy for the girls to use & they dried really fast. We hung them up on some clothesline too until we were ready to use them:
I bought a pack of these canvas aprons at my local teacher supply store which was much cheaper than buying them individually. Then I used my {awesome} Silhouette machine to cut out the crowns & the names in some heat transfer vinyl which I then ironed onto the aprons. So easy & they looked really cute:

The next craft the girls did was to decorate a princess hat. I used a princess hat we already had in our dress-up bin as an example & made the princess hats out of felt, interfacing, ric rac, tulle & some elastic for the strap:

Then the girls used foam shapes & rhinestones to decorate them how they wanted. The foam shapes were adhesive & stuck really well, but we did have to use a little glue to attach the rhinestones. Luckily we had plenty of adult supervisors to help with that & it wasn't as messy as I had feared!
The next craft they did was to make some beaded necklaces. Sadly, I didn't get any pictures of them doing that!
Here is the birthday girl in her decorated princess hat & apron:

{She just had so much fun!}
We also set up our easel with some sheets of paper & paint so that the girls could paint pictures whenever they wanted:

Like I said, that was probably their favorite activity! And when the paintings were dry, we rolled them up & put them in their goody baskets for them to take home.
Here are the goody baskets:
I found these cute baskets at Target in the $1 bin a while back & I knew they would be perfect to act as little artist bins for the girls to take all of their goodies home in. I was going to use my Silhouette to cut some princess crowns out of chalkboard vinyl (which is really reasonably priced through Expressions Vinyl), but then I found these already made at Michaels for super cheap! I just punched holes in them, tied them onto the baskets with some white yarn & then wrote each girl's name on it with my chalkboard markers:
My first thought for some party decorations was to do some kind of cute paper lanterns, but they are a little pricy! Much more than I had thought they would be! So I have been seeing these tissue paper pom-poms all over the internet lately & they seemed easy enough:
My mom & I made them & they really didn't take much time at all! Plus with the colored tissue paper they looked so great! We used white yarn to hang them everywhere!
We hung on the lights outside, off of the shade cover, off of the ceiling fan in the kitchen over the dessert table, on the umbrella outside:
On the big tree:

They looked so nice!
My daughter wanted a pinata as well, so we found a princess crown pinata at Target that we hung from the tree:

We also had a little "guess how many jellybeans in the jar" game. The chalkboard crown & the small plastic paint jar also came from Michaels:

I just stamped a crown, put some bling on it & punched it out with my circle punch to put on the top of the lid of the jar. I also stamped a crown on the notecards for each girl to use to write down how many jellybeans they thought were in the jar.
Here's a close-up:
{There were 712 jellybeans in that jar! Yep, my hubby counted every single one!}
I'm really bummed that I forgot to get a photo of the whole dessert table all together, but at least I got some photos of the desserts. I made an artist's palette cake:
Some princess crown sugar cookies:
And some princess crown {pink} chocolate lollipops:

I also used my Silhouette to make a little subway art for the dessert table. I wrote words that describe my daughter, nicknames, things she loves, etc. & cut it out in some bright pink vinyl. I already had the flat canvas so I stuck it on that. Then I covered it with a couple of layers of Mod Podge. The canvas was bigger than I had thought it was so I added a pink bow at the top to fill up some of the extra white space.
I really like how it turned out:

And now that the party is over, we can put it up in my daughter's room!
Of course, I had to make a little birthday shirt for the birthday girl too:

I love those $5 t-shirts from Target (sometimes they go on sale too) & then I used my Silhouette once again to cut out the crown & the little heart from some heat transfer vinyl & just ironed them onto the shirt. Sorry for the glare from my flash, but the silver heat transfer looks awesome in person!
The birthday girl all dolled up for her party:

{Oh how we love her!}
And she loved her pretty pettiskirt that I bought her from Fairy Flowers Boutique:

Their stuff is very reasonably priced, super cute & ships really fast!
Whew! Typing up this post may have made me as tired as I was after the actual party! But it was all worth it!
Labels:
Baking,
Birthday,
Chalkboard,
Clothes,
Fabric,
Family,
Heat Transfer Vinyl,
Invitations,
Kids,
Party Decorations,
Sewing,
Silhouette,
Vinyl Designs
Monday, April 4, 2011
A Hint of Easter
Can you believe that Easter will be here in 3 short weeks?!?!?! I really can't believe it is April! Wasn't it just Christmas? Time Flies! Well, I have slowly been making some decorations for Spring. I don't really have any specifically for Easter so I made a couple of quick projects this week.
This first idea I got from the girls at eighteen25. They simply bought some cheap, plastic Easter eggs at Target (they already have holes in each end) & strung them together & hung them up. So easy! Mine were a little heavy, so I had to swag them to give some support in the middle.
It adds a nice touch to our mantle:
To see theirs & also to check out their latest Spring subway art click here.
This next project was just as easy. I've had the white "Happy Easter" vinyl for a couple of years now & just hadn't done anything with it. So I bought a pack of think 11 x 14 flat canvases at JoAnn's. They were really inexpensive, plus I used a coupon-yay! I simply painted it a pretty light purple color, let it dry well & then stuck my vinyl on.
Here it is:

Nothing fancy, but it looks nice. I've been debating if I want to embellish it or not. Maybe some cute buttons or fabric flowers? I don't know?
Well that does it for our Easter decor around here! At least for now!
Tuesday, March 15, 2011
Chalkboard Canister Labels
You've seen this idea before, I know. But I got some new canisters at Tai Pan Trading a couple weeks ago & I knew when I bought them that I was going to use my Silhouette to make some of these cute chalkboard labels for them. I just think they're so cute! And, no, my four-year-old did not write on them, I did! Ha ha! But I like that if I want to change up what's in them I can simply erase the writing & write on them again.
So I keep the 3 on the left on the counter & then the spaghetti canister in my pantry, but here they all are:
I love that you can see through the top of them too:
I'm going to go back & get 3 more too for in my pantry for whole wheat flour, powdered sugar, dark brown sugar. I'm so excited to keep all of my goods nice & fresh in these convenient canisters & to get a little more organized in my kitchen!
Tuesday, February 15, 2011
Sweet {heart}
I put my Silhouette machine to use again last week to make a couple of last-minute Valentine's Day t-shirts for my girls. Since this was my first time trying out heat transfer vinyl I decided to use a couple of their older shirts just in case I messed something up. But it was really easy to do! And so fast! I can't believe it! I only cut out the graphic once, but I used the positive & negative space so that I could make two shirts from one cut. I'd hate to waste perfectly good vinyl!
So here are the shirts:
Very simple, but cute.
And here are my adorable little models in their "new" Valentine's Day shirts:


And they are sweethearts (most of the time)!
Labels:
Clothes,
Heat Transfer Vinyl,
Kids,
Silhouette,
Valentine's Day,
Vinyl Designs
Thursday, February 3, 2011
Chalkboard Vinyl
I got my first Sale-a-bration order last week! Love it all! One item I chose was the chalkboard vinyl. This is so fun! I hung it on a cabinet in my kitchen so that I can easily jot down grocery items, Target items, phone messages, love notes, etc. The black vinyl is actual chalkboard that you can write on with chalk & erase & use over & over again! The white "notes" is vinyl that is applied on top of the chalkboard vinyl. It was so easy to apply & when I get sick of it up there it will be super easy to just peel off too without damaging the cabinets.
Here it is, a clean slate:

I have some chalkboard markers that I just love. There are so many fun colors & they are so much more vibrant than regular chalk. And they wipe off easily too.
Here it is in use:
So fun! And my preschooler loves writing & drawing all over this too!
Remember, you can get this for FREE too if you place an order during Sale-a-bration!
Wednesday, February 2, 2011
Our Family
It just so happened that last year both sides of our family had some family pictures taken. I love family photos! We had moved some furniture around in the family room before Christmas & so I knew I now had the perfect spot to display some of our favorite ones. I also had some vinyl that I received for free at an Uppercase Living event a while back that said "Our Family." Perfect! We stuck the vinyl in the center & then arranged the pictures around it. It's definitely not perfect (now I know why people hand paper up first to map it all out), but I like how it turned out:
I {heart} vinyl:
It's so easy to use & adds a really fun, personal touch to your home!
And I love my family-all of them-they're the best!
Thursday, July 29, 2010
Beautiful Bridal Shower
So remember the bridal shower invite that I showed you a while back? This one:

Well the bridal shower was last Saturday. My sister-in-law, Cheryl, planned, organized & orchestrated the entire party (her nickname is "The Party Planner") & it turned out really, really nice. My sister-in-law, Beth, & I helped out too. It was a lot of work, but definitely worth it. As a side note, I've known my niece, Alisha, who this shower was for, since I was 16 years old & she was only 6. So I got a little emotional with this one {tear}. I have so loved watching her grow up into the beautiful woman she's become. And I can't believe she's getting married! I keep saying, how did she grow up when I haven't gotten any older? ;)
So anyway, I wanted to share some photos with you of the shower & some of the things we made for it. These are the thank you cards that I made for her that match the invite:
And here's a guest book that I made for people to write a little message to the bride & then we recorded who gave her what in the back. I have to say, I LOVE how the cake turned out! Don't you love it when you have a vision in your mind & it turns out even better than you though?
Here's the awesome dessert table. My SIL wanted an elegant dessert table & it definitely was! And filled with all sorts of yummy stuff too-cupcakes, cookies, chocolate covered pretzels & lots of candies!
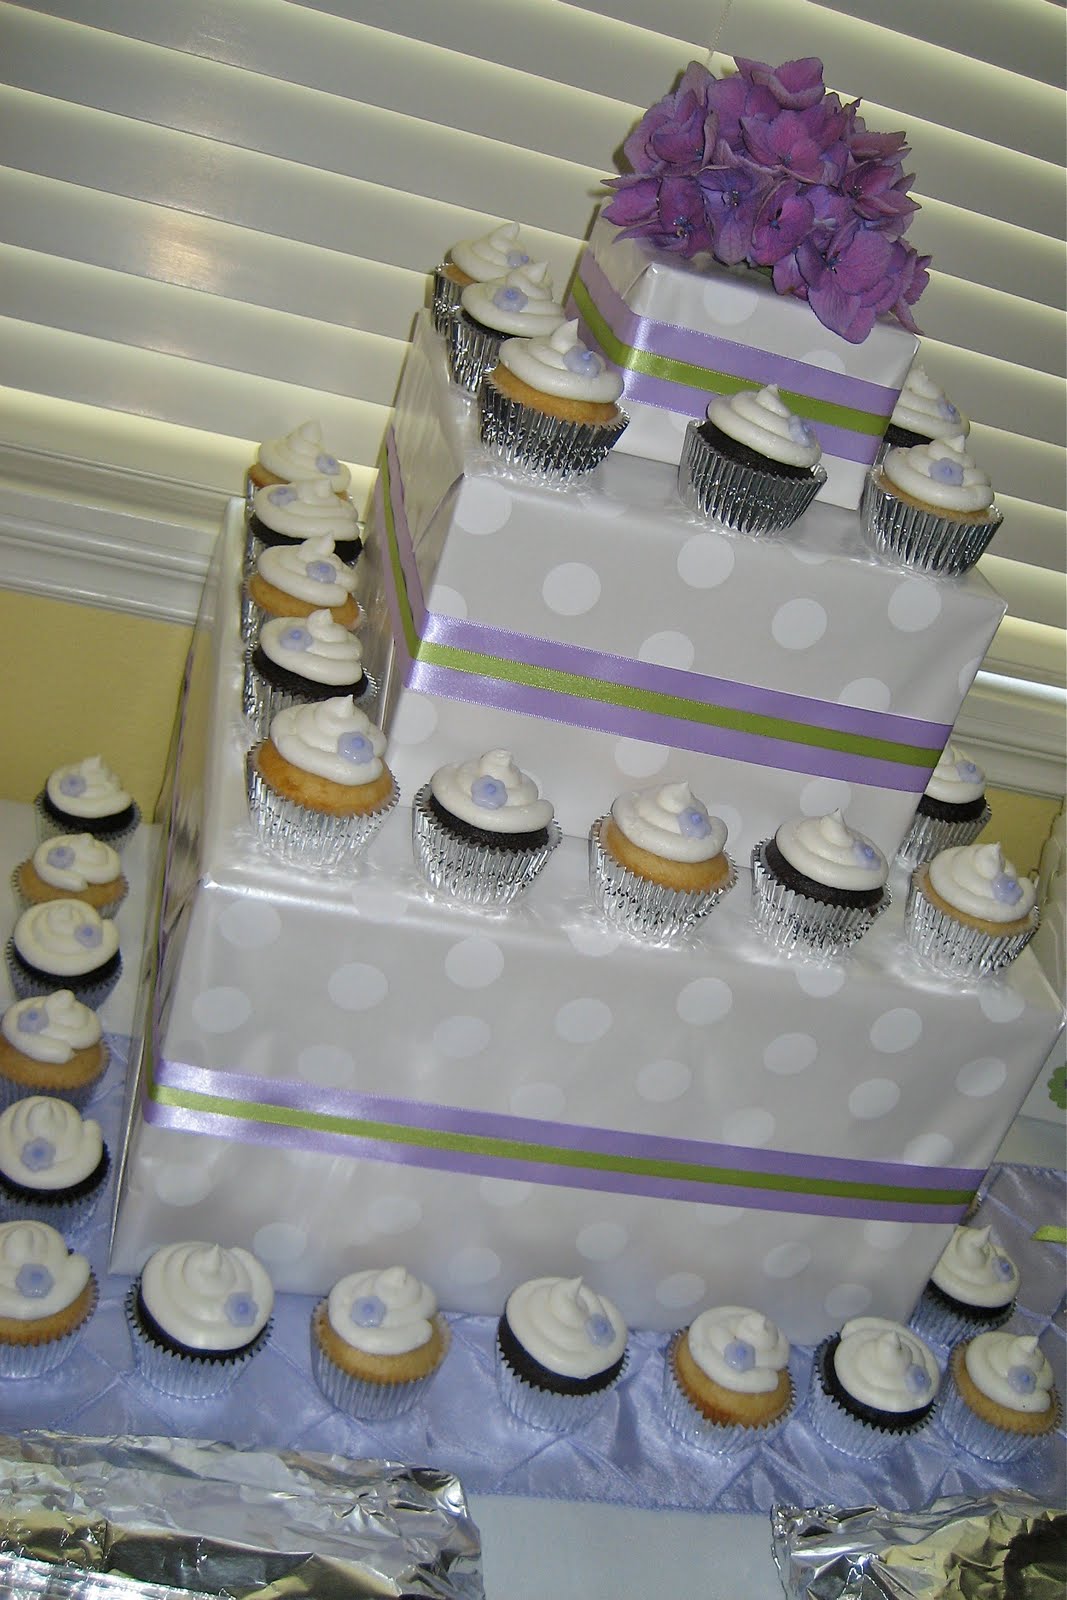
I had seen cupcake holders like these numerous times online & I thought it would be a perfect way to display the cupcakes at the shower. It was so easy to make too! I went to my local packing supply store & bought 3 square boxes in different sizes so that would make it look like a 3-tier cake. Then I covered the boxes with some pretty wedding wrapping paper. Then I wrapped some ribbon around it & topped it with some fresh hydrangeas on top. I was going to put the ribbon bands around the bottom of each layer, but with the cupcakes there it wasn't going to show. I thought it looked beautiful! Way better than I imagined! And it's the perfect way to display cupcakes. Yes, I got to practice my cake decorating skills again too! I made half chocolate & half vanilla cupcakes in silver foil liners, topped each one with a swirl of bright white buttercream & then added a small lavender fondant flower on top. They looked pretty & tasted yummy too!

My SIL, Beth, made these adorable heart-shaped butter cookies with her cookie press. I have to say, these cookies are so good they are totally addicting! But look how pretty they are & the way she displayed them was so cute!

My SIL, Cheryl, wanted to have some takeout boxes that people could fill with candy from the dessert table & take home with them as their party favor. So we decorated a bunch of these cute takeout boxes to match the invites. Another reason I love my Big Shot!

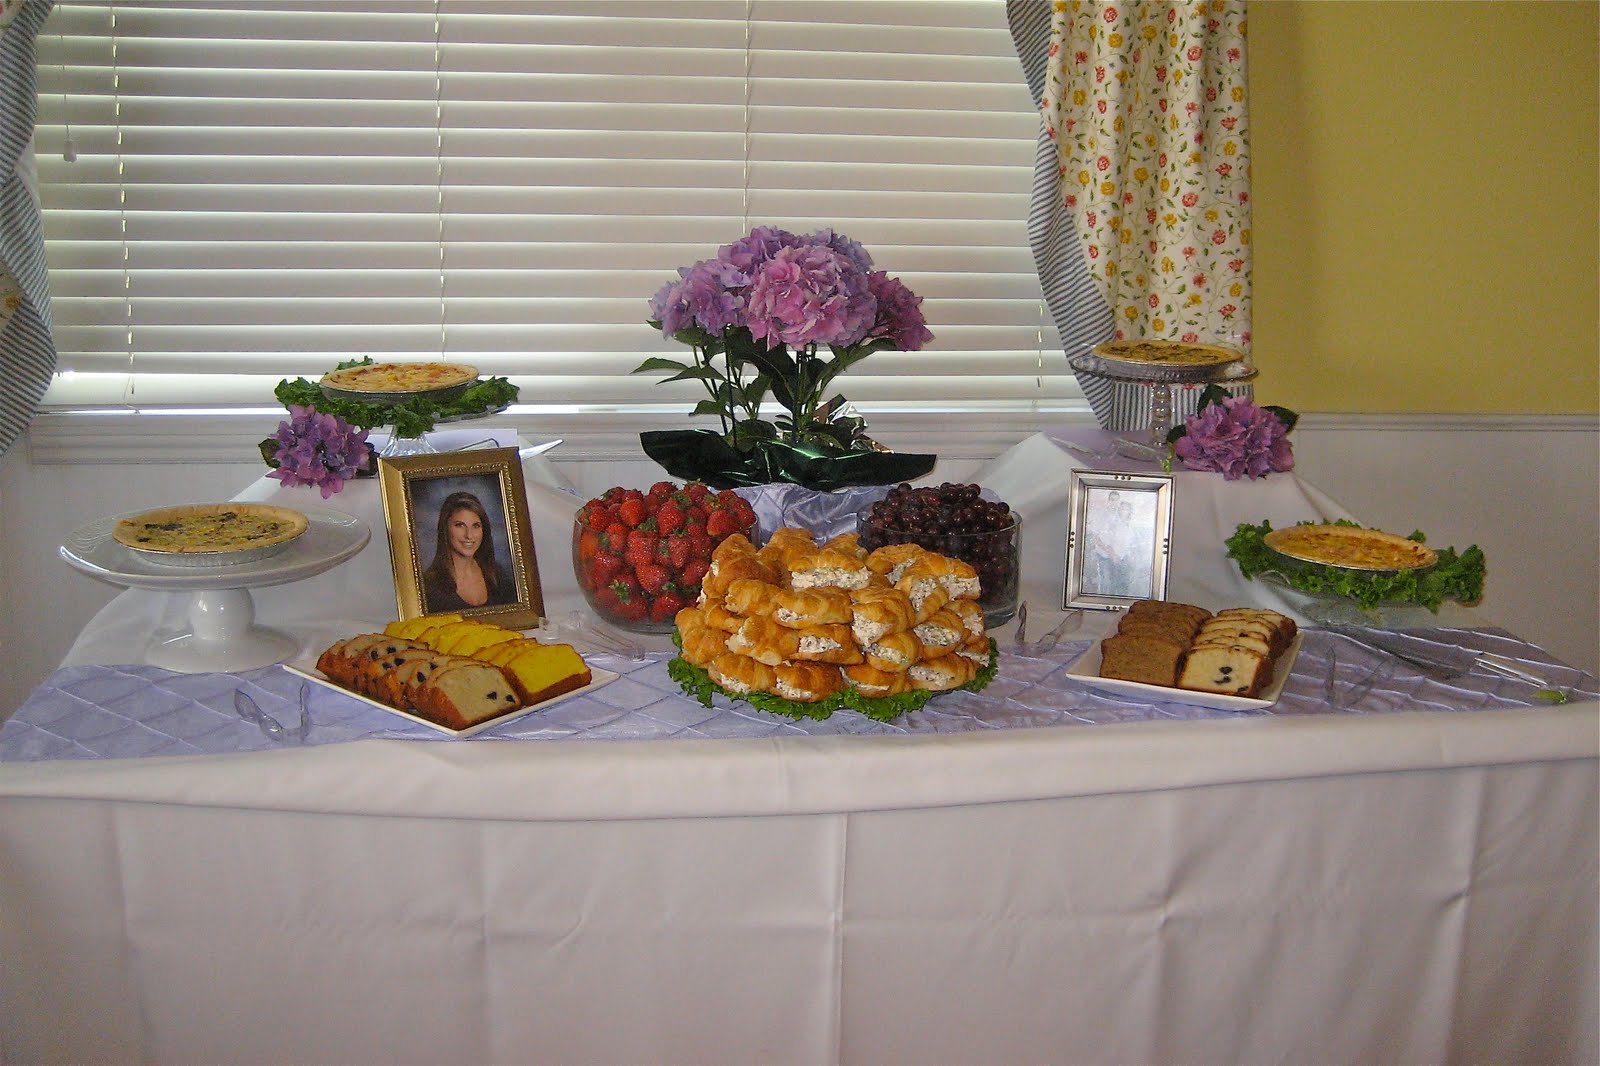
And here's a photo of the brunch table just because it looked so awesome too! And everything was delicious!
And here she is, my sweet niece Alisha! Soon to be Mrs. McLeod!
*Oh and don't you love that vinyl sign too? My friend Anya makes them. You can customize them any way you want. They are wonderful gifts! Check out all of her vinyl creations at Stuck Anya-Vinyl Lettering & More.
Labels:
Baking,
Big Shot,
Cupcakes,
Invitations,
Thank You,
Vinyl Designs,
Wedding
Subscribe to:
Posts (Atom)