Showing posts with label Bags. Show all posts

Friday, March 14, 2014

Sewing Stuff

I just never get as much sewing done as I would like.  I have big dreams of fabulous sewing projects, but life just gets busy.  And my family always comes first!  I did get a few sewing projects done though & I always feel bad for the recipients of my sewing gifts because they are my guinea pigs as I practice & develop my sewing skills.  Ha ha ha!  Hopefully they like their gifts though!

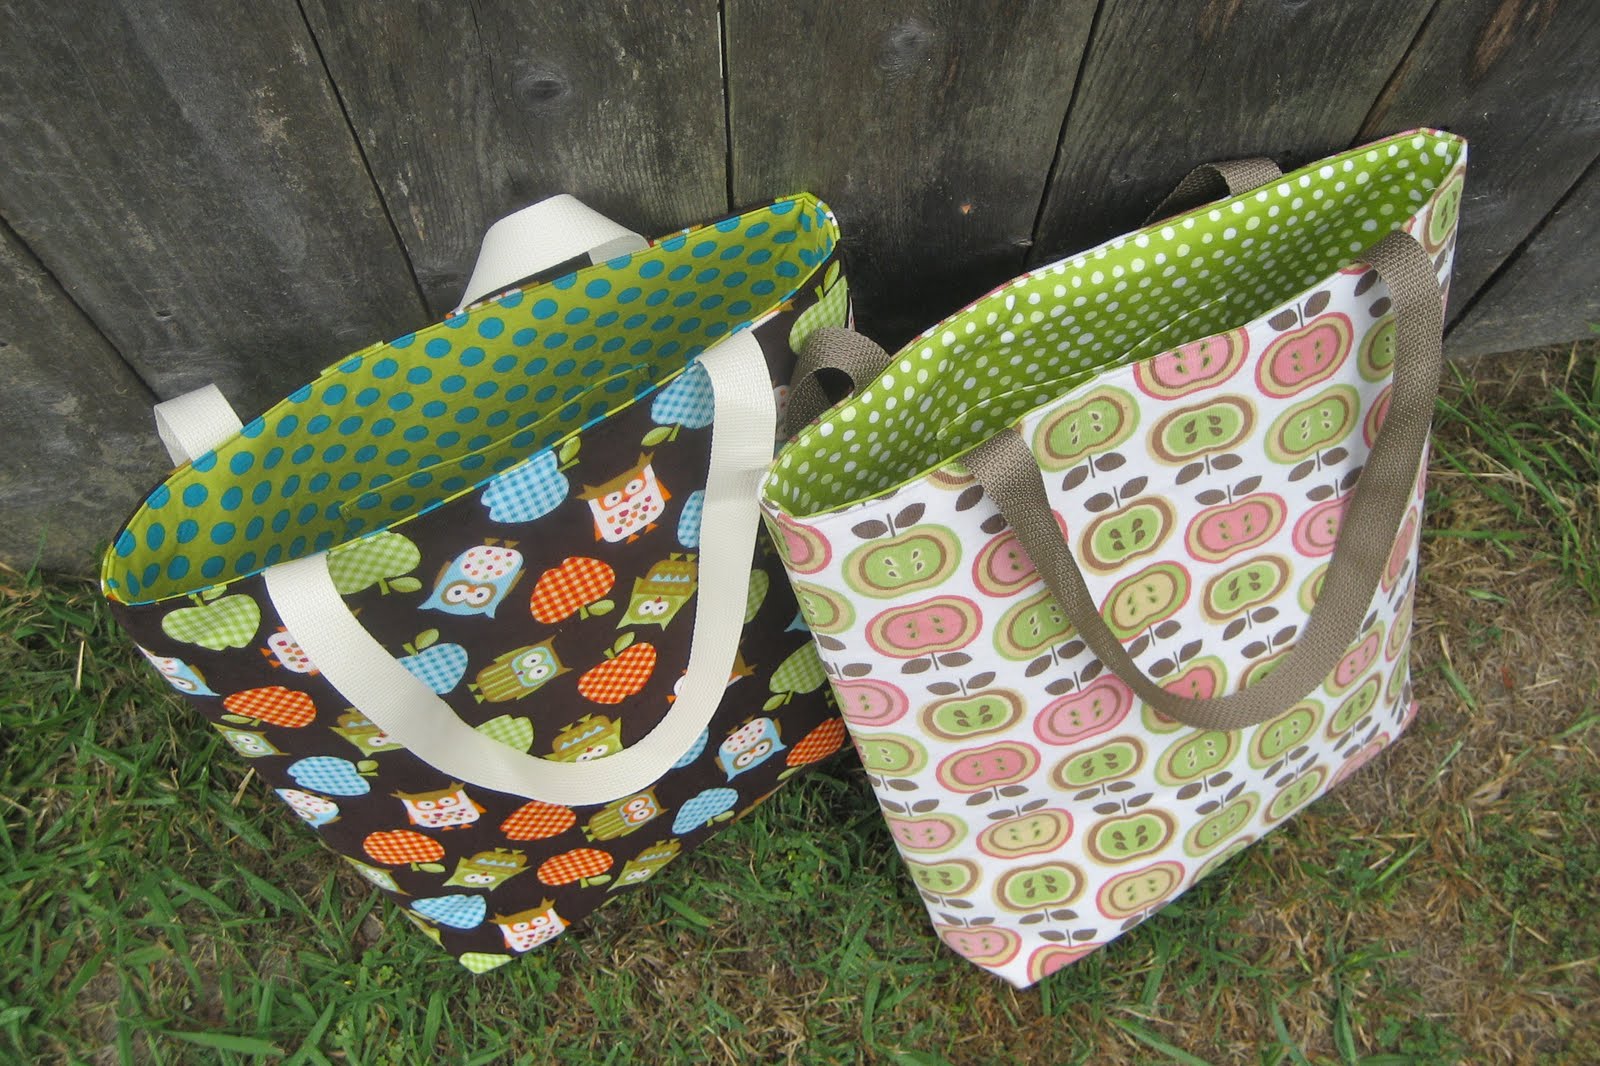
I made this big tote bag for my sister-in-law for her birthday last year:
 She'd been asking for a big tote bag & this one was big!  And I love the fabric!

2013 was the year of the baby in my husband's family.  There were 4 babies born!  And it seemed to be the year of the boy as 3 of the 4 were boys!  It was fun to shop for boy fabric for a change.  I made baby quilts for the new babies & I really enjoyed making each one.  You'll see a chevron theme on most of them.  What can I say?  I {heart} chevron.  And I feel like it's a great basic pattern that goes with just about anything.  And for quilting purposes it was really easy.  I just bought the large chevron print fabric for the front of the quilt & then a patterned fabric for the back of the quilt.  Then after I layered them with the batting in between I quilted along the chevron pattern for the actual quilting.  It was easy & they turned out great!

This one was for our cousin's baby girl, Saylor:
 I just love yellow & gray together!  And after having 3 girls I really love other colors together for girls besides just pink.

This one was for our cousin's baby boy, Ethan:
 I love, love, love these bold colors together!  
And chevron & polka dots together = I die!

This last chevron quilt was for our nephew, Elliott:
I love this pop of orange with the aqua & gray!

My brother-in-law loves Star Wars & so when I saw this fabric on sale I had to get it!  I just made a simple flannel blanket:
And I love the light blue star flannel on the back.

I also made my sister-in-law one of those infant car seat canopy covers:

 I loved this pattern!  It's not a great picture of how it works as the car seat canopy, but I'm sure you've seen those out & about.

This last quilt was for my great-nephew, Hudson:
His nursery is a nautical theme & when I saw this fabric I just had to get it.  I love the bright colors!

Yay for all these babies so I could practice my quilting!  :)

Monday, April 15, 2013

Random Craft


Did you notice the new header on my blog?  Yes, after having my little blog for 6 years I have decided to change its name.  So long to "One Crazy Stampin' Mama" & hello to "Random Craft."  Why the name change?  Well, I've been thinking about it for a couple of years now actually.  I no longer sell Stampin' Up! products, my crafting has become so much more than stamping & I hardly ever really stamp anymore so I decided to change it up.  I like the name "Random Craft" because that's what I feel I do.  I make random crafts.  I like to craft in general & so you will see a lot of random things on my blog.  Hopefully no one else is already using this title for a blog, I tried looking & it didn't seem like it.  Anyway, I'm trying it out.

So...on to my random crafts of late.

A few weeks ago I decided to make a cushion for the bench in our entryway:

We have had this bench FOREVER.  And it has taken lots of abuse from my children.  There are sticker remnants on the top, crayon marks, pencil marks, etc.  I wanted to make a cushion to cover up all of the markings & to add some color into our family room.  And I didn't want to sew a cushion cover.  So, thanks to some ideas on Pinterest, I made this really fast & easy cushion.  I bought the fabric at JoAnn's & then I bought some thick foam there too.  (Use your coupons for JoAnn's!)  Then I had my hubby get a piece of plywood for me one day when he was at Home Depot.  They cut it to the exact size we needed for the top of the bench.  I used the plywood as a guide to trim the foam to the same size just using a serrated knife.  Then I just laid the fabric out upside down, laid the foam on top of that, laid the plywood onto that & then started stapling the fabric down with my handy staple gun.  Of course, I went slowly, making sure the fabric was pulled tight & that the corners were folded nicely.  Took me maybe 10 minutes & it was on my bench!

I love it:

Now just as soon as little Quinn (14 month) stops eating shoes we can move our tan show bins back into those cubbies in the bench & it will be much more functional again.

We also spruced up the girls' bathroom a little bit:

Gosh.  Sorry my photos are so dark.  Anyway, thanks again Pinterest for these great ideas!  My hubby hung a wood strip along the entire wall of our bathroom where the old towel bar was.  Then we added 5 simple hooks.  Now we can hang 5 towels up instead of just 2.  It is so great!  Especially when we have visitors staying at our house, everyone has a place to hang their towel to dry.  And I love the shower curtain too!  It nicely covers up our outdated tub/shower combo until we can afford to re-do it.  Thank you Home Goods!  

I also printed out these bathroom printables that I found on Pinterest & stuck them in cheap white frames:

They look cute!  And I love the pops of color they bring into our very tan bathroom.  Just search "bathroom printables" on Pinterest & they pop right up.  I'm still trying to decide what color I want to paint that bathroom...

Also a few weeks ago I managed to find some time on a rainy day to make a few more coloring purses.  I made one for my daughter & then 2 others for her cousins.  They all turned out really cute:


These things are so handy & get a lot of use from my girls.

Here's the crayon side:

And then a simple ruffle on the other side:

I made these ones slightly larger than I usually do so that they can hold a full-size coloring book.  
I have to say it was so nice to have my sewing machine out again.  I just love sewing.  It is so fun creating things from just some simple supplies like fabric & thread.  And it is a great stress-reliever!  Well, as long as the kids are asleep!  

Monday, November 21, 2011

Handmade Christmas 2011: Shopper Tote

Here's another handmade Christmas present for ya! Can I just say I am so thankful to have Pinterest in my life this year? I have just found some amazing handmade gift ideas & tutorials. Thanks to everyone who is willing to share their awesome ideas on there! So I saw this shopper tote on Pinterest & you can find pictures & the full tutorial at The Crafty CPA. I love this style tote bag! So great for a teacher gift too, or for anyone who loves a good tote bag really. I think next time I would actually make the bag a bit larger & I would make the handles a tad shorter, but it's still a great bag. I did make one change which was that I only measured in 2 inches when boxing the bottom corners & I think the tutorial said to go in 5 inches if I remember right. I love that this bag has 2 outside pockets, one on each side, in between the handles too (it's hard to see the pocket in the photo).

And here's a shot of the inside of the bag:
I always like to use a lighter color lining inside of my bags, just so it's easier to see what's in there. I also love to add 2 large pockets, perfect for your phone & other small items you want to keep handy. Thanks again to The Crafty CPA for the inspiration for this one!

Thursday, November 3, 2011

A New Bag for Winter

I decided that I needed to make myself a new bag for Winter. Of course, I went to my favorite tutorial for the Tohoku Tote! I love this speckled gray fabric. And I love the black bow & straps with it. It's a little dark, but perfect for the Winter season.

And I just cannot seem to get myself away from the gray & yellow combo right now-love, love, LOVE those colors together! So here's a peek at the inside:
Make sure to click here if you want to make one of these bags for yourself. It's super easy to make & doesn't take much time at all!

Tuesday, November 1, 2011

Cute Crayon Purse

I've seen cute little purses like this before around on blogs or Pinterest, where there are pockets on the outside to hold crayons. So clever! I decided to make one for my niece for her 6th birthday. It was so easy to make & hardly took any time at all! I didn't use a pattern or template, but just kind of figured it out as I went along. I love how it turned out! And my 5-year-old loved it too & was immediately asking for me to make her one so I think I will just have to make a couple of these for my girls for Christmas this year. They're great to take along to church or doctor's appointments or restaurants or anywhere when you might need to have your child quiet & entertained for a while. For the size bag I made I could fit 9 crayons in the outside pockets. I used the twistable crayons just because they're pretty clean & kids can just twist them up when they get low.

Of course I wanted the other side to be cute too, so I added a ruffle & a button:
Inside I put a blank pad of paper, an alphabet activity book & a small Tangled coloring book:
I hope it gets lots of use!

Friday, September 9, 2011

A Fun Gift Set

I had been wanting to make something for my aunt who has helped us out a lot lately with some last minute babysitting. I think the Tohoku Tote is becoming my go-to pattern for tote bags. It is such a great bag! It's easy to do so I can get it made quickly & it's such a great size. I love this bright, fun fabric too! I also decided to make a zipper pouch to go inside of the tote bag, but then at the last minute I decided to add a strap. So I guess it's actually a wristlet now? Anyway, I love how both the tote bag & the zipper pouch turned out.

Here's the tote bag:
To get the free tutorial for the Tohoku Tote just click here. Thank you Cheri from I Am Momma-Hear Me Roar for now making it a public tutorial for anyone to use! Also, it is the new Create With Me project for September over at Ucreate, click here to read about that. It sounds fun, I'm going to link up this bag! I didn't do the pleat or the bow on this bag, but I added a large double yo-yo flower to the front for a little embellishment & I think it looks great!

Here's a close-up of the zipper pouch-I love the bright yellow ruffle:

A close-up of the double yo-yo flower:

And both the tote bag & the zipper pouch are lined with this fun bright blue fabric:
These two projects just make me happy! I was tempted to keep them for myself, but I do hope my aunt is enjoying them!

Friday, August 5, 2011

One More Summer Tote

Are you sick of seeing these yet? I love them, what can I say? And I finally made myself one! I know, I know, summer is almost over, but I know I'll still get lots of use out of this. I love this bright fabric. I went with green too, which is unlike me. I guess I'm trying to get out of my comfort zone a little more.

I had to do the ruffle, it's just so cute:

All loaded up:
To see the awesome tutorial for the summer tote click here.
You still have time to make one too before summer is over! :)

Thursday, July 7, 2011

Another Summer Tote


Remember the first summer tote I made here? I am loving these summer totes! They are perfect for gifts! I made this one for my sister-in-law for her birthday. I love picking out fabric so that the gift is really personalized. My SIL isn't really a ruffly kind of lady so I just made the tote with 3 pockets on each side. It turned out great!

Thursday, June 16, 2011

Teacher Totes

Well, yesterday was my daughter's last day of preschool! {I can't believe I'll have a kindergartner in the fall!} I made these totes for her 2 awesome teachers on Tues, finishing them just in time! I bought these super cute corduroy fabrics a while back knowing that I wanted to make her teachers some simple tote bags for end of the year gifts, but I totally procrastinated. Even though I rushed through these I really love them. Luckily they are just super simple totes, lined with cute polka dot fabrics & a pocket inside too. Nothing fancy, but perfect for teachers to tote around books & papers.
Here they are:
I love the linings too:
I hope that they get a lot of use out of these!

Tuesday, May 24, 2011

Summer Tote

Last month Tasha from Creation Corner shared an awesome tutorial for a Summer Tote for the "Sincerest Form of Flattery" series over at KojoDesigns. Her tote was a knock off of a bag fromPottery Barn. I think we can all agree that Pottery Barn comes up with some pretty amazing stuff, however, their prices can be a little steep. Well, the Summer Tote bag that Tasha made is adorable! Definitely the simple charm of Pottery Barn but with a little ruffle which makes it fun.

I have had this on my to-do list since I saw her tutorial. Our cousin turned 21 yesterday & I knew this would be a perfect gift for her that she can use on all of her trips to the beach this summer. I found the fabrics at JoAnn's & I love them! While I was at the store I wasn't quite sure if I was going to like the 2 fabrics together, but I think they worked out great! And I have to tell you that Tasha's tutorial was so clear & easy to follow! I made this in just one afternoon!

Of course, I had to fill it up as soon as I was done with it & try it out myself-pure awesomeness!
Here's the side with the pockets:

And the other side with the super cute ruffle:

Here's a little close-up & just to show you some of the stuff I put in it-3 towels in the main bag & then 2 bottles of sunscreen, a bottle of water & a swim diaper in the outside pockets:
And I still had room for more!

I also added a little piece of fabric with a snap on it to hold keys:
You definitely don't want to lose those at the beach!

I will definitely be making more of these soon!
Thanks again for the great tutorial Tasha!
And you should check out her blog, Creation Corner, she makes some amazing things & I am always feeling inspired when I visit!

Mama's New Bag

Do you remember the Tohoku Tote that I posted here? Do you remember how much I love, love, LOVE it? Well, I figured since I am all caught up on making gifts {for the moment} that Mama would make herself a new bag! And I had splurged on this gorgeous gray & yellow floral fabric a couple months ago & knew that I wanted to use it on this bag.

It looks so cute:

Again I did a large pocket (left) that could hold diapers if I want to use it as a diaper bag too & then 2 smaller pockets (right) for smaller items like my cell phone. I also added a piece of fabric that snaps together in a loop that I can hook my keys on to so they don't get lost. I hate digging through my purse for my keys!
Here's the inside:

Here I am wearing it {happy, happy} so that you can see it's size:
Don't you just love the gray & yellow together? I am lovin' it!

Monday, August 30, 2010

A Bigger {Better} Buttercup Bag

Here's the other Buttercup Bag that I made last week. I like this one so much better than the first one I made! I love the bigger size, plus I lined this one so it feels a lot stronger. I pretty much just followed Rae's instructions here for making a bigger Buttercup Bag. I increased the size of the pattern to 130%. I also made the strap 2 inches longer. Then I lined the bottom portion of the bag with a lightweight interfacing & I lined the top (polka dot) portion of the bag & the strap with a heavyweight interfacing. It made such a big difference! The bag feels very sturdy now. I also made 2 slightly larger pockets on the inside too just because pockets are always wonderful! I love this fabric too! It feels very fall-like to me & I love the punch of orange! I knew that I wanted to make a purse from this fabric when I bought it (I found it at M&L Fabrics in Anaheim, CA).

Of course, I added a yo-yo flower to the front for embellishment. I am lovin' these yo-yo flowers! And I just sew mine right onto the purse, but if you were making one as a gift you could just pin it on so the recipient could remove the flower if they don't like it.
Here's a close-up:
Here's a close-up of the inside of the bag. Notice that I bought some more fusible interfacing so that I didn't have to sew it on this time. Yay! No yucky stitching around the snap in this purse! It really looks a lot nicer. And I am so glad I put a double pocket in! Very handy!
Here's a photo of both of the Buttercup Bags just so you can see the size difference.
Now...what kind of Buttercup Bag to make next...?

Friday, August 27, 2010

Monogrammed Trick-or-Treat Bags


Here's an early Halloween project for ya! My crafty to-do list is so long right now so I'm trying to get things done early instead of scrambling at the last minute. I decided that this year I wanted to make my girls some trick-or-treat tote bags to cart their Halloween candy around in. Did you ever just use a pillowcase when you were younger for your candy? I did & I can remember trying to fill that thing up! That's basically where this idea came from. I wanted something like a smaller pillowcase-style bag that my girls could carry. I added the handles, making this a really simple, basic tote bag!

When I had this project in mind I was picturing a different fabric completely. But you know how that goes! Then you go to the fabric store & can't find exactly what you had pictured & settle on something else. And, as in this case, your project still usually turns out just as cute as you thought it would! I actually really do like this fabric & Kaylee loves it because there's some pink & purple on it. Perfect!

I just made the tote bags exactly the same for each of my girls & then added their monogram on it so they can keep track of which one is theirs. It was easy to do to! I used my Big Shot to cut the scallop circle out of black felt & then sewed it onto the front panel for the tote bag. Then I used my computer to create a really large "K." I printed it out, cut it out & then traced it onto the orange polka dot fabric. I then cut that out, used spray adhesive to attach it to the center of the black felt scallop circle & then used bright pink embroidery thread & hand-stitched it on. I did all of this before assembling & sewing together the bag.

Of course I made one for Aidynn too!

I decided to line it with the orange polka dot fabric for some extra strength, plus it just looks so darn cute!

And here is Kaylee modeling her new trick-or-treat tote bag so you can get an idea of the size. I wanted it to be a little big for right now so that they can grow into it & use it for many years of Halloween fun to come!

She's just so cute!
*Edited 8/28/10: To those who are wondering I got this cute Halloween fabric at JoAnn's!

Also, Tasha over at Creation Corner has started a Link Party Friday. People can link up whatever projects they've been working on lately. What a fun idea! I decided to link this monogrammed trick-or-treat bag up, so go over to Creation Corner & check it out & see what everyone else has been creating lately too!