Showing posts with label Party Decorations. Show all posts

Thursday, May 8, 2014

Cake Decorating Party

My oldest turned 8 in April.  
EIGHT!  
I really cannot believe that she is 8 already.  
Stop.  The.  Clock.  Please.  

Anyway, I love celebrating my girls' birthdays!  They get so excited when it's their birthday & I get so happy to make them feel extra special as they turn another year older.  Kaylee, had been talking about her birthday party since she turned seven.  Yes, she loves a good party & loves to help with the party planning too.  As her birthday got closer we told her she could have a small party at our house with a few friends.  She quickly decided that she wanted a crafty party.  A girl after my own heart!  When I asked her what crafts she wanted to do she told me cake decorating & jewelry making.  Ok then!  

Kaylee & I went to Hobby Lobby one day & shopped for everything for her party.  I think we got just about everything for her party at Hobby Lobby!  She chose some zebra print & pink invitations & we just took that theme & went with it for the whole party.  It was a lot of fun!  Since her birthday was on Easter this year & the weekend before was already booked up, we decided to do her party on the Tuesday during Spring Break.  And it worked out great!  I think the girls liked getting together during their break from school too.  It wasn't a fancy party, but it turned out well & the girls had a lot of fun which was the most important thing!  Ok, enough chatter from me, on to the party details.  And thanks to my friend, Jill, for some great cake decorating party tips!  She had just done a similar party for her daughter that was super cute.

We set everything up in the backyard:
 Luckily it was a nice warm day!  It looked pretty cute too & then it made for easy clean-up after the party.

We hung a simple banner on the fence:

We bought these plain white aprons at Hobby Lobby for the girls to decorate as their first craft & then to wear while decorating their cakes.  We even found zebra & pink iron-on letters that I ironed on with each girl's first initial:
 To decorate the aprons we had a bunch of fabric markers & then we hot glued some flowers & gems on as well.

Yes, Hobby Lobby even sells these convenient bakery boxes:
 We figured these were necessary for each girl to transport her cake home safely.

I just added a simple card stock scallop circle with their name on top of each box:

The best part about this party was that there was a lot that Kaylee could help with in preparing for it.  We had so much fun together!  The majority of the preparation could be done ahead of time too which was great.  We baked the cakes about a week before & then kept them in the freezer.  We also made the buttercream frosting a few days before & kept it in the fridge.  Then the day before her party we frosted the cakes in plain white frosting & kept them in the fridge for the next day.

Good thing we have a spare fridge in the garage:
 We made 10 little cakes & then one larger cake to eat during the party.

The morning of the party we put the frosting in the frosting bags with tips of various sizes & designs.  We also put the edible decorations (sprinkles, flowers, etc.) that Kaylee picked out into foil muffin tins.  Again, I was thinking about easy after party clean-up!
  I love the bright frosting colors she picked out:

 After the girls decorated their aprons they took a snack break (Cheez-Its, pretzels & Capri Suns) while we got out all of the cake decorating supplies.

These girls had so much fun decorating their little cakes:

 Oh yeah, I also started them off with a few simple tips for decorating a cake.  I gave each girl a paper plate too for them to use if they wanted to try out the different frosting tips before using them on their actual cakes.  But I didn't give them any direction because I wanted them to decorate their cakes however they wanted.

They really got into it:


I was a little surprised by how seriously they all took it & how much attention they paid to detail.  The cakes turned out so great! 

I took a picture of each girl with her apron on & her finished cake.  Kaylee included the photo with each girls' thank you card.

Here's Kaylee with her cake:

And my 4-1/2 year old, Aidynn, with her cake:


So being that this was a cake decorating party I wasn't sure what to do as far as serving a cake or some treat that we could put candles in & sing "Happy Birthday" to Kaylee with.  I ended up just making a cake to eat at the party since the girls were going to take their little cakes home to share with their families.

It had bright pink frosting of course, with these cool zebra print candles:

 Make a wish, birthday girl:

 The inside of the cake had a surprise too:
It was zebra print!
I have seen cakes with zebra print inside online many times & I thought it would be perfect for this zebra print party.  I just layered chocolate cake batter & white cake batter 1/4 cup at a time into my baking pans & baked them normally.  I was a little nervous about how it would look when we cut into it, but it looked so cool!  The girls loved it!

It got a little wild on our coordinating zebra print plates too:

After we had cake then my daughter opened her presents & then the girls finished the party by making beaded necklaces & bracelets.  The party was 2 hours long & it was the perfect amount of time to get everything done.  I would say this was definitely another successful party!

Happy 8th birthday, Kaylee-girl!

Friday, March 14, 2014

Crafty Stuff

Hello blog world!  Wow.  It has been almost one year since I last posted here!  Yikes!  Time really does fly when you are having fun.  I don't have any excuses for not posting for so long other than life is busy!  Even though things have been crazy busy around here I still manage to get my craft on when I can.  I decided to do a few posts with some pics of craftiness from the past year (I have been trying to remember to take pics when I do make something).

Here are the teacher gifts I made for the girls teachers for their end of the year gift last year:  
 I had gone to Utah in May with some friends & we went to this awesome wood/craft store called The Wood Connection.  I picked these cute wood pencils up at that store.  Then I just painted them, added pink glitter to the eraser, tied some silver ribbon around them & put each teacher's name on the pencil in black vinyl.  They turned out great!

When we moved to our new house the big girls decided they wanted to have their bunk beds separate for a while.  I decided they needed something above their beds.  But I didn't want anything too heavy (hello, we have earthquakes here!) so I just painted a canvas in a pink that coordinated with their bedding, painted a wooden letter of their initials white & glued it on the painted canvas:

 The pictures are from my phone & they are horrible!  Ha ha ha!  But they look really cute in person.

Then I painted some Ikea wooden spice racks white & we hung them on the wall next to each girls bed so that they could have a little shelf to put their reading books on:
 I know you saw that idea on Pinterest too.  But it works out great!  They love their little shelves.  Oh & the cute pink reading lights are from Ikea too.

My Aidynn has always wanted long hair.  She talks about it all of the time.  So for her 4th birthday last July I made her a Rapunzel braid:
 Isn't she darling?

Here's a better view of the braid:
 This was so fast & easy to make & it was by far her favorite gift.  It has definitely gotten a lot of use!  To make it I just braided yellow yarn, tied it with some pretty lilac ribbon & then hot glued some fake flowers in different shades of purple all over it.

I made myself a necklace for our family photos:
 I just used wood beads in different sizes & painted them a pretty aqua color.  I strung them onto ribbon & that's it!  It was an easy & inexpensive way to get exactly what I wanted to go with our colors for our family photos.

Speaking of, here's our family photo from last July:
I also made Aidynn a yellow wooden bead bracelet to wear.
(Photo credit:  Shari Hanson of Shari Hanson Photography)

In September we had our annual back to school dinner the night before the new school year began.  Every year it seems I add just a little bit more to it which is fun.  I totally got the idea for the apple plates off of Pinterest.  They looked so cute on our table: 

The chalkboard we use every year on our first day photos:

We also got the easel out for the girls to color on:

And they love coloring on the table when we cover it with paper:

Also inspired by Pinterest, cupcakes decorated like apples:

The annual dinner?  Spaghetti, zucchini & garlic bread:

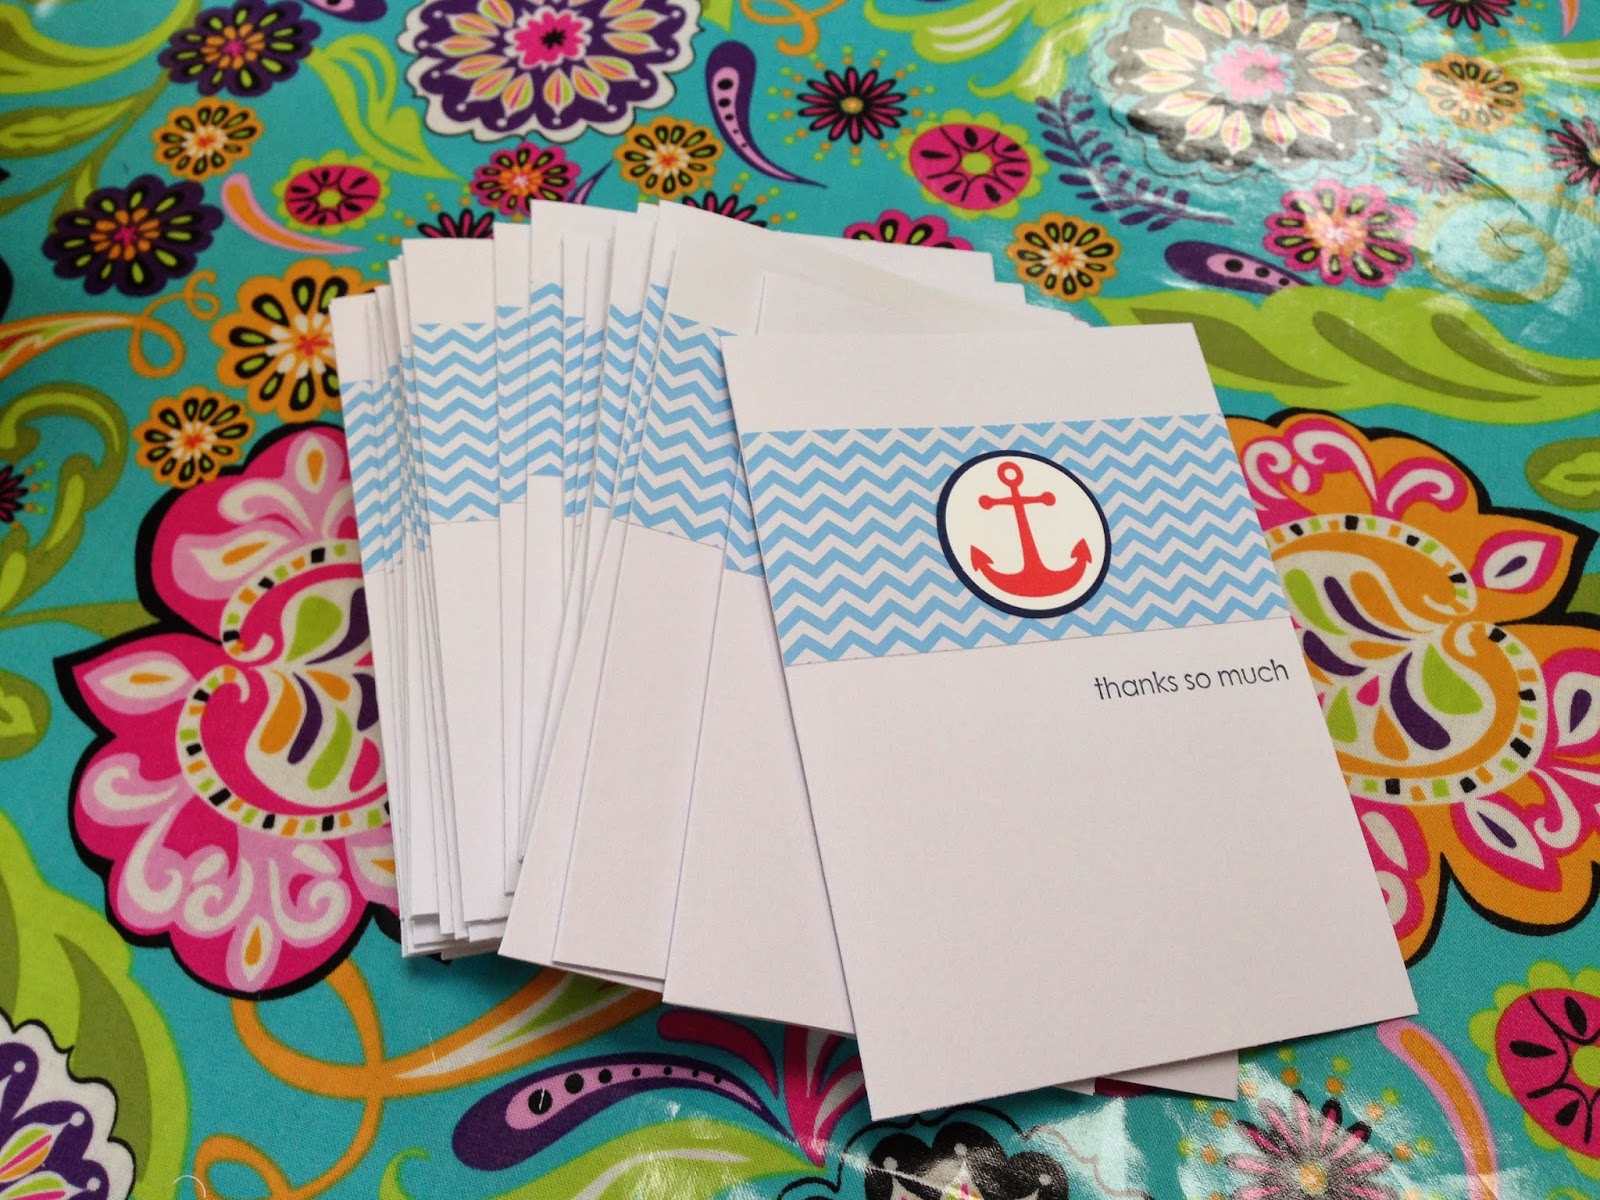
I made my niece some thank you cards for her nautical themed baby shower:
 Simple is always nice.

And a Christmas photo of these 3 beauties:
They keep me busy, but I love them so!

Well, that takes care of some of the random crafts from the past year.  Stay tuned for the sewing & baking adventures!

Friday, May 11, 2012

Movie Night Birthday Party

We've decided that we aren't going to do big birthday parties for our girls every year.  There's just no way we can afford it, plus they are a lot of work for this busy mom!  But, of course, we love to celebrate birthdays!  And Kaylee really wanted to do a little something with her friends this year for her birthday.  So we decided to do a movie night birthday party!  I figured that was easy enough-play a movie, provide some treats, birthday fun!  Well, if you have followed my blog for a while now you know that I can get carried away.  There must be some kind of support group for this kind of problem!  {smile}  I just can't help myself!

The week before the movie night I started looking around on Pinterest & came across all sorts of cute, simple ideas for our party.  And, hence, got a little carried away...

I made a party invitation in the digital design program I always use which is My Digital Studio from Stampin' Up!  I love how it turned out & I just printed them out in 5"x7" size at Costco:

Then I used my Silhouette machine to print & cut out some "Admit One" tickets.  We wrote each girls' name on the ticket & simply stapled it to the invitation & then dropped them off to our friends' houses:

I made a movie poster & clipped it on our easel at the entrance to our "movie theater."  My daughter had picked Tangled to watch that night so I printed out a picture of the movie cover off the Internet & glued it on there:

I attempted to make a "theater" feeling in our family room by draping our TV cabinet in red plastic tablecloths:
So you could see through the plastic tablecloths a little, but it was a really cheap idea so I wasn't going to be too picky about it!

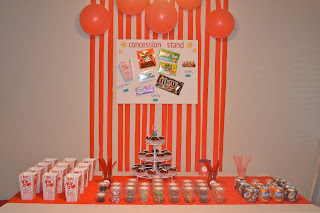
For our movie night treats we had a concession stand, of course:

Every girl received 3 blue tickets when they arrived at the party so that they could buy some treats at the concession stand.  Each item cost 1 ticket.  I made a "concession stand" poster to show some of the goodies they could "buy" & also to be a decoration:

We had popcorn:
 (I found the little cardboard popcorn boxes at Target.)

We had candy:
 (I saw this idea on Pinterest of putting the movie candy in these little containers.  I just printed out some decorative circles, punched them out & then wrote the names of the candy on them to attach on the lids.  My husband thought I was crazy for doing this because he said most of our party guests can't read yet anyway, but I thought it was such a cute idea!  And I like how I could make the perfect kid-sized portions for our movie night.)

We also had soda:
 (Caffeine free, of course!  And I love those little cans!)

I covered an empty baby formula can with some scrapbook paper & added a little "tickets" label.  Then I cut a slot into the lid so that the girls could put their tickets into the can when they "bought" something at the concession stand:

I started thinking that the likelihood of 10 little girls sitting through the entire Tangled movie wasn't good.  I decided to have at least one game ready to play to keep them entertained.  I found a great "Pin the Frying Pan on Flynn Rider" game online.  She provides a printable frying pan where all you have to do is print & cut it out, but then you have to draw your own "wanted" poster.  Luckily one of my husband's hidden talents is that he can draw really well!
So he drew the poster for our game:

The birthday girl got to go first:

And little sister, Aidynn, went last.  But you can see the frying pans in this photo:

I had also decided to bake some cupcakes so that we would have something we could stick a candle into so we could sing happy birthday to Kaylee.  I decided on these delicious hostess imitation cupcakes:


They fit with our concession stand theme, plus these are seriously some of our all-time favorite cupcakes!  And they're really easy to make too!

I also got the idea online to print out a few Tangled coloring pages to give the girls as their thank you for coming goody along with a set of inexpensive watercolors (since Rapunzel loves to paint, ya know):

I am so happy with how everything turned out.  And really, honestly, it came together quickly & was fairly inexpensive & best of all the girls had a blast!  Maybe we'll just do movie night every year for birthdays!

Saturday, May 5, 2012

Baby Blessing Dessert Table

Hello!  Are you still out there?  I'm still here, even though it's been a while since I've posted anything.  What can I say?  Life has been hectic.  We've had some ups & we've had some downs.  I won't bore you with all of the details.  And I am sorry I have not been able to respond to any of your emails.  And thank you for all of the nice requests for buying things that I make.  You all are so sweet!  I would love to be able to craft & sell, but at this point in my life it just is not feasible.  Maybe in the future?  Anyway, hopefully I can get back to blogging a little more regularly now that life seems to be quieting down.

Well, on Easter we blessed our baby Quinn.  In our church, children don't get baptized until they are eight years old.  But after they are born we have a baby blessing for them.  We decided to bless Quinn on Easter since so much family would be in town, it was the perfect time.  Now back when I was pregnant, I knew that I wanted to do an all white dessert table for the baby blessing.  I know, I'm crazy to have already been thinking about that before she was even born.  But I loved the idea of all of the desserts being white.  Just like the beautiful white blessing dress she would wear on her special day.  I think the white is so beautiful because it is symbolic of the purity & innocence of this new baby.  As I started actually planning the dessert table for the blessing after Quinn was born, I decided that I did want to add in a little bit of color.  I decided to add a kraft brown color & light pink, just like I used for her birth announcements.  I think it added a nice contrast to all of the white.  *By the way, sorry for the dark photos.  Our house hardly gets any natural light at all.

Here's the entire table set up:
 A while back I finally broke down & just bought a nice white cotton tablecloth.  It's so versatile & this way I can use it for anything & just change up the accents depending on what kind of party or event we are hosting.  For the baby blessing I used some kraft wrapping paper that I had gotten at IKEA before Christmas.  It made the perfect {cheap} table runner!

I also used my Big Shot to make a banner that said "Quinn Marjorie" to hang above the dessert table:

I made a little printable for the table too using My Digital Studio from Stampin' Up!  I simply had it printed out at Costco & used some Mod Podge to adhere it to a plain white canvas & then added a couple of paper rosettes made with my Big Shot:

The glare is really bad in that photo.  Here is what it looks like digitally:
The pink verses are taken from a primary song at church & the overall idea I've seen used many times online.

And a close-up of the paper rosettes: 

I made a chocolate cake with chocolate mousse from Our Best Bites in the middle & then covered it with white buttercream ruffles.  I have to say the chocolate mousse is so stinkin' good & it's found in this recipe here.  It looked really pretty, just what I wanted for the blessing dessert table.  I also made a Q to put on the top of the cake with some pink melting chocolate:
 (I just typed & printed out a Q on my computer.  Then I covered it with waxed paper.  I melted some pink melting chocolate & then put it inside a squeeze bottle & then traced over the Q.  I let it harden back up & then it simply slid right off of the waxed paper & I stuck it down into the frosting on top of the cake-easy!)

I stuck with the monogram theme with my sugar cookies too:
 People always love my sugar cookies.  I can't take credit for them though, the recipe is from Our Best Bites & it is so good!  I used a scalloped circle cookie cutter for these ones & then my large Q stamp (thoroughly cleaned & sanitized first) to lightly stamp into the cut dough.  I baked the cookies & then just filled in the Q with some light pink royal icing.

I had also made some white cupcakes with white buttercream frosting, my sister-in-law made some of her yummy spritz cookies with light pink sprinkles & then I put out some various white-colored candies in the small dishes on the table.  It looked good, I was happy with how it turned out.

And here are my 3 pretty girls on Quinn's blessing day:
 The blessing dress was made by my grandma for my mom to wear, then I wore it & now each of my daughters has worn it on their blessing days.  It is very special!

We also attempted a family photo & managed to get one decent shot:

The rest looked more like this:

Oh, my crazy family!  But I love them more than anything!