Showing posts with label Autumn. Show all posts

Friday, March 14, 2014

Baking Stuff

I love to bake!  I get that from my mom.  She loves to bake too.  The problem?  Then I end up eating it!  Ha ha ha!  I didn't actually do too much baking over the past few months just because I have been trying to eat better & if sweets are around, I will eat them.  Luckily we have many neighbors & friends who enjoy being the recipients of the baked goods.  

I made this simple bundt cake for my hubby's birthday:
 Luckily his birthday cake requires very little fuss.  He requests this chocolate chip bundt cake every year.  It is easy & it is so good!  What I also love about this bundt cake is that it's dense which makes it sturdy so it travels well too.  I can't do bundt cakes too often because they are just so heavy, but I'll make this recipe a couple times a year.  If you are in the mood for chocolate, lots & lots of rich chocolate, then this cake is the one!

Here's another pic of the apple decorated cupcakes we made for our annual back to school dinner:
 I saw this idea on Pinterest & they were so easy to decorate-red buttercream, green fruit slice cut in pieces to make leaves & a pretzel rod for a stem.  The girls loved helping with these too!

For Thanksgiving this year I made some pies:
 I'm not a big pie person, but my absolute favorite kind is the Apple Crunch pie (above right).  That's actually the only kind of pie I usually make.  So for Thanksgiving I thought I would branch out & also make a pumpkin pie & cherry pie.  Yum!

We went to my parents house for the actual Thanksgiving holiday & my mom made cupcakes with our girls:
 She had bought one of those little cupcake decorating kits & they turned out really cute!

For some sweet treats for friends during the holidays I dressed up my chocolate chip bundt cake & made them mini:
 Why are they just so cute when they are mini?  And they looked pretty with the powdered sugar "snow" & holly berries.

In January our baby turned 2!  She is SO into Monster's Inc. & Monsters University.  It is so funny!  She drags her little Mike & Sulley stuffed characters everywhere.  So it was just the natural choice for the theme for her birthday party this year.  I saw this Monsters inspired cake on Pinterest & decided to give it a try myself.

I think it turned out pretty cute:


Quinn loved it & that's all that really mattered!  Oh & it tasted pretty darn good too!

Saturday, November 12, 2011

My Favorite Cupcakes for Fall

Ok, so these are my favorite cupcakes for Fall! Every year during the Fall I get a craving for these yummy spice cupcakes. The best part-there's nothing fancy to making these. I simply open a box of Duncan Hines Spice Cake mix & bake them according to the directions. Then I top them with a very thin layer of vanilla frosting. I don't like too much frosting taking away from the spice cake taste. Cream cheese frosting would be yummy too but the folks in my house aren't too keen on that, so I just use the vanilla. Then my girls helped to decorate-their favorite part! We put a pumpkin candy on some, we sprinkled cinnamon on others & then we put both onto others. And then we taste tested a few! So good!

Thursday, September 22, 2011

Simple Autumn Wreath

I modeled this Autumn wreath after the Simple Spring Wreath I made way back in April. Yep, I've had that Spring wreath up ever since & now that our weather has been nice & cool & tomorrow is the first day of Autumn, I decided it was time to change the wreath. I have seen so many cute Autumn wreath ideas on blogs & Pinterest lately, but I decided to go with this one simply because I had everything on hand already ( well, except for the styrofoam wreath form). At first I was thinking of doing a Halloween wreath with black, orange, purple & green, but then I figured I better just make a more generic Autumn wreath that I can leave up for a bit longer. I did the same type of flowers that I made on the Simple Spring Wreath, except this time I used felt which is sturdier & fluffs up nicely which I love! Another simple & inexpensive decoration for our home!

*If you want to see a tutorial on how to make the cute flowers check out this post over at Make It and Love It (scroll down past the baby hat part). So easy & I love how different fabrics give the flowers a different dimension!

Monday, November 29, 2010

Thankful

I hope you all had a great Thanksgiving! Ours was wonderful! Lots of food, lots of family, lots of fun! I've seen so many cute "thankful" albums that people have made for their families to record each year what they are thankful for. I decided that this year I wanted to make one for our family. I am excited to see every year what each of us is grateful for & to be able to look back to the previous years & remember what we have been grateful for. Of course my girls are still too young to write what they are thankful for, but they can draw pictures & then we can write it out for them. I am excited to have started this album this year & to record our blessings here in it.

So this is the first page in the album:
And here are our notes for this year:
My original plan was to get a quick photo of us on Thanksgiving too, but that just didn't happen! Oh well! Maybe next year, I think it would be fun to see how different we are from year to year.

These pages were super easy to make, it's still not too late to start your own thankful album for your family!

Wednesday, November 24, 2010

Holiday Blocks

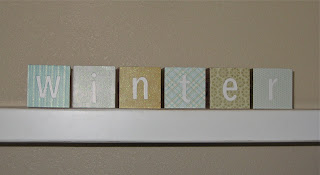
So, yes, two days before Thanksgiving I finally finished my holiday blocks. I have been meaning to get these done all month long! Stampin' Up! now sells these 3" x 3" MDF blocks. They are $9.95 for 4 blocks. I knew that I wanted to make an "autumn" sign for on top of the TV with this super cute Autumn Spice Designer Paper since I don't have a lot of fall themed decorations for our house. Then I decided to just keep flipping the blocks around to make as many signs as I could out of them. So I made the four seasons first: autumn, winter, spring & summer. Now I can leave these up all year long!


I still had 2 other sides to decorate so I wanted to think of holidays that I don't have many decorations for. I decided on Valentine's Day & Easter to finish my blocks off.

They were so easy to make too! I picked cute designer paper then cut it to 3" x 3." Then I applied some Mod Podge to the block & stuck the paper on. Then I cut out the letters with my Big Shot & glued them onto the center of each block. Last, I covered each block in Mod Podge to seal it. So this was my first time using Mod Podge (crazy, I know) & I have to say it is awesome! I now understand the Mod Podge obsession!

Tuesday, November 23, 2010

An Attitude of Gratitude

I teach the 16 to 18 year old young women every Sunday at my church. Our last lesson was about gratitude. It was a very appropriate lesson seeing as Thanksgiving is this week & all. The lesson was a little short & I knew that I would need something to fill up the extra time with. I came up with this simple card for the girls to make:
I love these fall colors together-Pumpkin Pie, Cajun Craze, More Mustard & Chocolate Chip. They made the cards & then I told them to give it or mail it to someone telling them why you are grateful for them. The girls really had fun making the cards.

I also found these super cute journals in the dollar bin at Michaels. I simply jazzed them up a little by adding their monogram inside of a scallop circle. I love monograms! My challenge to them is to write one thing that they're grateful for every day for an entire year. I know that some days it might be hard to think of what you're grateful for, but even if we're enduring some trials in our life there is always something to be grateful for. I hope that they do it!
And on the inside cover I included an awesome quote about gratitude:
During this week of Thanksgiving I am grateful for so many things. I am most grateful for my family & for our health! What are you most thankful for this year?

Wednesday, November 10, 2010

Autumn Bottle Cap Magnets

Have you been seeing all of these bottle cap magnets around on crafty blogs lately? I thought they were super cool right away & knew that I wanted to figure out how to make some. It seemed easy enough-get some bottle caps, punch out designer paper or punch out a stamped image using the 1" circle punch, seal them inside the bottle cap & then glue a magnet onto the back. The problem I'm having is what to use to seal them with. I was trying to avoid using casting resin if possible because that stuff scares me a little! But, I tried using my Crystal Effects from Stampin' Up! & even some Mod Podge Dimensional Magic & I haven't liked the results with either one. It seems like both of those make my stamped images run & it looks awful. And the Mod Podge Dimensional Magic made lots of bubbles. I mean lots. Even after I popped the little bubbles that were there to begin with, when I came back later, somehow more bubbles had appeared!

Well, I made some autumn magnets with my favorite autumn designer paper & the Mod Podge Dimensional Magic. They look pretty cute even though every single one has bubbles in it.
Here's a close-up of one of them:
I guess I will have to break down & try the casting resin. Wish me luck!

Monday, November 8, 2010

Happy Harvest

It was time to take down the Halloween banner & to make one for fall! So I used my Big Shot again, of course, to cut out the pennants & the letters & then strung them up. I just love the textured autumn designer paper. It makes decorating so easy!

Wednesday, November 3, 2010

Autumn Ribbon Board

I realized yesterday that Halloween is over & it's now November! That means it's time to take down all of the Halloween decorations (Didn't we just put them up?) & put up the Fall decorations. I really don't have too much seasonal decor other than stuff for Christmas, but as my girls get older I've been trying to slowly gather more & more for other holidays too. They just love to decorate! So yesterday during nap time I made an Autumn ribbon board. It turned out pretty cute!

If you want to make your own, check out my ribbon board tutorial!

Tuesday, November 18, 2008

Some Autumn-Inspired Cards

Yesterday I had some time to make thank you/thinking of you cards that I have been needing. I decided to make them Autumn-inspired even though it's still been in the high eighties here in Southern California. I basically got out my Seasonal Icons stamp set (hostess set), my Best Wishes & More stamp set, my Autumn Vine Designer Paper & some Autumn-colored card stock & ink & stamped away! It was fun to get some stamping done again & I really like how they all turned out. The last 3 cards are all the same layout, I just switched the colors around!


Thursday, November 6, 2008

Yes, I went vinyl crazy!

I really did! I usually don't do any decorating for Halloween or Autumn. But, as my daughter has gotten older & more aware of all the holidays, I decided it was time to start getting a little festive with each season & holiday that comes. So, I think, these are my last 2 Autumn vinyl projects. I just finished them yesterday & I love how they came out. Plus, Uppercase Living makes it so easy, how could I resist?
This first is another glass block ($4.38 at Lowe's). With the vinyl on the front. This one is 2-step so the pumpkin is in Terra Cotta & the "Autumn Days" is in Chocolate Brown. And then the ribbon has pretty fall leaves on it in coordinating colors. Honestly, this took me abou 5 minutes to do & it looks great! I love it at night with a little battery-powered tealight behind it. So pretty! These make great gifts too! They have really cute ones for Christmas too, which will be here before we know it! This next project is a wood board for Autumn. I just painted the MDF board (Uppercase Living sells them ready to go) with Chocolate Brown paint. Then I distressed the edges with sandpaper. Next I applied the Mocha Brown "AUTUMN" & then the Fresh Linen "we rake, we pile, we jump" over it. Again, this was so easy to make & now I'll have an Autumn decoration to hang on my wall for years to come!If you have any questions about any of the vinyl projects you've seen here on my blog or if you're interested in ordering some vinyl for yourself please email my sister-in-law Bethany & she'll help you out!


Sunday, November 2, 2008

Some New Autumn Projects

I know what you're thinking, "More vinyl? I thought this was a stamp blog?"
Well, it is mostly a stamp blog since that is one of my favorite things, but I also enjoy almost anything crafty, so I subject my readers to whatever crafts I have been working on lately. As you can probably tell, my order from my sister-in-law through Uppercase Living came in a few days ago & so I've been getting all of my autumn vinyl projects done. I love them because they are so easy to complete & they look so nice!
Well, here's project #1:
I just bought this trifle bowl at Wal-mart (I think it was around $6) & then I bought some fake fall vegetables/acorns on sale at Michael's to put inside of the bowl. Last, I stuck the "Give Thanks" vinyl in the color Soft Copper onto the outside of the bowl & this is my new centerpiece on my kitchen table for the fall!
Project #2:
This one was soooooo easy! I had this plain white plate & I just stuck the "FALL" vinyl on it in the color Terra Cotta right in the center & then stuck this above my cabinets in the kitchen.


And project #3:

First, my colors are a little off in this photo, so I'm not quite sure what happened. My wall is a taupe color, the frame is chocolate brown, the fabric inside of the frame is a cream color, the wheat is the color Honey Wheat & the saying is Chocolate Brown. This was one of the hostess gifts from Uppercase Living, so I got this one for FREE! And I got to choose the colors I wanted for it & everything! So I found this shadowbox frame, with the fabric already inside, at Michael's & bought it with a 50% off coupon. Then I just stuck the vinyl onto the outside of the glass. Easy! I'm thinking that it might look a little washed out, so I might put some fall leaves inside of the shadowbox part, or maybe a piece of fall-colored scrapbook paper.
Well, I promise I'll have some stamping projects again soon!


Friday, September 26, 2008

A Quick Fall Project

So I finally broke down & bought the Big Shot Die Cutting Machine. And I am in love with it! This was the first major project that I made using the Big Shot. I thought of the idea & then it took me less than an hour to finish the entire thing! Here it is:
This was so easy to make! First I cut the large scallop circles out of chipboard using the Big Shot. It was a breeze! Then I cut the designer paper out using the same scallop circle die & the Big Shot again. It was awesome because I cut 4 sheets all at the same time! Then I glued the designer paper onto the chipboard (I made mine double-sided with designer paper just to make it extra pretty!). Next I used my Crop-A-Dile to punch holes at the top of each scallop circle & then to attach a jumbo eyelet. Then I used the Big Shot again to cut out the larger circles that the the chipboard letters sit on. I glued those on & then glued the naked chipboard letters right on top of them (unfortunately I didn't have any Stampin' Up! chipboard letters). Then I stamped my 4 images, punched them out with the 1-1/4" Circle Punch, glued them down to slightly larger circles that I had cut with the Big Shot earlier & then attached them to my project using Pop-Up Glue Dots. Then I added a couple of small embellishments for decoration. Lastly I used some Chocolate Chip 5/8" Grosgrain Ribbon to tie each piece around a hook on a shelf in my family room & then tied a coordinating piece of 1/4" grosgrain ribbon in a bow just for a little something extra. And now I have a beautiful little fall decoration for my home! This would make a super fun & easy class as well.
Here are some close-ups:


Friday, November 9, 2007

Fall Flowers & the Envelope Template

For the month of November Stampin' Up! is having a Paper Party Promotion. This means that if you buy 3 packs of Designer Series Paper, you get 1 for FREE! Yea! Free stuff is always good! Stampin' Up! Designer Paper is so cute and such a good deal. The Five-in-One Card Cover Template (106523, $9.95, p. 169) also works wonderfully with the Designer Paper because it's double sided. This template includes five envelope styles in two sizes. The cards below show examples of what can be done from that one template. I love it!
This was made using the larger envelope template. It's size is 6 1/2" x 4". It's also a good size to put small gifts in. And it's so easy to use: Just lay the template on the paper you want to use, trace along the lines of the template using an embossing stylus (like the one on p. 187, 100663, $2.50), then cut out the shape of the envelope, and then fold along the inside lines and glue the envelope together!

This shows the envelope upside down, so you can see why the double sided Designer Paper is so perfect for this template. It makes such cute, decorative envelopes! This is the card I made for the inside. I love that Fall Flowers Designer Paper!
All supplies Stampin' Up!: Happy Everything, Headline Alphabet, Fancy Flexible Phrases stamp sets; Fall Flowers Designer Paper, Whisper White, Really Rust, Old Olive, Soft Sky card stock; Really Rust, Old Olive, Chocolate Chip Classic Stampin' Pads; Daisy Punch, Vintage Brads, Rounded Tab Punch, Scallop Circle Punch, 1-3/8" Circle Punch, 1-1/4" Circle Punch, Pop-Up Glue Dots, Five-in-One Card Cover Template.

For this card I used the mini envelope template. It's size is 2 1/2" x 1 1/2". It makes the perfect accent for your cards or scrapbook pages and holds a little message nicely.

This picture shows the tag that goes inside of the mini envelope. It says: "Time passes...friendship stays right where it's put!" Once again, I am loving this Fall Flowers Designer Paper!

All supplies Stampin' Up!: Wonderful Favorites, Curvy Verses stamp sets; Fall Flowers Designer Paper, Soft Sky, Sahara Sand, Whisper White card stock; Old Olive Classic Stampin' Pad; Five-in-One Card Cover Template, Tag Corner Punch, Spring Flower Bouquet Punch, Silver Brads, Soft Sky Double-Stitched Ribbon.

Tuesday, November 6, 2007

Autumn is Here!

Ok, so it's Southern California and we really don't get the four seasons here, but I know that it's Autumn somewhere right now! I don't have many Autumn decorations for our house so I've been making some cards to display. For those of you who are enjoying the changing colors of the fall leaves and the cooling temperatures, just know that I am extremely jealous!
All supplies Stampin' Up!: Autumn Fest, Much Appreciated, Sanded Background stamp sets; Creamy Caramel, Chocolate Chip, Really Rust, Naturals Ivory card stock; More Mustard, Really Rust, Chocolate Chip, Creamy Caramel Classic Stampin' Pads; Distressing Tool, Vintage Brads, Hemp Twine, Crimper, Stampin' Dimensionals.

All supplies Stampin' Up!: Autumn Fest, Holidays & Wishes stamp sets; Creamy Caramel, Chocolate Chip, Really Rust, Naturals Ivory card stock; More Mustard, Pumpkin Pie, Really Rust, Chocolate Chip Classic Stampin' Pads; Chocolate Chip, Creamy Caramel Stampin' Write Markers, Scallop Circle Punch, 1-3/8" Circle Punch, 1-1/4" Circle Punch, Hemp Twine, Stampin' Dimensionals.

All supplies Stampin' Up!: Year After Year, Holidays & Wishes, Canvas Background stamp sets; Kraft, Old Olive, Pumpkin Pie, Chocolate Chip, Very Vanilla card stock; Basic Brown, Chocolate Chip, Old Olive, Pumpkin Pie Classic Stampin' Pads; Photo Corners Punch, Blender Pens, Pumpkin Pie 1/4" Grosgrain Ribbon.

Tuesday, October 30, 2007

Another Gift Bag


Here is another gift bag I made recently. I filled it with a bunch of goodies and took it over to our friends who just had a baby.
Gift Bag (Michael's)
All other supplies Stampin' Up!: Autumn Fest, Happy Everything, Headline Alphabet stamp sets; Naturals Ivory, Really Rust, More Mustard card stock; Chocolate Chip, More Mustard, Pumpkin Pie, Really Rust Classic Stampin' Pads; 5/8" Chocolate Chip Grosgrain Ribbon, 1/4" Pumpkin Pie Grosgrain Ribbon, Tag Corner Punch, 1/8" Handheld Circle Punch, Scallop Circle Punch, 1-3/8" Circle Punch, 1-1/4" Circle Punch.

Friday, October 26, 2007

Autumn Fest


Here is one of the projects that we made on Wed night at my upline's house. We used the Watercolor Wonder Crayons (p. 186, $19.95 for a set of 12). These crayons are amazing! They're pricier than the watercolor pencils, but they are so much more versatile! For this card we colored with the crayons directly on the stamp (this method works best with solid stamps) and then sprayed the stamp with a mist of water and then stamped. It's a great way to use multiple colors and blend them together. The Watercolor Wonder Crayons also work well for coloring the inside of images because they blend really well (use a Blender Pen, Aqua Painter or a Watercolor Paintbrush all on p. 185, $5.95-$16.95). They also come in all of the exclusive Stampin' Up! colors so they match perfectly with your projects!
All supplies Stampin' Up!: Autumn Fest, Flowers & Flourish, Flannel Plaid Background stamp sets; More Mustard, Elegant Eggplant, Naturals Ivory card stock; More Mustard, Chocolate Chip Classic Stampin' pads; Watercolor Wonder Crayons-Earth Elements, 5/8" Bravo Burgundy Grosgrain Ribbon, Stampin' Dimensionals.