Showing posts with label Thank You. Show all posts

Friday, March 14, 2014

Crafty Stuff

Hello blog world!  Wow.  It has been almost one year since I last posted here!  Yikes!  Time really does fly when you are having fun.  I don't have any excuses for not posting for so long other than life is busy!  Even though things have been crazy busy around here I still manage to get my craft on when I can.  I decided to do a few posts with some pics of craftiness from the past year (I have been trying to remember to take pics when I do make something).

Here are the teacher gifts I made for the girls teachers for their end of the year gift last year:  
 I had gone to Utah in May with some friends & we went to this awesome wood/craft store called The Wood Connection.  I picked these cute wood pencils up at that store.  Then I just painted them, added pink glitter to the eraser, tied some silver ribbon around them & put each teacher's name on the pencil in black vinyl.  They turned out great!

When we moved to our new house the big girls decided they wanted to have their bunk beds separate for a while.  I decided they needed something above their beds.  But I didn't want anything too heavy (hello, we have earthquakes here!) so I just painted a canvas in a pink that coordinated with their bedding, painted a wooden letter of their initials white & glued it on the painted canvas:

 The pictures are from my phone & they are horrible!  Ha ha ha!  But they look really cute in person.

Then I painted some Ikea wooden spice racks white & we hung them on the wall next to each girls bed so that they could have a little shelf to put their reading books on:
 I know you saw that idea on Pinterest too.  But it works out great!  They love their little shelves.  Oh & the cute pink reading lights are from Ikea too.

My Aidynn has always wanted long hair.  She talks about it all of the time.  So for her 4th birthday last July I made her a Rapunzel braid:
 Isn't she darling?

Here's a better view of the braid:
 This was so fast & easy to make & it was by far her favorite gift.  It has definitely gotten a lot of use!  To make it I just braided yellow yarn, tied it with some pretty lilac ribbon & then hot glued some fake flowers in different shades of purple all over it.

I made myself a necklace for our family photos:
 I just used wood beads in different sizes & painted them a pretty aqua color.  I strung them onto ribbon & that's it!  It was an easy & inexpensive way to get exactly what I wanted to go with our colors for our family photos.

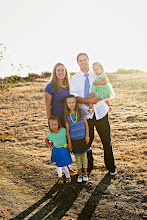
Speaking of, here's our family photo from last July:
I also made Aidynn a yellow wooden bead bracelet to wear.
(Photo credit:  Shari Hanson of Shari Hanson Photography)

In September we had our annual back to school dinner the night before the new school year began.  Every year it seems I add just a little bit more to it which is fun.  I totally got the idea for the apple plates off of Pinterest.  They looked so cute on our table: 

The chalkboard we use every year on our first day photos:

We also got the easel out for the girls to color on:

And they love coloring on the table when we cover it with paper:

Also inspired by Pinterest, cupcakes decorated like apples:

The annual dinner?  Spaghetti, zucchini & garlic bread:

I made my niece some thank you cards for her nautical themed baby shower:
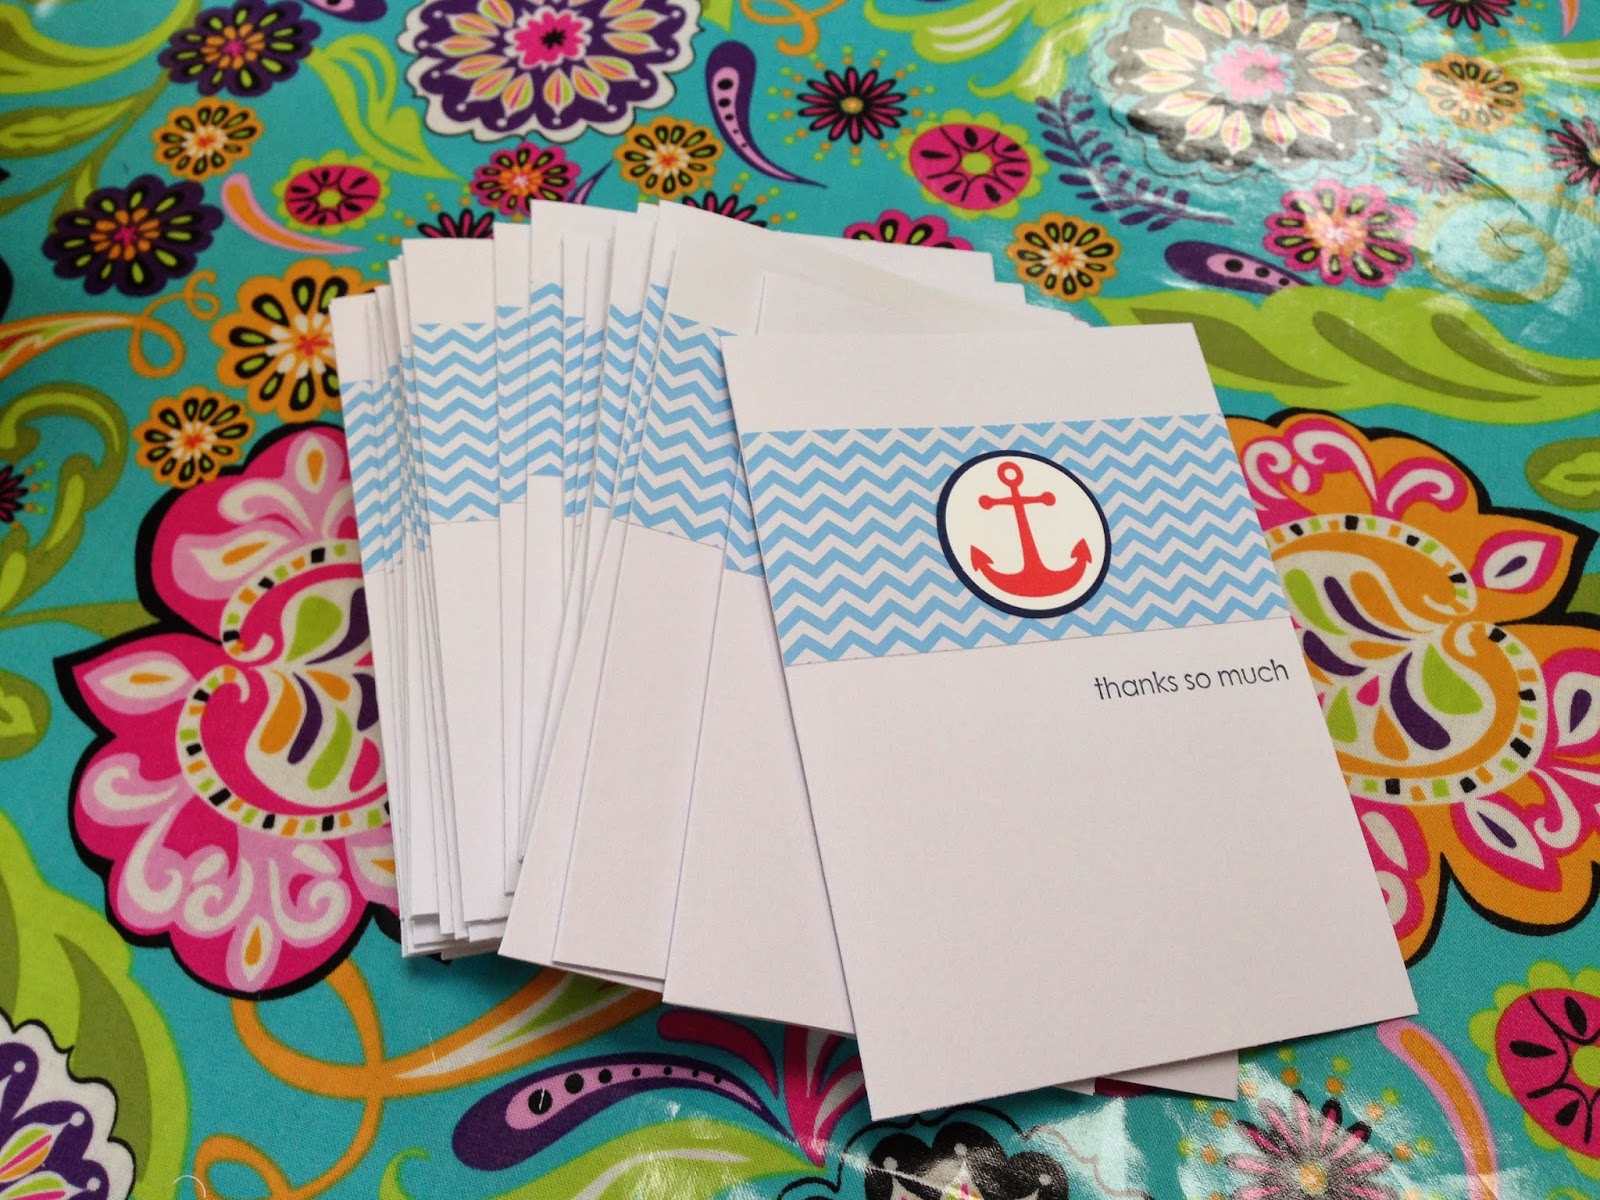
 Simple is always nice.

And a Christmas photo of these 3 beauties:
They keep me busy, but I love them so!

Well, that takes care of some of the random crafts from the past year.  Stay tuned for the sewing & baking adventures!

Tuesday, January 24, 2012

Crafting with Kids: Stamping

I've been thinking that I should be better at posting the crafts I do with my kids on the bloggy blog here. I know I always like to come across new ideas for keeping my kids busy & maybe I can inspire you along the way too. The other day we decided to do a little stamping. My advice is to keep it as simple as possible! Use limited supplies! They still have fun & there isn't quite as much chaos or mess. So I laid down some scratch paper & told them to only stamp on the paper & not on the table, they each picked a few stamps to use & then they each picked a color they wanted to use. They had a great time!

Sometimes they just stamp papers to hang up in the house, sometimes they stamp cards to give to people. This time my oldest was making some thank you cards for those who bought Girl Scout cookies from her to give when we deliver the cookies:
Since she's a Daisy Girl Scout she used the daisy stamp in yellow & then she used the "thank you" stamp in a royal blue color which is the color of her Daisy tunic. I typed up the message on the computer & printed out a bunch for her & then she signed her own name. This project was simple enough & it kept them busy for a while-perfect!

Monday, January 16, 2012

Girly Thank You Cards

I realized the other day that I already need a few baby thank you cards. And I know I'll probably need some more. I came up with the simple card above. Since I was making a bunch of them I wanted a pretty simple design. And I didn't want a card too baby-themed so that if I have extras I can always use them for other thank you needs later on. But I did want it to be a little girly! It's hard to see in the picture, but I love the pretty doily stamps. I used 3 different sizes & stamped them in a very light pink, a slightly darker light pink & a kraft brown color. I love the rounded corners & the simple scallop brown border. I think they dress up this simple card a bit! Well, another thing checked off the "prepare for baby" to-do list!

Monday, May 16, 2011

Princess Party Thank You Cards

I decided to try out My Digital Studio to make some thank you cards for my daughter's birthday gifts. There is nothing fancy to these, I kept them really simple. I made them postcards so they are just two-sided.
Here's the front:
Here's the back:
I needed 16 of these so I made the back fill in the blank so that it was easier for my daughter to only have to write a few words on each one. She's not used to writing that much yet, so she actually only wrote about half of them herself & then she just signed her name on the other half & I filled the out for her. This was the first time I had printed anything with the professional printing services that Stampin' Up! offers. They turned out really nice! I like the matte finish of it & the thick weight of the card stock. They were shipped to me super fast too, I was amazed!

Thursday, May 12, 2011

Thank You Cards

Here are the thank you cards that I put in the Mother's Day gift box. You can never have too many thank you cards!
I used a new flower punch on this one:
And I am totally in love with yellow & gray together right now:
Both of these cards were very quick & easy to make too-some of my favorite kind!

Tuesday, November 23, 2010

An Attitude of Gratitude

I teach the 16 to 18 year old young women every Sunday at my church. Our last lesson was about gratitude. It was a very appropriate lesson seeing as Thanksgiving is this week & all. The lesson was a little short & I knew that I would need something to fill up the extra time with. I came up with this simple card for the girls to make:
I love these fall colors together-Pumpkin Pie, Cajun Craze, More Mustard & Chocolate Chip. They made the cards & then I told them to give it or mail it to someone telling them why you are grateful for them. The girls really had fun making the cards.

I also found these super cute journals in the dollar bin at Michaels. I simply jazzed them up a little by adding their monogram inside of a scallop circle. I love monograms! My challenge to them is to write one thing that they're grateful for every day for an entire year. I know that some days it might be hard to think of what you're grateful for, but even if we're enduring some trials in our life there is always something to be grateful for. I hope that they do it!
And on the inside cover I included an awesome quote about gratitude:
During this week of Thanksgiving I am grateful for so many things. I am most grateful for my family & for our health! What are you most thankful for this year?

Wednesday, September 8, 2010

Thanks for Everything

I needed a thank you card for my cousin who always babysits for us & even stayed with our girls a couple of weeks ago overnight so that we could celebrate our anniversary with a night away. Yes, she is awesome! Anyway, I pulled out the For Everything stamp set again because I am just in love with it right now. I love those flowers & the super cute greeting too!

Wednesday, August 18, 2010

Elegant Thank You

I am always needing thank you cards! I had no idea what I wanted to do when I sat down to make this card except that I wanted to use this stamp, called Ornate Blossom, and this pattern of designer series paper from Greenhouse Gala. As I went along the card just kind of came together! I think it turned out more elegant than I planned, but I like it! It's a very simple card too. Do I make any other cards than simple these days? But I love these colors together too-River Rock, Baja Breeze & Basic Gray.

Tuesday, August 3, 2010

Birthday Thank You Cards

Here are the thank you cards that I made for Aidynn's birthday. I just kept running with the pink & white polka dot theme! I love these big cupcakes-so cute! And it was a good way to use up my retired red buttons too! I think I'm hungry for a cupcake now!

Thursday, July 29, 2010

Beautiful Bridal Shower

So remember the bridal shower invite that I showed you a while back? This one:
Well the bridal shower was last Saturday. My sister-in-law, Cheryl, planned, organized & orchestrated the entire party (her nickname is "The Party Planner") & it turned out really, really nice. My sister-in-law, Beth, & I helped out too. It was a lot of work, but definitely worth it. As a side note, I've known my niece, Alisha, who this shower was for, since I was 16 years old & she was only 6. So I got a little emotional with this one {tear}. I have so loved watching her grow up into the beautiful woman she's become. And I can't believe she's getting married! I keep saying, how did she grow up when I haven't gotten any older? ;)

So anyway, I wanted to share some photos with you of the shower & some of the things we made for it. These are the thank you cards that I made for her that match the invite:

And here's a guest book that I made for people to write a little message to the bride & then we recorded who gave her what in the back. I have to say, I LOVE how the cake turned out! Don't you love it when you have a vision in your mind & it turns out even better than you though?

Here's the awesome dessert table. My SIL wanted an elegant dessert table & it definitely was! And filled with all sorts of yummy stuff too-cupcakes, cookies, chocolate covered pretzels & lots of candies!

I had seen cupcake holders like these numerous times online & I thought it would be a perfect way to display the cupcakes at the shower. It was so easy to make too! I went to my local packing supply store & bought 3 square boxes in different sizes so that would make it look like a 3-tier cake. Then I covered the boxes with some pretty wedding wrapping paper. Then I wrapped some ribbon around it & topped it with some fresh hydrangeas on top. I was going to put the ribbon bands around the bottom of each layer, but with the cupcakes there it wasn't going to show. I thought it looked beautiful! Way better than I imagined! And it's the perfect way to display cupcakes. Yes, I got to practice my cake decorating skills again too! I made half chocolate & half vanilla cupcakes in silver foil liners, topped each one with a swirl of bright white buttercream & then added a small lavender fondant flower on top. They looked pretty & tasted yummy too!

My SIL, Beth, made these adorable heart-shaped butter cookies with her cookie press. I have to say, these cookies are so good they are totally addicting! But look how pretty they are & the way she displayed them was so cute!

My SIL, Cheryl, wanted to have some takeout boxes that people could fill with candy from the dessert table & take home with them as their party favor. So we decorated a bunch of these cute takeout boxes to match the invites. Another reason I love my Big Shot!

And here's a photo of the brunch table just because it looked so awesome too! And everything was delicious!

And here she is, my sweet niece Alisha! Soon to be Mrs. McLeod!
*Oh and don't you love that vinyl sign too? My friend Anya makes them. You can customize them any way you want. They are wonderful gifts! Check out all of her vinyl creations at Stuck Anya-Vinyl Lettering & More.

Friday, May 28, 2010

Thank You

What is this? A card? Yes folks, believe it or not I actually made a card this week! I just don't seem to be making them quite as much as I used to, but I still love it! I needed a thank you card for our cousin who so graciously played tour guide on our trip to San Francisco a few weeks ago so this is what I came up with. My inspiration came from my baby's new bathing suit (see photo below). I just love this bathing suit! Let me tell you, Target has been coming up with some pretty cute stuff lately! Anyway, I just love the colors-the bright pink, black & white with a tiny hint of green-and I love the bold flowers so I just tried to reproduce that in this card.
Here's the cute little bathing suit:
You can find color & pattern inspiration almost anywhere!

Tuesday, May 11, 2010

Pretty Envelope

I have been buying lots of gift cards lately for presents, but haven't had much time to spend making cards to put them in. My solution? I've been making some pretty envelopes to stick the gift cards in. They only take about 5 minutes to make & are so much fun to embellish! I made the one above to hold a teacher appreciation gift card (yes, Teacher Appreciation Day is coming up-May 19th or 20th, I think). I just made a template so that it's quick to trace & cut out the envelopes from now on & then decorate. And they are so pretty because when you use double-sided designer paper it's pretty on the inside too!

Thursday, February 18, 2010

Some Fun Spring Cards

Here are some fun spring cards for ya! I'm still using & loving my Welcome Neighbor Designer Series Paper Pad that's available through our current Sale-a-bration promotion. I just love the bright, spring-time colors! I also just busted out my Flower Folds Bigz XL Die for my Big Shot. This die is awesome! It cuts flowers in 4 different sizes (the smallest 2 are shown on my cards & the other 2 are bigger than those, so you get an idea of just how big they really are) & it also scores around the center of each flower so that you can fold the petals up if you want, creating a really neat 3D embellishment. And I know you've heard it before, but I can't live without my Big Shot machine now! It cuts through just about anything! I can't wait to buy some cool fabric to try out with this Flower Folds die. I think it would be super cute to make a matching t-shirt & onesie for my girls to wear during the Spring. I've also seen some pretty cute headband flowers & pony tail holders made using fabric & a Big Shot, so I just might have to try my hand at that too!
For my cards I just ran some sheets of designer paper through the Big Shot (Note: with the Flower Folds die you want to only cut one sheet at a time because of the scoring lines). I picked a bunch of different colors & patterns & then mixed them all up. Then I glued those onto a square of textured Old Olive card stock on the front of a card. Then I punched out a circle for the center of the flower & adhered a button to the center of that. And lastly I stamped my greeting on the front. I used the Fundamental Phrases stamp set because it has many different greetings & I really needed some birthday & thank you cards! It's so easy to make a lot of the same card once you have a layout figured out that you like.
Here's a close up of one of the cards:
And here's the Flower Folds die:
I'm definitely ready for Spring!

Monday, September 14, 2009

Another Baby Girl!

So my sister-in-law just found out that she's having another girl! Yay! This makes 3 girls for her & 9 girls between my husband & his 2 brothers (we have 2 & his other brother has 4)! We are so excited for them! I had decided a while ago that I wanted to make a set of thank you cards to give to my sister-in-law for all of the wonderful things that this next little bundle will receive. So I made 2 versions of the same card-one for boy & one for girl & was just waiting until they had their ultrasound so I knew which one to make a whole bunch of! I have to say that I really like these thank you cards! I love the 2 pinks & the olive together! And I love using the Big Shot, especially for projects where I need many of the same element (in this case the Top Note die). These cards were so fast & easy to make, but I think they're really cute too! Congrats Beth, I hope you like them! All supplies Stampin' Up!:
STAMPS: Nursery Necessities, Holiday Blitz
PAPER: Pretty in Pink, Melon Mambo, Old Olive, Whisper White
INK: Pretty in Pink, Melon Mambo, Old Olive
ACCESSORIES: Big Shot, Top Note Die

And here's the baby card that I made to go with the packaged thank you cards & the cute little outfit that I found for the baby. I wanted to use the same colors, but change up the design!
All supplies Stampin' Up!:
STAMPS: Nursery Necessities, Holiday Blitz, Polka Dot Background
PAPER: Pretty in Pink, Old Olive, Whisper White
INK: Pretty in Pink, Melon Mambo, Old Olive
ACCESSORIES: Big Shot, Circles & Scallop Circles Dies, Melon Mambo Polka Dot Grosgrain Ribbon


And here's the boy version of the same card. If my sister-in-law was having a boy I was going to make a bunch of these ones for her! Again, I really like the 2 blues with the olive!
All supplies Stampin' Up!:
STAMPS: Nursery Necessities, Holiday Blitz
PAPER: Bashful Blue, Brocade Blue, Old Olive, Whisper White
INK: Old Olive; Bashful Blue, Brocade Blue & Old Olive Stampin' Write Markers
ACCESSORIES: Big Shot, Top Note Die

Saturday, August 29, 2009

A Sweet Thank You Card

I made this card as a thank you for my Mom who stayed with us for 3 weeks after Aidynn was born. We are so grateful for her & all that she does for us. She truly is amazing, thoughtful, sweet, wonderful & genuine just like the stamp says!

All supplies Stampin' Up!:
STAMPS: On a Pedestal
PAPER: Whisper White, Tempting Turquoise, Chocolate Chip, Certainly Celery
INK: Certainly Celery, Melon Mambo; Chocolate Chip, Tempting Turquoise & Melon Mambo Stampin' Write Markers
ACCESSORIES: Scallop Edge Punch, Melon Mambo Polka-Dot Grosgrain Ribbon, Big Shot, Texturz Plates-Stampin' Up! Backgrounds 1, Stampin' Dimensionals

Saturday, June 13, 2009

Another Baby Thank You Card

So I couldn't make just one design for my baby thank you cards! Here's the other one I came up with. This one is a little more involved & more elegant looking. This one is my favorite! I used some old designer paper & I really like these colors together (Pink Pirouette, Basic Gray, Very Vanilla). I wanted to use the damask print because that's what we're doing in this baby's nursery, except it's just a brighter pink. And I love the little accent of the halfback pearl-it's so pretty! I made these ones so that if I have some leftover I can use them as thank you cards for anything, not just baby stuff! Sorry the colors in the picture seem a little off or gray or something-I still need to learn how to use Photoshop!
All supplies Stampin' Up!:
STAMPS: Friends 24-7, Thank You Kindly
PAPER: Parisian Summer Designer Paper, Pink Pirouette, Basic Gray, Very Vanilla Card Stock
INK: Pink Pirouette, Basic Gray
ACCESSORIES: Very Vanilla Taffeta Ribbon, Cream Halfback Pearls (Pretties Kit)

Friday, June 12, 2009

Quick Baby Thank You Card


My good friend, Anya, had a diaper shower for me! Since we're having another girl & have so much baby stuff already, everyone just brought a pack of diapers. What a good idea & it was so much fun! So I needed to make quite a few thank you cards. Of course, I wanted something quick & easy. I used the Big Shot to cut out the Top Note Die which was great because I could cut through many layers of card stock at once! And 2 of my favorite colors together-chocolate & pink! This card is very simple, but I really like it!
All supplies Stampin' Up!:
Stamps: I'm Here, Thank You Kindly
Paper: Pink Pirouette, Chocolate Chip, Whisper White
Ink: Pink Pirouette, Chocolate Chip
Accessories: Big Shot, Top Note Die