Showing posts with label Handmade Christmas 2011. Show all posts

Monday, December 19, 2011

Handmade Christmas 2011: Insulated Casserole Carrier

Do you remember the insulated casserole carrier I made here? So easy to make & what a great gift for those who cook & carry. It will keep dishes hot or cold. I love the cherry print & the bright red polka dot lining on this one!
Here's the inside:
This is a really fast project to make & is a great gift to give!

Check out the original tutorial from 2 little hooligans here.

Friday, December 16, 2011

Handmade Christmas 2011: Yummy Snack Mix

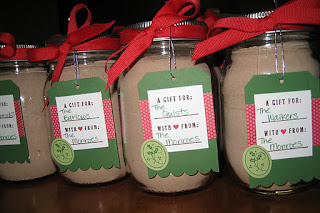
We love snack mix around here! So I thought a Christmas-style snack mix would make the perfect simple neighbor/friend/teacher/whoever gift this year. First I used the Num Num Mix recipe from Somewhat Simple to make the Chex part. I had made this recipe for a Halloween-style snack mix back in October & it is super good. I thought it was just a little too sweet for my taste though. So this time around I cut the ingredients for the glaze in half but still used the same amount of Chex cereal-perfection! Then I just added some pretzels, peanuts & Christmas M&Ms. This is the perfect combination of salty & sweet & is pretty addicting once you start eating it! Then I divided it into mason jars-one of my favorite ways to package a goody. I made a simple label for the top & tied some pretty ribbon around the lid & they were ready to go!
I hope everyone likes this snack mix as much as we do!

Monday, December 12, 2011

Handmade Christmas 2011: Digital Holiday Cards

I just love how our Christmas card turned out this year! Super simple!
Last year after making a gazillion handmade cards I had told my husband not to let me do it again this year. I love making cards, but for Christmas, I just need way too many cards now. So I decided to create a digital Christmas card in my Stampin' Up! My Digital Studio software to have printed. Getting a decent picture of my girls was an adventure all of its own, but this one was good enough for me. Luckily I had found a good Groupon deal so I had to pay fairly little for my cards too & they were printed on high-quality matte card stock & included free envelopes & shipping. Score! So when I got my cards I did use my corner punch to round the four corners of each card. Yes I have problems. But I love the look of the rounded corners & the company I used to print the cards didn't offer that option. It didn't take too long & it really makes the cards look nice. I still do miss the handmade cards, but this sure was fast & easy! Even if you don't have a program to create your own digital holiday card check around on sites such as Shutterfly or Pear Tree Greetings or even Costco, they have some really cute designs! And a lot of companies have been offering great deals. I know my sister-in-law ended up using maybe 3 or 4 different companies to create her cards with this year, but she got almost all of them for free! And how fun it is to have a few different designs to mail out! Just an idea if you haven't already sent out cards-it's not too late!

Saturday, December 10, 2011

Handmade Christmas 2011: Gift Tags

I'm all about keeping it simple, but still handmade this year for Christmas. Especially since I am now 8 & 1/2 months pregnant! These gift tags are so, so easy. Take your favorite card stock (mine is this lovely kraft color), stamp in Christmas-y colors & then use a fun punch to punch them out. Then you can just use a small piece of double-sided tape to stick them on presents or you can punch a tiny hole at the top & use some ribbon or baker's twine to tie them onto a gift bag (above). So easy!
I made a bunch of these the other night, some in red, some in green:
Then I made a bunch of these Santa gift tags for the gifts from Santa. All we'll have to do is write the girls' names on them & they'll know it's from Santa:
These honestly took me about 15 minutes to make. I usually like to make a bunch of different gift tags but, like I said, this year I'm keeping it simple!

Friday, December 9, 2011

Handmade Christmas 2011: Sugar Cookies

So a few months ago I got this set of cookie stamps from Stampin' Up! I thought they were so cute & seemed like an easy way to make cookies with my girls. In the set there is a pumpkin, a heart & a snowflake:
All you do is switch the silicone stamp on the wooden handle. So we tried to make these with the pumpkin stamp around Halloween. The instructions said to use a recipe where the cookies don't puff up too much. So I tried one of the recommended recipes that came in the cookie stamp set. All went well until we baked our cookies & they puffed up! Such a bummer! You could hardly see the pumpkin stamped on the cookie. I was frustrated too because I used the recipe that they recommended.

Anyway, I decided to give the cookie stamps another try for a gingerbread party we were going to. This time I used my favorite sugar cookie recipe because the cookies hold their shape really well when you bake them. They turned out so much better this time!
Here they are:
It would have been cute to sprinkle them with some clear or blue sugar before baking them, but I wanted to add a little bit of frosting because it's just so yummy too. So I made my light blue frosting, stuck it in a plastic candy bottle & just applied it over the snowflake in the center:
So cute & so delicious!
These would be great to bundle up & deliver during the holiday season too!
Honestly, you should try the sugar cookie recipe from Our Best Bites. It's very easy & I get mass compliments on it every single time I make them!

Thursday, December 8, 2011

Handmade Christmas 2011: Card Stock Ornaments

I was in charge of planning & organizing the Christmas progressive dinner for the women of my church this year (about 80 women total). Luckily I had a lot of wonderful women to help me & I think it turned out pretty well. We wanted to have a little something that the women could take home with them, but something that was Christmas-y & spiritual too. And with such a large group of women we needed something that was pretty inexpensive too. I came up with this simple card stock Christmas ornament.
I used my Big Shot to cut out the red scallop circles (I think I cut about 5 sheets of card stock at once so it wasn't too bad). Then I stamped the wreath & the "Merry Christmas" onto white strips of card stock & used my circle punch to punch them out. I also typed up a Christmas scripture on my computer, printed it out & then used the circle punch again to punch it out for the back of the ornament. We glued them all together, punched a small hole in the top & used some pretty green ribbon I had leftover from my niece's bridal shower to add a loop so it could be hung from a tree.

Here's the back side with the scripture on it:
These were quick & easy to put together & very inexpensive.
I hope all of the women liked them!

Friday, December 2, 2011

Handmade Christmas 2011: Crayon Purses

So you've seen this project here. When I was making that one for my niece, my oldest daughter really, really wanted me to make her one too. I decided to make a crayon purse for each of my girls for Christmas this year. They will love carrying these to church & having their own little purse to hold their crayons & paper or small coloring books. These don't take much fabric & come together really fast too which is great.

Here's a pic of the other side of the bags:
I love the cute ruffle & the big button. I know these are going to be a hit this year!

Monday, November 28, 2011

Handmade Christmas 2011: Photo Tile Coasters

A few months ago I saw these fantastic photo tile coasters over at the blog Oopsey Daisy. And I bookmarked the tutorial for future reference knowing this would make a great little Christmas gift. Since then I've seen these pinned all over Pinterest too. They are so cute & they were super easy to make & inexpensive-the best kind of handmade gifts! And I always love a chance to play around with resin! With my parents coming next week I suddenly was realizing I needed to get their gift done ASAP.
Luckily we had these awesome family photos from last year, so I made some photo tile coasters:

I just printed my photos in 4" x 6" size from Costco (only $0.13 each), bought shiny white 4" x 4" tiles (only $0.16 each), bought the small circle felt mounting circles (can't remember how much they cost, but not much for a lot of circles) & then bought a small box kit of resin (was $9.99, but I used a 50% off Michaels coupon).

So I just cropped my photos to 4" x 4" size & glued them down on the coasters with a glue stick. Then I covered the tiles with resin to seal it on there. Plus the resin will withstand the heat or cold that comes from placing a glass or mug on them. My tip with the resin is to follow the directions EXACTLY! And not to put too much on because it spreads & levels out by itself. I had some overflow over the sides which I then had to use a razor blade to scrape off later, but if you raise them up a little bit on something before you put the resin on it will just drip off over the sides & you probably won't have to do that. Tip for next time! I let them dry for 3 days & then just stuck the felt mounting circles on the bottom. Done! For the original tutorial for this & more detailed directions click here.

I decided to go ahead & make us a set too while I was at it:

I love them! They are so nice & shiny! And they really do look so much better in person than in my photos here.

I tied a pretty ribbon around the set for my parents & they're all ready for gifting:

Thanks to Alison over at Oopsey Daisy for the fabulous idea! You should just check out her blog anyway because it's great!

Friday, November 25, 2011

Handmade Christmas 2011: Digital Scrapbook

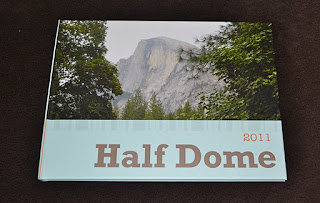
This gift, technically, is semi-handmade I guess! I uploaded the photos & added the text & created the book, but the design & templates & production came from Paper Coterie. I made this digital scrapbook for my husband for Christmas. He's always hard to shop for. A couple of months ago he hiked Half Dome in Yosemite with his brother so I thought it would be neat to put all of the photos into a book for him. Plus, Paper Coterie had a coupon code for a free $30 credit. This book was 8-1/2" x 11" size, hardcover & cost $32. So I had to pay $2 for the book (plus $9.21 for shipping). Not too bad though for the entire book. I love Paper Coterie & this is the third book I've made through them. The quality is great, their designs are super fun, the program is really easy to use & they always have these great coupon codes which make for a great deal! The code I used is already expired, but if I see another one I'll try to remember to post it on here for you. There are also so many other companies right now that are offering great deals on digital scrapbooks, so you should check for them if you have someone on your list that you're not sure what to give for the holidays.

Here's the front cover:
Some of my favorite inside pages:

And you can even customize the back cover too:
So give a digital scrapbook a try this year, it is a great gift that will last for years to come!

Tuesday, November 22, 2011

What is everyone looking at?

Thanks to Blogger Stats I can see what you all have been looking at around here on my little blog. What has been at the top of the list, by far, for the past couple of weeks? My Handmade Christmas 2010: Hot Cocoa Mix & Chocolate Dipped Marshmallows that I made as neighbor/friend/anyone gifts for last year:

I thought I would share the link to it again in case you are in need of a fun, easy handmade gift for this year, just click here to see that post again.

Monday, November 21, 2011

Handmade Christmas 2011: Shopper Tote

Here's another handmade Christmas present for ya! Can I just say I am so thankful to have Pinterest in my life this year? I have just found some amazing handmade gift ideas & tutorials. Thanks to everyone who is willing to share their awesome ideas on there! So I saw this shopper tote on Pinterest & you can find pictures & the full tutorial at The Crafty CPA. I love this style tote bag! So great for a teacher gift too, or for anyone who loves a good tote bag really. I think next time I would actually make the bag a bit larger & I would make the handles a tad shorter, but it's still a great bag. I did make one change which was that I only measured in 2 inches when boxing the bottom corners & I think the tutorial said to go in 5 inches if I remember right. I love that this bag has 2 outside pockets, one on each side, in between the handles too (it's hard to see the pocket in the photo).

And here's a shot of the inside of the bag:
I always like to use a lighter color lining inside of my bags, just so it's easier to see what's in there. I also love to add 2 large pockets, perfect for your phone & other small items you want to keep handy. Thanks again to The Crafty CPA for the inspiration for this one!

Monday, November 14, 2011

Handmade Christmas 2011: Alphabet Bean Bags

Do you remember my Handmade Christmas 2010 projects from last year? Oh it was so much fun! I love making people gifts & being able to really customize things for them. I am not going to be making as many handmade gifts this year as I did last year, but I thought it would still be fun to post them for you all to see. Maybe inspire you to make some handmade holiday gifts of your own? So here's hoping that I have the time & energy to get all of the projects made that I have planned!

Anyway, here is the very first handmade Christmas gift for 2011-alphabet bean bags.


I made these as a gift for my 2-year-old this year. One of her favorite things to do during her gymnastics class was to play with the bean bags. And since she follows right along with her big sister & is already starting to learn a few letters, I thought I would make them alphabet bean bags. Well, really she just knows A for her name, but soon enough she'll be ready to learn the others too.

Do you want to make some for yourself? Here's what I did:
They were a little time consuming to make, but very easy. I used my 5-1/2" x 5-1/2" square acrylic ruler to cut 52 squares from the fabric. I so love this fabric, by the way. It's from the Michael Miller Ta Dot collection. So bright & fun! I had first lined the fabric with some fusible interfacing just so that they'd be a little stronger since I know they will get tossed around a lot. Then I used my Silhouette machine to cut out the letters from white heat transfer vinyl. I liked this large chunky font too. I ironed the letters onto half of the squares of fabric. Then I sewed two squares of the same color together, one letter square & one plain square, with the right sides together, leaving a 2 inch opening. Then I clipped the corners & turned each square inside out. I ironed them nice & flat. Then I filled each one with pinto beans. Tons of beans! For this size bean bag I measured out 3/4 cup of beans for each one. (I needed 8 16 oz bags of pinto beans, which I got for $0.38 each at Target.) Then I top stitched around the entire bag, just shifting the beans around inside as I sewed around the entire square, closing up the opening as I did this. And that's it!

They turned out super cute! Much better than I had hoped for & they feel pretty sturdy too. I know they will provide a lot of fun for my girls & will be educational too!