Showing posts with label Decorated Tins. Show all posts

Monday, May 9, 2011

Tab Top Can Treats

So I was really hoping to have this posted before Teacher Appreciation Week, but life happens & blogging didn't! I'm sure you've probably seen this idea before & you've probably even seen the awesome tutorial that Our Best Bites had on their blog by now, but I still want to share it here in case you need a cute little gift/treat at some point.

Here were my treat cans for my daughter's preschool teachers:
Just click here to see the whole tutorial from Our Best Bites on how to make these & they even include free printables for the front of the can. So easy & they look super cute!

Here's what I put inside of mine instead of M&Ms:
Even though the cans are pretty small, I still fit 10 pieces of bite-sized candy bars in there. I wanted there to be a variety of candy in there since you never know what people like.

This was so easy that I even made one for one of the girls that I teach every Sunday at church & gave it to her for her birthday. I just used one of my stamps & some punches to decorate the front of this one:
I will definitely make these again!
Thanks to the ladies at Our Best Bites for sharing!

Wednesday, August 6, 2008

Quick & Easy Baby Gift

I saw this idea in Gifts from the Heart, a special issue from Paper Crafts Magazine. I thought it was such a cute little baby gift idea. Make a few of these to keep on hand & you'll always be ready when a new little one is born. I used one of my leftover Nugget Tins from Papertrey Ink. Then I just put a travel size baby lotion, baby wash & washcloth inside. I tied a piece of ribbon around the tin, attached the tag with a safety pin & done! So easy!

Wednesday, July 9, 2008

Birthday Card Organizer

Yes, I know, another tin! Honestly, I love making these decorated tins & I'm always finding a new use for them! This one is a Birthday Card Organizer. I've been wanting to make some type of a birthday card organizer for a long time, but just hadn't found something that was ideal for me. The tin works great! I have dividers inside for each of the 12 months plus calendar pages where I can write down the birthdays for each month. Hopefully this will help me to plan ahead a little when it comes to making birthday cards! I like the idea of having all of my upcoming birthday cards stored & organized in one place. And the tin is easy to move around wherever I want to put it & it helps to protect my newly made cards from the innocent but destructive hands of my toddler! I used the Summer Days Simply Scrappin' Kit which I just love! It turned out even better than I had hoped! I've also decided that since I've been a slacker this month & haven't planned a stamp class, that I'll be offering this Birthday Card Organizer as a "class in the mail." For details see the information below the pictures:
Front of the tin.
(sorry my pic is a little fuzzy)

Top of the tin.

Samples of the calendar pages.

The dividers.

(each one is decorated differently)

Inside of the tin.

I have the dividers & calendar pages inside already,

so you can see how much room there still is for cards!

Class in the Mail Details:
Birthday Card Organizer Kit

The Birthday Card Organizer tin is a cute, decorative way to organize your cards for upcoming birthdays. It also makes a wonderful gift-it’s never too early to start thinking about Christmas! The Birthday Card Organizer tin is decorated using the Summer Days Simply Scrappin’ Kit from Stampin’ Up! Everything will be pre-cut & pre-stamped for you. A step-by-step instruction sheet is included to help you put it all together. Detailed photos of the Birthday Card Organizer will be emailed to you as well. All you need to do is supply your own Tacky Glue (or adhesive of your choice).


What’s included:

The Tin:

You will get one Provo Craft white lunchbox tin with handle. The approximate size is 7”x 5”x 4” (the tin will hold at least 20 cards plus envelopes). The designer paper will be pre-cut for you & everything will be pre-stamped as well. The ribbon, buttons, & other embellishments will also be pre-cut & included in the kit. You will also receive Mini Glue Dots & Stampin’ Dimensionals that will be used to adhere some of the embellishments to the tin.

The Dividers:

Inside of the tin are 12 tabbed dividers. They are made with textured card stock in coordinating colors so that everything matches. The tabs will be pre-stamped for you as well with the 12 months of the year: JAN, FEB, MAR, APR, MAY, JUN, JUL, AUG, SEP, OCT, NOV, DEC. You will decorate them with stickers from the Summer Days Simply Scrappin’ Kit.

The Birthday Calendar Pages:

You will also receive 12 blank calendar pages with the month pre-stamped on it. They have a column for the day of the month & a column to write the name of the birthday person. You will decorate these with stickers from the Summer Days Simply Scrappin’ Kit as well. The calendar pages are sized to fit perfectly behind each divider so that you can keep birthdays & cards organized by month.


Ordering Info:

Card Tin Kits are available from July 9 – August 8 (while supplies last).
They will be shipped within 2 weeks of placing your order. If you live in my area, we can arrange for pick-up/delivery of your kit so you won’t have to pay for shipping.

Birthday Card Organizer Kit = $25
Shipping (U.S. only) = $7

*If you would like to order one of these tins already made, just add $10.
*I accept PayPal or credit card only.

To order or ask questions please email me.

Friday, June 27, 2008

Another Monogram Tin

Ok, so I just can't get enough of these monogram tins. I'm sure you are sick of seeing them by now! They are so easy to make & are such a great little gift! I made this one for my sister-in-law, Cheryl, whose birthday was this past Wednesday. Happy Birthday, Cheryl! I was trying a new background to see how the photo would turn out. I put it against my white fridge & then put a piece of white card stock on my counter. I guess it turned out all right!?!

Here's the top of the tin.


The tin holds 10 note cards plus envelopes. I made 5 of her notecards like the one above & then ran out of the Almost Amethyst ribbon.

So I made the other 5 like the one above, using the Whisper White Taffeta Ribbon.


And here's her actual birthday card. It has to match, of course! Does it have too much "stuff" on it? It's a little more than I usually do so I wasn't sure!

Friday, May 30, 2008

Another Note Card & Tin Set

I just finished this small lunchbox tin & 10 matching notecards & envelopes. My husband's aunt just turned 60 & we are having a big party tomorrow to celebrate. Happy Birthday, Joanie! So this is what I came up with for her. It's the exact same idea as the Monogram Tin & Note Cards that I've previously shown (click here to see them). Joanie loves butterflies & so I wanted to incorporate that into her gift. I just simply replaced the monogram letter with a butterfly. And the colors correspond to the invitations that I made for her party (the invites are the last photo in this post just for reference). I used Prints Designer Series Paper for both the tin & the note cards. Each note card has a different pattern for it's background, so it makes them each unique. These tins are so easy to make & really make a great little gift!
Here's a view of the top of the tin.
The 10 note cards & matching envelopes.
Here's a close-up of one of the note cards. Each one has a different patterned paper for its background, but the layout is the same.
Here's the invitation that I made for her party. I just used the same colors & stamp set for her gift as well.

Tuesday, April 8, 2008

Lemon Recipe Tin

I had a customer order a Recipe Tin & she wanted it in yellow & green (she's giving it as a gift & her friend's kitchen is in those colors). So this is what I came up with for her! I hope that she likes it & that her friend does too! I used Certainly Celery & So Saffron Prints Designer Series Papers. They look great together! I also used a stamp from the Tart & Tangy set from the Occasions Mini Collection 2008 to be a lemon. I put Glassy Glaze Enamel over the lemon stamp too, so it has a really shiny, juice look to it. Overall I think it came out super cute!

Here are the matching dividers.

Sorry the picture came out really dark so the colors look a little off!

And here's the matching Recipe Card Holder & a Recipe Card. I stamped the Recipe Cards alternately in yellow & green (For a lemon & a lime I guess!).

If you have certain colors in your kitchen & you want to purchase a Recipe Tin to match, please contact me & we'll figure out a combination that works for you too!

Thursday, March 20, 2008

Yes, Another Card Tin!

Last night at my monthly demonstrator meeting we made...card tins! Here is the one I made. I had some leftover paper from making my Cherry Recipe Tin so I used it for this. It's from the Summer Picnic Designer Paper in the Occasions Mini Collection. Honestly, no matter what designer paper you use, these tins always turn out so cute! Front of the tin.
Top of the tin.
Back of the tin.
Inside of the tin.
The dividers.

Sunday, March 16, 2008

April Stamp Class


I know everyone is probably really getting sick of these tins by now! But I decided to do the monogram tin & note cards for my stamp class for April because they make a great gift & Mother's Day is coming up in May. So if you are interested in making one for yourself or to give as a gift, the info is below:


Monogram Tin & Note Cards Class


You will make one small tin (approximate size is 4"H x 5-1/2"L x 2-3/4"D) & 10 note cards (envelopes included). You get to choose what designer paper you want to use too-Soft Sky, Certainly Celery, Rose Red or Multi-colored (see photos below). You will also be making 10 monogram note cards (sized 5" x 3-1/2")-4 blue, 3 pink, & 3 green (10 envelopes included). You can personalize the tin & the note cards with whatever letter & font you choose. There are some sample photos below.


Here are the details:

Date: Friday, April 11th

Time: 6:30pm

Place: Julie's House

Cost: $15

RSVP: By Tuesday, April 1st


The front of the tin. This is the Multi-colored designer paper choice.


A view of the top of the tin.


A view of the inside of the tin with the 10 note cards & envelopes inside.


This is another one made with some retired paper, but you can make one like this in your choice of Soft Sky, Certainly Celery or Rose Red designer paper.


Here are the note cards. You will make 10- 4 blue, 3 pink, & 3 green, 10 envelopes are also included.


Please invite your friends too! If you have any questions please contact me.

If you can't make it to the class & would like to order a kit click here for more info.

~Julie

Thursday, March 6, 2008

A Tin for my Daughter

I know you all are sick of seeing my tins! But, here's another one anyway! I made this one for my daughter. She's almost 2 & she loves these tins. She always wants to carry them around & play with them, so I thought "Why not just make her one?" So here's what I came up with. It uses some retired designer paper & I didn't use any buttons or small embellishments in fear of her swallowing them! I know she'll love it!

Friday, February 29, 2008

Fall Flowers Card Tin

Here are the photos of the Fall Flowers Card Tin:
Front of tin.

Top of tin.


Back of tin.


Inside of tin.


Four tabbed dividers, covered on both sides with designer paper.

For ordering information click here.

Le Jardin Card Tin

Here are photos of the Le Jardin Card Tin:
Front of the tin.

Top of the tin.


Back of the tin.


Inside of the tin.


The four dividers, covered on both sides with designer paper.

For ordering information click here.

Tuesday, February 26, 2008

It Made My Day!


I went to JoAnn's today & guess what they sell now? One of my favorite craft items in the whole world-Provo Craft Lunchbox Tins!!! (These are the tins I use to make my Card Tins, Recipe Tins, Baby Tins, etc.) I was so excited! It really made my day! Now I only have to drive 1 mile to get tins when I need them instead of having to drive to the party supply store across town (who hardly ever had them anyway) or ordering them online (& having to pay shipping & then wait for delivery). And they only cost $4.99 at JoAnn's! So, if you have your weekly 40% off coupon, you can get them for only $2.99! It's great! Also, they have a bunch of the other styles of Provo Craft tins too!

Wednesday, February 20, 2008

Tin Kits Available for Purchase

I’ve decided to start offering some of my tins as kits that you can order & then put together at home. They are so fun & easy to make! And they make great gifts too! (Think about wedding showers, baby showers, birthdays, housewarmings, Mother’s Day, etc.!)

Recipe Tin Kits


Available March 1 - June 30 (while supplies last)

-Sorry, these Recipe Tin Kits are no longer available. Please scroll down to view other Tin Kits that are still available.


The first kits I am offering are for the recipe tins. You can choose either the Cherry Recipe Tin or the Floral Recipe Tin (click on title to see more photos & details of each style). Everything will be pre-cut & pre-stamped for you. A step-by-step instruction sheet will be included as well. All you need to do is supply your own Tacky Glue, or adhesive of your choice, for putting it all together (yep, I just use basic Tacky Glue & it holds really well!).

What’s included:

The Tin:

You will get one Provo Craft white lunchbox tin with handle. The approximate size is 7”x 5”x 4”. The designer paper of your choice (either Cherry or Floral) will be pre-cut for you. Everything will be pre-stamped & pre-punched for you as well. For the front you can choose what you would like the tin to say. You can choose from: “recipes,” “favorite recipes,” “favorite family recipes,” or “family recipes.” The ribbon, buttons, & other embellishments will also be pre-cut & included in the kit. You will also receive Mini Glue Dots & Stampin’ Dimensionals that will be used to adhere some of the embellishments to the tin.

The Dividers:

Inside of the tin are 6 tabbed dividers. They are made with the same designer paper so that everything matches (either Cherry or Floral). They are also double-sided so they have a clean, finished look. The tabs will be pre-stamped for you as well. The categories are: “veggies, salads & sides,” “breads,” “soups, stews & sauces,” “meats & main dishes,” “desserts,” and “misc.”

The Recipe Cards:

Included in your kit are 25 blank recipe cards. They are 4”x6” in size. They are lined, double-sided & the front bottom corner is stamped with an image that coordinates with the designer paper (either Cherry or Floral). You could also easily use a 4”x6” index card or print off recipes from your home computer & cut them down to fit inside of the tin. (You can purchase extra blank recipe cards too, see “Ordering Info” below)

The Recipe Card Holder:

You will also receive a jumbo binder clip that serves as a recipe card holder. Everything will be pre-cut, pre-stamped, & pre-punched for you. The designer paper & colors used will correspond to the tin (either Cherry or Floral).

Ordering Info:

Recipe Tin Kits are available from March 1 – June 30 (while supplies last).
They will be shipped within 2 weeks of placing your order. If you live in the Riverside area, we can arrange for pick-up/delivery of your kit so you won’t have to pay for shipping.

Tin kit = $30
Shipping (U.S. only) = $7
Extra Recipe Cards (25) = $6

*If you would like to order one of these tins already made, just add $5.
*I accept PayPal or credit card only.


To order or ask questions please email me:
stampinjules@gmail.com


Card Tin Kits


Available March 1 - July 31 (while supplies last)

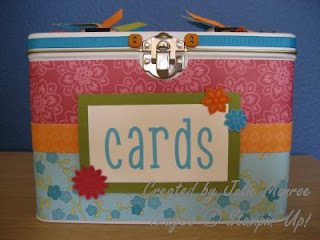
The Card Tin Kits make great gifts or are a unique way to store your own cards. You can choose from the Bali Breeze Card Tin, the Fall Flowers Card Tin, or the Le Jardin Card Tin (click on title to see more photos & details of each style). Please note: The designer paper included in your kit may not be the exact pieces shown in the samples, but it will still have pieces from the same designer paper package, the same colors & designs. Everything will be pre-cut & pre-stamped for you. A step-by-step instruction sheet will be included as well. All you need to do is supply your own Tacky Glue, or adhesive of your choice, for putting it all together (yep, I just use basic Tacky Glue & it holds really well!).
*Card Tin Kits can be made using any other Stampin’ Up! Designer Series Paper too, just contact me with your request. You can find the other Designer Series Paper options on pg. 168-171 in the catalog or by clicking here.


What’s included:

The Tin:

You will get one Provo Craft white lunchbox tin with handle. The approximate size is 7”x 5”x 4” (the tin will hold at least 25 cards plus envelopes). The designer paper of your choice (Bali Breeze, Fall Flowers or Le Jardin) will be pre-cut for you. Everything will be pre-stamped & pre-punched for you as well. The ribbon, buttons, & other embellishments will also be pre-cut & included in the kit. You will also receive Mini Glue Dots & Stampin’ Dimensionals that will be used to adhere some of the embellishments to the tin.

The Dividers:

Inside of the tin are 4 tabbed dividers. They are made with the same Designer Series Paper so that everything matches. They are also double-sided so they have a clean, finished look. The tabs will be pre-stamped for you as well. The categories are: “birthday,” “thank you,” “celebrate,” and “misc.”


Ordering Info:

Card Tin Kits are available from March 1 – July 31 (while supplies last).
They will be shipped within 2 weeks of placing your order. If you live in the Riverside area, we can arrange for pick-up/delivery of your kit so you won’t have to pay for shipping.

I also have packages of handmade cards available for purchase. If you are buying a Card Tin as a gift, it’s a quick & easy way to fill it up with cards & make it complete! The cards are sold as an assorted package of 10 including: 3 birthday, 3 thank you, 1 wedding, 1 baby (neutral), 1 friendship, 1 blank & 10 white envelopes.

Card Tin Kit = $20

Shipping (U.S. only) = $7

10 Assorted Cards + Envelopes = $15

*If you would like to order one of these tins already made, just add $5.

*I accept PayPal or credit card only.

To order or ask questions please email me:stampinjules@gmail.com


Monogram Tin Kits

Available April 1-July 31 (while supplies last)

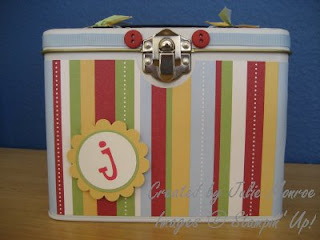
The Monogram Tin Kit makes a wonderful personalized gift, or buy one to use yourself! Please note: The designer paper included in your kit may not be the exact pieces shown in the samples, but it will use pieces from the designer paper package you choose (Soft Sky, Certainly Celery, Rose Red or Multi-colored). Everything will be pre-cut & pre-stamped for you. A step-by-step instruction sheet will be included as well. All you need to do is supply your own Tacky Glue, or adhesive of your choice, for putting it all together (yep, I just use basic Tacky Glue & it holds really well!).

What's included:

You will receive one small lunchbox tin (approximate size is 4"H x 5-1/2"L x 2-3/4"D) & 10 note cards (envelopes included). You get to choose what designer paper you would like-Soft Sky, Certainly Celery, Rose Red or Mult-colored. You will also get everything you need to make 10 monogram note cards (sized 5" x 3-1/2")-4 blue, 3 pink, & 3 green (10 envelopes included). You can personalize the tin & the note cards with whatever letter you want. Everything will be pre-cut & pre-stamped for you. To see more photos click here.

Ordering Info:

Monogram Tin Kits will be available from April 1-July 31 (while supplies last). They will be shipped within 2 weeks of placing your order. If you live in the Riverside area, we can arrange for pick-up/delivery of your kit so you won’t have to pay for shipping.

Monogram Tin Kit = $20

Shipping (U.S. only) = $7

*If you would like to order one of these tins already made, just add $5.

*I accept PayPal or credit card only.

To order or ask questions please email me:stampinjules@gmail.com

Cherry Recipe Tin

Here are photos of the Cherry Recipe Tin choice:
This is the Cherry Recipe Tin, the Cherry Recipe Card Holder & a Cherry Recipe Card.

The front of the Cherry Recipe Tin.


The top of the Cherry Recipe Tin. The word "yummy" is stamped on the blue oval.

The six dividers. They are covered on both sides with the matching designer paper.


The front & back of the Cherry Recipe Cards (recipe cards come double-sided).

For ordering information click here.