Showing posts with label Family. Show all posts

Thursday, May 29, 2014

LDS Baptism Book

I thought I would also share the baptism book that I made for my daughter's baptism.  I liked the idea of having a small memory book for her to fill out about her special day that she can treasure forever.  And I also wanted a place for guests at the baptism to sign in so she can remember who was there.  I had searched online to get some ideas for an LDS themed baptism book & I just didn't find very many examples at all.  So I decided to come up with my own.  I used my digital program again & created 8" x 8" scrapbook pages.  I had taken her to the temple to take some pictures of her in her white baptism dress so I used those photos throughout the book.  I included some pages that had a poem, song or scripture on it as well as some fill-in the blank pages where she could record how she felt on her baptism day.  I also left some pages blank so that we could add on some pictures from her actual baptism day later on.  After I made my digital scrapbook pages I waited.  I waited until Shutterfly had one of their free 8" x 8" hardcover photo book deals.  (Watch for them because I swear it seems they have this offer about once a month.)  Then I uploaded my scrapbook pages in jpeg format into Shuttefly & created a blank book.  It was so easy & I only had to pay for shipping!  The book turned out really nice too, I am really happy with it.  So I thought I would share it here in case anyone else had a hard time finding some ideas for a baptism book.

Here's the actual book:

The following are the digital pages that I made for the entire book:

Front cover:

First page inside:


The following pages go side by side in the book:


Back cover:

So here are a couple of pictures of the actual book with some of the pages where I added pictures of her baptism day later:


Shutterfly also gives you the option of adding a clear memorabilia pocket at the back of your book which I thought was a great idea:
I put one of her invitations (click here to see that) in the pocket along with some other pictures from her baptism day.  You could also put cards that were received in there too.

I am so glad that I made this book for Kaylee.  It was easy, inexpensive & now I have the template already set for when my other 2 daughters are baptized in the future.  All I will have to do is change the accent color to whatever color they want & personalize it just for them.  

I hope this gives you some ideas if you are wanting to make your own baptism book!

Friday, May 11, 2012

Movie Night Birthday Party

We've decided that we aren't going to do big birthday parties for our girls every year.  There's just no way we can afford it, plus they are a lot of work for this busy mom!  But, of course, we love to celebrate birthdays!  And Kaylee really wanted to do a little something with her friends this year for her birthday.  So we decided to do a movie night birthday party!  I figured that was easy enough-play a movie, provide some treats, birthday fun!  Well, if you have followed my blog for a while now you know that I can get carried away.  There must be some kind of support group for this kind of problem!  {smile}  I just can't help myself!

The week before the movie night I started looking around on Pinterest & came across all sorts of cute, simple ideas for our party.  And, hence, got a little carried away...

I made a party invitation in the digital design program I always use which is My Digital Studio from Stampin' Up!  I love how it turned out & I just printed them out in 5"x7" size at Costco:

Then I used my Silhouette machine to print & cut out some "Admit One" tickets.  We wrote each girls' name on the ticket & simply stapled it to the invitation & then dropped them off to our friends' houses:

I made a movie poster & clipped it on our easel at the entrance to our "movie theater."  My daughter had picked Tangled to watch that night so I printed out a picture of the movie cover off the Internet & glued it on there:

I attempted to make a "theater" feeling in our family room by draping our TV cabinet in red plastic tablecloths:
So you could see through the plastic tablecloths a little, but it was a really cheap idea so I wasn't going to be too picky about it!

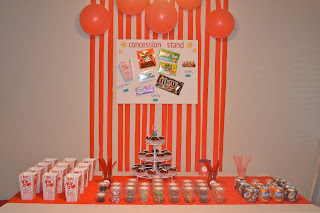
For our movie night treats we had a concession stand, of course:

Every girl received 3 blue tickets when they arrived at the party so that they could buy some treats at the concession stand.  Each item cost 1 ticket.  I made a "concession stand" poster to show some of the goodies they could "buy" & also to be a decoration:

We had popcorn:
 (I found the little cardboard popcorn boxes at Target.)

We had candy:
 (I saw this idea on Pinterest of putting the movie candy in these little containers.  I just printed out some decorative circles, punched them out & then wrote the names of the candy on them to attach on the lids.  My husband thought I was crazy for doing this because he said most of our party guests can't read yet anyway, but I thought it was such a cute idea!  And I like how I could make the perfect kid-sized portions for our movie night.)

We also had soda:
 (Caffeine free, of course!  And I love those little cans!)

I covered an empty baby formula can with some scrapbook paper & added a little "tickets" label.  Then I cut a slot into the lid so that the girls could put their tickets into the can when they "bought" something at the concession stand:

I started thinking that the likelihood of 10 little girls sitting through the entire Tangled movie wasn't good.  I decided to have at least one game ready to play to keep them entertained.  I found a great "Pin the Frying Pan on Flynn Rider" game online.  She provides a printable frying pan where all you have to do is print & cut it out, but then you have to draw your own "wanted" poster.  Luckily one of my husband's hidden talents is that he can draw really well!

So he drew the poster for our game:

The birthday girl got to go first:

And little sister, Aidynn, went last.  But you can see the frying pans in this photo:

I had also decided to bake some cupcakes so that we would have something we could stick a candle into so we could sing happy birthday to Kaylee.  I decided on these delicious hostess imitation cupcakes:


They fit with our concession stand theme, plus these are seriously some of our all-time favorite cupcakes!  And they're really easy to make too!

I also got the idea online to print out a few Tangled coloring pages to give the girls as their thank you for coming goody along with a set of inexpensive watercolors (since Rapunzel loves to paint, ya know):

I am so happy with how everything turned out.  And really, honestly, it came together quickly & was fairly inexpensive & best of all the girls had a blast!  Maybe we'll just do movie night every year for birthdays!

Wednesday, May 9, 2012

My Big Girl is 6!

I can't believe my big girl is 6!  
Oh the things I have learned over these last 6 years!
What an amazing gift it has been to be able to be a mom.

So, per our family tradition, Kaylee got to pick what kind of cake/dessert she wanted for her birthday.  Well, her favorite ice cream is neapolitan.  She loves the three ice cream flavors in one!  And she had seen a picture of a neapolitan cake before when I was looking at ideas on Pinterest.  So she requested a neapolitan cake for her birthday dessert this year.  I have to say it was super easy to make (yay) & it tasted really good too!

I simply used 3 different box mixes-strawberry, vanilla & chocolate.  I leveled them off & then stacked them using the thinest amount of buttercream frosting in between the layers as I could.  We don't like too much frosting on our cakes around here!  Then I tinted the buttercream light pink (again, per Kaylee's request) & I just covered all of the layers in that.  I wanted it to look nice & fluffy, sort of old school, like I can remember my mom or grandma doing.  It was so simple, but perfect too!

We added 6 long pink candles for our birthday girl:

Happy birthday to you, Kaylee-girl:

And the inside looked pretty cool:

So yummy!

I saw one the other day on Pinterest that was like this except with red, white & blue layers.  That would be so fun to try for Memorial Day or the Fourth of July!

Saturday, May 5, 2012

Baby Blessing Dessert Table

Hello!  Are you still out there?  I'm still here, even though it's been a while since I've posted anything.  What can I say?  Life has been hectic.  We've had some ups & we've had some downs.  I won't bore you with all of the details.  And I am sorry I have not been able to respond to any of your emails.  And thank you for all of the nice requests for buying things that I make.  You all are so sweet!  I would love to be able to craft & sell, but at this point in my life it just is not feasible.  Maybe in the future?  Anyway, hopefully I can get back to blogging a little more regularly now that life seems to be quieting down.

Well, on Easter we blessed our baby Quinn.  In our church, children don't get baptized until they are eight years old.  But after they are born we have a baby blessing for them.  We decided to bless Quinn on Easter since so much family would be in town, it was the perfect time.  Now back when I was pregnant, I knew that I wanted to do an all white dessert table for the baby blessing.  I know, I'm crazy to have already been thinking about that before she was even born.  But I loved the idea of all of the desserts being white.  Just like the beautiful white blessing dress she would wear on her special day.  I think the white is so beautiful because it is symbolic of the purity & innocence of this new baby.  As I started actually planning the dessert table for the blessing after Quinn was born, I decided that I did want to add in a little bit of color.  I decided to add a kraft brown color & light pink, just like I used for her birth announcements.  I think it added a nice contrast to all of the white.  *By the way, sorry for the dark photos.  Our house hardly gets any natural light at all.

Here's the entire table set up:
 A while back I finally broke down & just bought a nice white cotton tablecloth.  It's so versatile & this way I can use it for anything & just change up the accents depending on what kind of party or event we are hosting.  For the baby blessing I used some kraft wrapping paper that I had gotten at IKEA before Christmas.  It made the perfect {cheap} table runner!

I also used my Big Shot to make a banner that said "Quinn Marjorie" to hang above the dessert table:

I made a little printable for the table too using My Digital Studio from Stampin' Up!  I simply had it printed out at Costco & used some Mod Podge to adhere it to a plain white canvas & then added a couple of paper rosettes made with my Big Shot:

The glare is really bad in that photo.  Here is what it looks like digitally:
The pink verses are taken from a primary song at church & the overall idea I've seen used many times online.

And a close-up of the paper rosettes: 

I made a chocolate cake with chocolate mousse from Our Best Bites in the middle & then covered it with white buttercream ruffles.  I have to say the chocolate mousse is so stinkin' good & it's found in this recipe here.  It looked really pretty, just what I wanted for the blessing dessert table.  I also made a Q to put on the top of the cake with some pink melting chocolate:
 (I just typed & printed out a Q on my computer.  Then I covered it with waxed paper.  I melted some pink melting chocolate & then put it inside a squeeze bottle & then traced over the Q.  I let it harden back up & then it simply slid right off of the waxed paper & I stuck it down into the frosting on top of the cake-easy!)

I stuck with the monogram theme with my sugar cookies too:
 People always love my sugar cookies.  I can't take credit for them though, the recipe is from Our Best Bites & it is so good!  I used a scalloped circle cookie cutter for these ones & then my large Q stamp (thoroughly cleaned & sanitized first) to lightly stamp into the cut dough.  I baked the cookies & then just filled in the Q with some light pink royal icing.

I had also made some white cupcakes with white buttercream frosting, my sister-in-law made some of her yummy spritz cookies with light pink sprinkles & then I put out some various white-colored candies in the small dishes on the table.  It looked good, I was happy with how it turned out.

And here are my 3 pretty girls on Quinn's blessing day:
 The blessing dress was made by my grandma for my mom to wear, then I wore it & now each of my daughters has worn it on their blessing days.  It is very special!

We also attempted a family photo & managed to get one decent shot:

The rest looked more like this:

Oh, my crazy family!  But I love them more than anything!