Showing posts with label Fabric. Show all posts

Friday, March 14, 2014

Sewing Stuff

I just never get as much sewing done as I would like.  I have big dreams of fabulous sewing projects, but life just gets busy.  And my family always comes first!  I did get a few sewing projects done though & I always feel bad for the recipients of my sewing gifts because they are my guinea pigs as I practice & develop my sewing skills.  Ha ha ha!  Hopefully they like their gifts though!

I made this big tote bag for my sister-in-law for her birthday last year:
 She'd been asking for a big tote bag & this one was big!  And I love the fabric!

2013 was the year of the baby in my husband's family.  There were 4 babies born!  And it seemed to be the year of the boy as 3 of the 4 were boys!  It was fun to shop for boy fabric for a change.  I made baby quilts for the new babies & I really enjoyed making each one.  You'll see a chevron theme on most of them.  What can I say?  I {heart} chevron.  And I feel like it's a great basic pattern that goes with just about anything.  And for quilting purposes it was really easy.  I just bought the large chevron print fabric for the front of the quilt & then a patterned fabric for the back of the quilt.  Then after I layered them with the batting in between I quilted along the chevron pattern for the actual quilting.  It was easy & they turned out great!

This one was for our cousin's baby girl, Saylor:
 I just love yellow & gray together!  And after having 3 girls I really love other colors together for girls besides just pink.

This one was for our cousin's baby boy, Ethan:
 I love, love, love these bold colors together!  
And chevron & polka dots together = I die!

This last chevron quilt was for our nephew, Elliott:
I love this pop of orange with the aqua & gray!

My brother-in-law loves Star Wars & so when I saw this fabric on sale I had to get it!  I just made a simple flannel blanket:
And I love the light blue star flannel on the back.

I also made my sister-in-law one of those infant car seat canopy covers:

 I loved this pattern!  It's not a great picture of how it works as the car seat canopy, but I'm sure you've seen those out & about.

This last quilt was for my great-nephew, Hudson:
His nursery is a nautical theme & when I saw this fabric I just had to get it.  I love the bright colors!

Yay for all these babies so I could practice my quilting!  :)

Monday, March 19, 2012

Back at the sewing machine again!

So Quinn is now 7 weeks old & I busted out my sewing machine again! Yay! My oldest daughter had a birthday party for a friend on Saturday & I knew I wanted to make her one of these adorable crayon purses. I had this leftover fabric which I love, love, love! And these crayon purses are really so quick & easy to make. Well, unless you have a 7 week old & then it might take you a few days to finish like it did me. {smile} And they are so handy for when you want your child to be occupied-church, long car ride, doctor appointments, etc. I know you've seen me make these before, but I thought I'd share this one with you too. Did I mention I love this fabric?

So here is the side with the crayon pockets:
And the other side with a ruffle:
And the inside with a plain pad of paper & a small princess coloring book:
I hope that our friend likes this & gets lots of use out of it!

Tuesday, January 24, 2012

Ribbon Board Makeover

To be honest, I get bored with my home decor very easily. I don't know why. I do something I love, but then get sick of it quickly & want to change things again. Oh it drives my husband nuts! Especially now with Pinterest there are just too many fabulous ideas out there that I constantly see & want to try for our house. I really try to only make changes when they fit into our budget. I've found that I am pretty content to just change out small, simple decor items & it gives me the updating I need without changing big, expensive items in our house.

The source of my latest irritation-my kitchen. Since we rent I obviously will not be doing any crazy remodels in the kitchen or anything, but it drives me nuts because it is so dark in there. We hardly have any natural light in our house, especially in the kitchen. And I am tired with the color scheme of my kitchen towels/accessories. Isn't that crazy? I know, I am a little nuts. But we've been using the same dark blue & white & yellow kitchen towels for 8 years now. It's definitely time for a change & to brighten things up in the kitchen.

I found some kitchen towels in a pretty bright blue color & thought they would add just the right touch of color to the kitchen. Next on my list was to makeover my dark denim & yellow ribbon board. It's pretty big & hangs on one wall in the kitchen. I went to JoAnn's not knowing what I was looking for exactly, except that I wanted to do something with that same bright blue color & then maybe add dark brown or a cocoa brown color. I came across some dark brown polka dot fabric & since I love polka dots (& didn't find anything else I liked) I decided to buy that. Then I found some ribbon in the same color as our new kitchen towels & then added some big white buttons too.

Here's the new ribbon board:
And in it's spot in the kitchen:

I didn't even take the denim fabric off of the old ribbon board, just the old ribbon & then stapled the new fabric & new ribbon right on. Then I sewed the buttons & we now have a whole new ribbon board! So easy, inexpensive & it makes me feel better when I walk into the kitchen now that it's had some sort of little update! And this was a quick & easy project to do while waiting to have this baby! :)

Tuesday, January 17, 2012

Wet Bag

I made one last quick baby project yesterday-a wet bag. I figure this will come in handy in the diaper bag for any baby items that become wet, you know, from spit up, blowouts, etc. It will be a great bag to throw that wet stuff in & keep everything else in the diaper bag dry. It has a zippered top & then a handle that snaps so that I can hook it on the stroller or anywhere else too.
Isn't the fabric cute? I found it at JoAnn's a while ago in their new Babyville line & I bought a 3-pack of it with one of my coupons, click here to see it online. It's Polyurethane Laminated PUL fabric meant for making waterproof cloth diaper covers, but can be used for a variety of other projects as well. It's polyester fabric with a Polyurethane coating. And it's machine washable which is awesome!

So after I finished the wet bag I packed up my sewing machine & cleaned up my craft area because I am being induced tomorrow morning. The day is finally here! We are going to meet this baby! So I know I won't be doing much crafting for a while as we adjust to this new little princess in our home. So wish me luck & stay tuned for some photos!

Friday, January 13, 2012

Knit Baby Blanket

I have this super soft knit blanket from Gymboree that I love & I used with both of my older girls when they were babies. It is the perfect weight for a blanket-not too thick, not too thin. When I saw this tutorial for a knit receiving blanket over at Make It and Love It last year I realized that I could actually {probably} make one of these blankets myself. And I bookmarked it for a possible baby gift idea. Fast forward a few months & being pregnant with my own baby girl, I found this adorable owl knit fabric at JoAnn's. I love these cute owls so I bought some of the fabric up right away to make a knit baby blanket with. And I finally finished it today! Yay! With only one week left to my due date! I didn't actually know if I would be able to get it done, but here it is:
And I used a cute, bright pink polka dot knit for the back:
Oh it is so soft, I love it! And pink & brown-some of my fave colors together!

So I haven't had much practice sewing with knits before & let me tell you it can be a bit tricky. I decided to try out my walking foot on my sewing machine for this blanket & it really did make a huge difference! It was still a little tricky to sew the knit fabric, but it was much easier than using my regular sewing foot. I think with some more practice it would be a lot better. Don't look closely at my binding, the stitching is definitely not straight since the knits stretch & move a little while sewing. But I still think it turned out pretty well & can't wait to use it with our baby girl!

Thursday, January 12, 2012

Monogram Frilly Frame for the Nursery

I'm sure you've seen all of the monogram takes on this fabulous IKEA frame in the blog world. Here's one I made for the new baby's nursery:
I loved this frame when I saw it at IKEA & was wondering what I could do with it. Then I found this fabric that coordinates with the nursery bedding (we already have the nursery set up, just moving the 2-1/2 year old out & the baby in) at JoAnn's & I knew I wanted to do some kind of decor with it for the new baby. Add in blogs & Pinterest where I started seeing this frame with all sorts of creative transformations & I decided on doing a monogram for the nursery. This was such an easy project too-just a little spray paint, fabric & a wooden letter! And I love how it turned out!
I know it's a little bright, but here's the nursery so you can see how it coordinates:
(Don't mind the baby stuff being stored in the crib!)
I loved this bedding when I found it at Target when I was pregnant with our last little girl. I love the bright pink for a change & the hint of green, instead of pastel baby colors. I am glad I finished this & got it all hung up before our little one arrives!

Friday, December 30, 2011

Nursing Cover

Today I am officially 37 weeks pregnant, which means this little baby is considered full-term! Yay! Now she can come anytime as far as I'm concerned! Of course, now that I've been feeling better & we've hit our goal of keeping her in until 37 weeks, she'll probably be stubborn & arrive late. We shall see! In the meantime I have been trying to keep myself busy instead of just waiting around for a baby to come. Well, besides being busy with my two older girls. So I have been making meals for the freezer like mad & I have been slowly working on some more baby projects. My project yesterday was this nursing cover. I had never attempted to make one before. I looked at a bunch of different tutorials before & terms like "boning" & "D-rings" were intimidating me a little. But, yesterday I just decided to go for it. And it was so easy! This project probably took me about 2 hours from start to finish.

The neck strap is adjustable. Hence the need for D-rings. Which, by the way, are not scary at all, but very simple to use. And the boning goes into the top hem so that the nursing cover curves out so you can see the little one while nursing. Again, using the boning was really easy to use.


Then I added a couple of terry cloth pockets to the inside bottom of each corner. These pockets are a great place to store a breast pad & the terry cloth is so handy if you need to wipe up any little dribbles. And of course this is great because you can just throw it in the washer anytime you need to.
A closer look, it's just a square of terry cloth, folded in half into a triangle & then sewn in place when you sew the hem down.
What a great baby shower gift this makes too! It's inexpensive, easy to make & super handy to have!

If you want to make one yourself I recommend checking out the following tutorials, I sort of used a combination of the 2 to make this one:
Nursing Cover Tutorial at Diary of a Quilter
Nursing Cover Tutorial at Our Seven Dwarfs

Tuesday, December 27, 2011

Infant Car Seat Canopy

I managed to get another baby project done! Yay! Sitting at the sewing machine counts as resting right? {wink, wink} I have a car seat canopy that we used with my last little one & it is so handy! It was very cute too, but the fabric was really thin & bright which made it very bright for when she was in the car seat. I wanted to make a canopy that was thicker & darker, you know, so that it will hopefully help to promote sleep when we need it to! I found this floral fabric at Hobby Lobby in AZ a while back & loved it immediately. I bought 2 yards of it & have been waiting for a project to use it with. I love how it turned out for the canopy. I made the straps out of a bright pink polka dot fabric just for fun & I used thick (2") velcro to attach the canopy onto the car seat so that it's really secure.

Here's a picture of the lining fabric:
I used a dark gray flannel. Like I said, I want this to not only keep the baby warm & out of the wandering hands of strangers, but to help keep it dark & cozy in there as well for when it's time for a little snooze. I am so excited I got it done!

Friday, December 23, 2011

It's Done!

Right in time too! We had a little scare last week when I started having some contractions & we thought this baby was trying to escape a little early. Well, 5 weeks early actually. I've had doctor's orders to rest, rest, rest & so that's what I've been doing. We just need to try to keep her in until 37 weeks, one more week to go & then she will be considered full term. Luckily my contractions have been very few & very far between since then so I think the rest is helping. I am so glad that I was able to get all of my Christmas stuff done before I had contractions too. My plan after finishing the Christmas stuff was to move on to baby stuff. So this rest has put a little kink into getting all of the baby projects done that I wanted to (bibs, burp cloths, knit blanket, knit hats, car seat canopy, etc.). But it did finally give me the time to sit down & bind the baby quilt! I finished it yesterday & gave it a wash in the machine & I love it! I love how soft & ripply it gets after you wash it. I just want to wash it a few more time so it really gets that worn-in look & feel. The colors may be a little different than norm for a baby quilt, but that's how I like my baby stuff-with fabrics that you wouldn't necessarily consider "baby." And you know I love pink & brown together.

The back is all the large flower print too & I just love it:
I am so happy that I finished this before she arrived!
Now let's just keep our fingers crossed that she'll stay in for at least one more week!

Monday, December 19, 2011

Handmade Christmas 2011: Insulated Casserole Carrier

Do you remember the insulated casserole carrier I made here? So easy to make & what a great gift for those who cook & carry. It will keep dishes hot or cold. I love the cherry print & the bright red polka dot lining on this one!
Here's the inside:
This is a really fast project to make & is a great gift to give!

Check out the original tutorial from 2 little hooligans here.

Friday, December 2, 2011

Handmade Christmas 2011: Crayon Purses

So you've seen this project here. When I was making that one for my niece, my oldest daughter really, really wanted me to make her one too. I decided to make a crayon purse for each of my girls for Christmas this year. They will love carrying these to church & having their own little purse to hold their crayons & paper or small coloring books. These don't take much fabric & come together really fast too which is great.

Here's a pic of the other side of the bags:
I love the cute ruffle & the big button. I know these are going to be a hit this year!

Monday, November 21, 2011

Handmade Christmas 2011: Shopper Tote

Here's another handmade Christmas present for ya! Can I just say I am so thankful to have Pinterest in my life this year? I have just found some amazing handmade gift ideas & tutorials. Thanks to everyone who is willing to share their awesome ideas on there! So I saw this shopper tote on Pinterest & you can find pictures & the full tutorial at The Crafty CPA. I love this style tote bag! So great for a teacher gift too, or for anyone who loves a good tote bag really. I think next time I would actually make the bag a bit larger & I would make the handles a tad shorter, but it's still a great bag. I did make one change which was that I only measured in 2 inches when boxing the bottom corners & I think the tutorial said to go in 5 inches if I remember right. I love that this bag has 2 outside pockets, one on each side, in between the handles too (it's hard to see the pocket in the photo).

And here's a shot of the inside of the bag:
I always like to use a lighter color lining inside of my bags, just so it's easier to see what's in there. I also love to add 2 large pockets, perfect for your phone & other small items you want to keep handy. Thanks again to The Crafty CPA for the inspiration for this one!

Monday, November 14, 2011

Handmade Christmas 2011: Alphabet Bean Bags

Do you remember my Handmade Christmas 2010 projects from last year? Oh it was so much fun! I love making people gifts & being able to really customize things for them. I am not going to be making as many handmade gifts this year as I did last year, but I thought it would still be fun to post them for you all to see. Maybe inspire you to make some handmade holiday gifts of your own? So here's hoping that I have the time & energy to get all of the projects made that I have planned!

Anyway, here is the very first handmade Christmas gift for 2011-alphabet bean bags.


I made these as a gift for my 2-year-old this year. One of her favorite things to do during her gymnastics class was to play with the bean bags. And since she follows right along with her big sister & is already starting to learn a few letters, I thought I would make them alphabet bean bags. Well, really she just knows A for her name, but soon enough she'll be ready to learn the others too.

Do you want to make some for yourself? Here's what I did:
They were a little time consuming to make, but very easy. I used my 5-1/2" x 5-1/2" square acrylic ruler to cut 52 squares from the fabric. I so love this fabric, by the way. It's from the Michael Miller Ta Dot collection. So bright & fun! I had first lined the fabric with some fusible interfacing just so that they'd be a little stronger since I know they will get tossed around a lot. Then I used my Silhouette machine to cut out the letters from white heat transfer vinyl. I liked this large chunky font too. I ironed the letters onto half of the squares of fabric. Then I sewed two squares of the same color together, one letter square & one plain square, with the right sides together, leaving a 2 inch opening. Then I clipped the corners & turned each square inside out. I ironed them nice & flat. Then I filled each one with pinto beans. Tons of beans! For this size bean bag I measured out 3/4 cup of beans for each one. (I needed 8 16 oz bags of pinto beans, which I got for $0.38 each at Target.) Then I top stitched around the entire bag, just shifting the beans around inside as I sewed around the entire square, closing up the opening as I did this. And that's it!

They turned out super cute! Much better than I had hoped for & they feel pretty sturdy too. I know they will provide a lot of fun for my girls & will be educational too!

Thursday, November 10, 2011

Baby Monthly Onesies

I first saw this idea on BabySteals.com a while back. They had these cute iron-on vinyl circles with month ages on it that you could simply adhere to a onesie & then take a photo of your little one every month to document their growth over that first year. What a great idea! Since I've seen them there, I've come across many other crafters in blogland & on Pinterest creating their own baby monthly onesies. I knew that I wanted to do this for Baby #3 as well. My plan is to take a photo every month of this baby girl on the quilt that I'm making for her so I decided to use some of the leftover fabrics from the quilt to make the circles for the onesies with so that it all coordinates.


Thanks to my wonderful Silhouette machine this project was super easy! I just drew a circle the size I wanted in the Silhouette program & then cut out 12 of them with the 12 different pieces of fabric. Before I cut the fabric I had ironed some sewable Heat n Bond onto the back so that I could then easily iron the circles right onto the onesies. There are great directions online for cutting fabric with your Silhouette if you need more details. After the circles were ironed on then I sewed each one down with a tight zig zag stitch on my sewing machine. Then I used my Silhouette once again to cut out the month ages in some white heat transfer vinyl & just ironed those onto the center of each circle. Done!

So the hardest part of the whole project for me was picking out which size onesies to use for each month. My babies tend to be on the smaller size, so their age doesn't usually match up with the clothing size. Especially with these Carter's onesies, they always seem to run a little big to me. So I just guessed the best I could & hopefully they will all fit this little girl on the right month.

Isn't it amazing how much babies grow over their first year? Here's the size difference between 1 month & 12 months (which are actually a newborn size onesie & a 9 month size onesie since my babies rarely even hit the 12 month size onesies):
And a close-up of one of the monthly circles:
I have about a million things to do & I have quite a few sewing projects I want to make for Christmas presents, but all I seem to want to work on are the baby projects! I am so glad I got these all done & ready for baby. I can't wait to see her wear one each month! This would make such a cute baby shower gift too!

Saturday, November 5, 2011

Fabric Basket

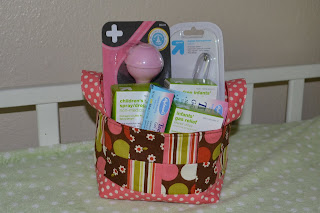
I went to a baby shower for one of my good friends from church last night. She is due about 2 weeks before me & she is also having a girl! This is her first baby & I am so excited for her & her hubby! They will be fantastic parents. Anyway, one of my favorite gifts to give to first-time parents is a goodie basket with all sorts of baby medicines, creams & other items that we have found useful & necessary with our babies. You know, all of those things you don't really think about when you first have a baby, but then eventually you'll end up needing them. At least this way they will be prepared for those unexpected illnesses, bouts of gassiness, or that first round of teething. So I saw this super cute fabric basket pinned on Pinterest & found the tutorial for making it over at the blog Pink Penguin, click here to see it. So cute! I thought what better way to deliver all of the baby goodies than in an adorable fabric basket like this one. So I just followed the easy tutorial & made one of my own. Now, it is pretty small, so just keep that in mind, but it is a great way to use up scraps of fabric.

Here it is all filled & ready for gifting:
Everything wouldn't look quite so squished if I had taken them out of the boxes, but that might be a little weird for a baby gift, right? I hope all of this stuff comes in handy for them & their new little baby girl!

Thursday, November 3, 2011

A New Bag for Winter

I decided that I needed to make myself a new bag for Winter. Of course, I went to my favorite tutorial for the Tohoku Tote! I love this speckled gray fabric. And I love the black bow & straps with it. It's a little dark, but perfect for the Winter season.

And I just cannot seem to get myself away from the gray & yellow combo right now-love, love, LOVE those colors together! So here's a peek at the inside:
Make sure to click here if you want to make one of these bags for yourself. It's super easy to make & doesn't take much time at all!

Tuesday, October 25, 2011

The Quilting is Done!

Boy it's been crazy busy around here! But I managed to finish the quilting for the baby quilt. Yay! I simply sewed through the corners of each square, creating an X across each one. My biggest problem was keeping the backing fabric flat & from bunching up & getting pinched while sewing. I had even used a spray adhesive to try to hold it in place too. But I think it turned out pretty great:
And here it is all trimmed up:
Now I just have to do the binding! I love sewing the binding! Ok, so I've only done it a couple of times, but I do love it! I have a couple of projects I need to sneak in first, though, so the binding is going to have to wait for a little bit.

Friday, October 7, 2011

What's Up?

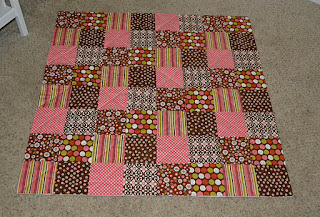
So what has everyone been up to? I have been working on a few gifts. They are finished, but I don't want to blog them before I give them to the recipients! Yesterday I ironed & cut out the squares of fabric for a quilt I want to make for Baby #3:
You know me, I just have a thing for pink & brown together. I'm worried this quilt is going to be a little dark, but I think it will be cute. Hopefully I can start sewing it tomorrow!

Thursday, September 22, 2011

Simple Autumn Wreath

I modeled this Autumn wreath after the Simple Spring Wreath I made way back in April. Yep, I've had that Spring wreath up ever since & now that our weather has been nice & cool & tomorrow is the first day of Autumn, I decided it was time to change the wreath. I have seen so many cute Autumn wreath ideas on blogs & Pinterest lately, but I decided to go with this one simply because I had everything on hand already ( well, except for the styrofoam wreath form). At first I was thinking of doing a Halloween wreath with black, orange, purple & green, but then I figured I better just make a more generic Autumn wreath that I can leave up for a bit longer. I did the same type of flowers that I made on the Simple Spring Wreath, except this time I used felt which is sturdier & fluffs up nicely which I love! Another simple & inexpensive decoration for our home!

*If you want to see a tutorial on how to make the cute flowers check out this post over at Make It and Love It (scroll down past the baby hat part). So easy & I love how different fabrics give the flowers a different dimension!

Friday, September 9, 2011

A Fun Gift Set

I had been wanting to make something for my aunt who has helped us out a lot lately with some last minute babysitting. I think the Tohoku Tote is becoming my go-to pattern for tote bags. It is such a great bag! It's easy to do so I can get it made quickly & it's such a great size. I love this bright, fun fabric too! I also decided to make a zipper pouch to go inside of the tote bag, but then at the last minute I decided to add a strap. So I guess it's actually a wristlet now? Anyway, I love how both the tote bag & the zipper pouch turned out.

Here's the tote bag:
To get the free tutorial for the Tohoku Tote just click here. Thank you Cheri from I Am Momma-Hear Me Roar for now making it a public tutorial for anyone to use! Also, it is the new Create With Me project for September over at Ucreate, click here to read about that. It sounds fun, I'm going to link up this bag! I didn't do the pleat or the bow on this bag, but I added a large double yo-yo flower to the front for a little embellishment & I think it looks great!

Here's a close-up of the zipper pouch-I love the bright yellow ruffle:

A close-up of the double yo-yo flower:

And both the tote bag & the zipper pouch are lined with this fun bright blue fabric:
These two projects just make me happy! I was tempted to keep them for myself, but I do hope my aunt is enjoying them!