Showing posts with label Big Shot. Show all posts

Friday, May 25, 2012

Personalized Chalkboards

I can't remember if I mentioned this before or not, but my calling at church is the Additional Relief Society Meeting Coordinator.  What is that?  I am (with the help of a large committee of women) in charge of planning & carrying out monthly activities for the women in my church.  The activities vary throughout the year, always having a spiritual message, sometimes we have dinner, sometimes just snacks or treats, sometimes we learn a new skill, sometimes we make a craft, sometimes we complete a service project.  It's a lot of work (we have anywhere from 50-90 women at each activity), but it's a lot of fun as well.  I have a really great committee of creative & truly inspired women to help & these activities would not get done without them!  

Our activity for May was centered around President Uchtdorf's talk "Forget Me Not."  Such a great & memorable talk!  We invited the Young Women to attend as well (girls ages 12-17) & we served dinner (teriyaki chicken bowls & salad), we had a speaker (who used the "Forget Me Not" talk) & we made a craft (memo boards).  We wanted a cute, useful craft that the women could make that evening that wouldn't break our budget!  So one of the ladies came up with the idea to do memo boards.  We provided the boards & then a variety of supplies so that they could make the boards their own.  We had chalkboard paint, metal sheets that they could glue down on the board to make them magnetic, paint, scrapbook papers, die cutting machine, etc.

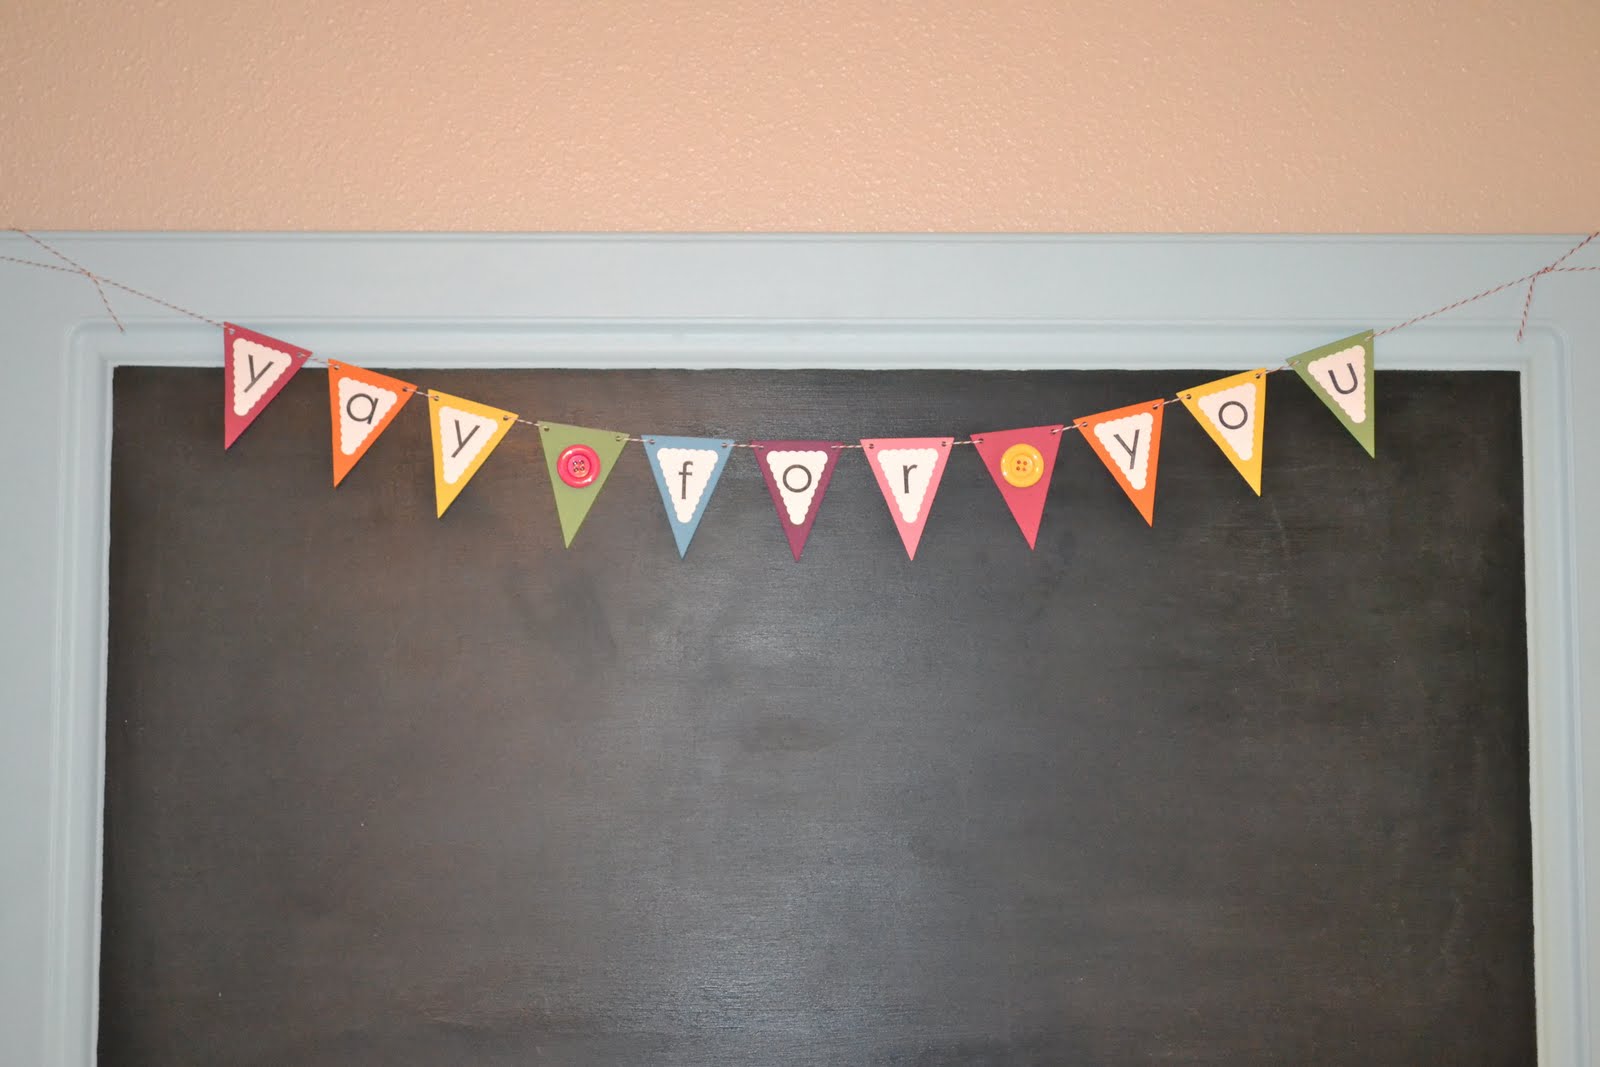
Here is the sample I made for our display case to show them one idea for our craft:

It was really simple, but went well with our theme.  I just taped off the edges of the board & painted the inside with chalkboard paint.  Then I used my Big Shot to cut out the letters & the flower.  I glued them down & attached a big yellow button in the center of the flower.  Easy!

We had a few extra boards after our activity, so I brought a couple home.  I made my girls their own personalized chalkboards.  This time I painted the boards first, then I drew a simple template that I traced onto the board & then filled in with chalkboard paint.  And then I used my Big Shot to cut out their names with some cute polka dot scrapbook paper & glued them down.  I did cover the letters this time with some Mod Podge since these boards are going to be used a lot by little hands.
They turned out pretty cute:
And just give them some colored chalk & the girls are entertained for a while!  Awesome!

Saturday, May 5, 2012

Baby Blessing Dessert Table

Hello!  Are you still out there?  I'm still here, even though it's been a while since I've posted anything.  What can I say?  Life has been hectic.  We've had some ups & we've had some downs.  I won't bore you with all of the details.  And I am sorry I have not been able to respond to any of your emails.  And thank you for all of the nice requests for buying things that I make.  You all are so sweet!  I would love to be able to craft & sell, but at this point in my life it just is not feasible.  Maybe in the future?  Anyway, hopefully I can get back to blogging a little more regularly now that life seems to be quieting down.

Well, on Easter we blessed our baby Quinn.  In our church, children don't get baptized until they are eight years old.  But after they are born we have a baby blessing for them.  We decided to bless Quinn on Easter since so much family would be in town, it was the perfect time.  Now back when I was pregnant, I knew that I wanted to do an all white dessert table for the baby blessing.  I know, I'm crazy to have already been thinking about that before she was even born.  But I loved the idea of all of the desserts being white.  Just like the beautiful white blessing dress she would wear on her special day.  I think the white is so beautiful because it is symbolic of the purity & innocence of this new baby.  As I started actually planning the dessert table for the blessing after Quinn was born, I decided that I did want to add in a little bit of color.  I decided to add a kraft brown color & light pink, just like I used for her birth announcements.  I think it added a nice contrast to all of the white.  *By the way, sorry for the dark photos.  Our house hardly gets any natural light at all.

Here's the entire table set up:
 A while back I finally broke down & just bought a nice white cotton tablecloth.  It's so versatile & this way I can use it for anything & just change up the accents depending on what kind of party or event we are hosting.  For the baby blessing I used some kraft wrapping paper that I had gotten at IKEA before Christmas.  It made the perfect {cheap} table runner!

I also used my Big Shot to make a banner that said "Quinn Marjorie" to hang above the dessert table:

I made a little printable for the table too using My Digital Studio from Stampin' Up!  I simply had it printed out at Costco & used some Mod Podge to adhere it to a plain white canvas & then added a couple of paper rosettes made with my Big Shot:

The glare is really bad in that photo.  Here is what it looks like digitally:
The pink verses are taken from a primary song at church & the overall idea I've seen used many times online.

And a close-up of the paper rosettes: 

I made a chocolate cake with chocolate mousse from Our Best Bites in the middle & then covered it with white buttercream ruffles.  I have to say the chocolate mousse is so stinkin' good & it's found in this recipe here.  It looked really pretty, just what I wanted for the blessing dessert table.  I also made a Q to put on the top of the cake with some pink melting chocolate:
 (I just typed & printed out a Q on my computer.  Then I covered it with waxed paper.  I melted some pink melting chocolate & then put it inside a squeeze bottle & then traced over the Q.  I let it harden back up & then it simply slid right off of the waxed paper & I stuck it down into the frosting on top of the cake-easy!)

I stuck with the monogram theme with my sugar cookies too:
 People always love my sugar cookies.  I can't take credit for them though, the recipe is from Our Best Bites & it is so good!  I used a scalloped circle cookie cutter for these ones & then my large Q stamp (thoroughly cleaned & sanitized first) to lightly stamp into the cut dough.  I baked the cookies & then just filled in the Q with some light pink royal icing.

I had also made some white cupcakes with white buttercream frosting, my sister-in-law made some of her yummy spritz cookies with light pink sprinkles & then I put out some various white-colored candies in the small dishes on the table.  It looked good, I was happy with how it turned out.

And here are my 3 pretty girls on Quinn's blessing day:
 The blessing dress was made by my grandma for my mom to wear, then I wore it & now each of my daughters has worn it on their blessing days.  It is very special!

We also attempted a family photo & managed to get one decent shot:

The rest looked more like this:

Oh, my crazy family!  But I love them more than anything!

Thursday, December 8, 2011

Handmade Christmas 2011: Card Stock Ornaments

I was in charge of planning & organizing the Christmas progressive dinner for the women of my church this year (about 80 women total). Luckily I had a lot of wonderful women to help me & I think it turned out pretty well. We wanted to have a little something that the women could take home with them, but something that was Christmas-y & spiritual too. And with such a large group of women we needed something that was pretty inexpensive too. I came up with this simple card stock Christmas ornament.
I used my Big Shot to cut out the red scallop circles (I think I cut about 5 sheets of card stock at once so it wasn't too bad). Then I stamped the wreath & the "Merry Christmas" onto white strips of card stock & used my circle punch to punch them out. I also typed up a Christmas scripture on my computer, printed it out & then used the circle punch again to punch it out for the back of the ornament. We glued them all together, punched a small hole in the top & used some pretty green ribbon I had leftover from my niece's bridal shower to add a loop so it could be hung from a tree.

Here's the back side with the scripture on it:
These were quick & easy to put together & very inexpensive.
I hope all of the women liked them!

Thursday, November 17, 2011

"Yay for You" Cupboard Door Chalkboard


A couple of weeks ago our ward (church congregation) had a Super Saturday & this was one of the projects. What is a Super Saturday? It's a day full of fun crafts that you can sign up to make. I signed up for the cupboard door chalkboard. And then my hubby had to go into work & I didn't make it that day. But I was still able to get the cupboard door & do this project at home.


One of the ladies had gotten a bunch of cupboard doors for only $7 each! This one was unfinished so I first threw a coat of primer over the entire thing. Then I painted it the soft blue color. I got this color in a sample size at Home Depot, it's a Martha Stewart paint & was less than $2 & I still have a bunch leftover. Then I painted the raised center of the cupboard door with chalkboard paint. I ended up doing 4 coats of the chalkboard paint because I wanted to make sure it would work really well. Then I hot glued on some clips onto the bottom that I got at Staples.

Now the cupboard door that I chose was a big one. I mean, really big. I took this picture just to show you how large it is. It's all hung up in it's new spot in our kitchen above the girls' little table:

I had decided that I wanted to add some kind of sign saying "Yay for You" on it. I wanted this chalkboard to be a place where our family can write all of the good things we've been up to or the things we are proud of. And also a place where we can hang favorite artwork or awards or anything else special to us. I want it to help us do a little more positive reinforcement around our house & help our girls to strive to do well. So I decided to add a cute little pennant banner at the top that says, "Yay for You":
And I used my Big Shot so cutting out the pennants was super fast & easy. I love how the banner turned out! The colors really brighten the whole thing up & make it more fun.

Here it is already being put to use:
My kindergartner loves it! I think this is going to work out just great!

Friday, July 22, 2011

Ice Cream Birthday Party

We decided to have an ice cream party for my daughter's second birthday. She's not big on cake, but she loves ice cream! And it's the perfect cool treat for a hot summer birthday! I wanted to share a few of the things we did for her little party, it turned out so great!

I made her invites with the Stampin' Up! digital designing software, called My Digital Studio.
Here's the front:
And the back:
I also went ahead & made some thank you cards too:
They turned out really cute! They look even better all printed out. I love the colors!

I also decided (2 days before her party) to make her a little ice cream cone shirt:
I used my Silhouette & the heat transfer material & it was so fast & easy. It probably took me all of 10 minutes to finish. My only complaint is that my fabrics were a little sheer so you can see through them, but it still looked cute.

I also made a birthday hat headband:
Tasha over at Creation Corner has made these & they are just so adorable! Mine definitely isn't as cute & embellished as Tasha's, but it looked pretty cute. Tasha has a great tutorial on her blog on how to make these, check it out here.

Here's the birthday girl with her cute shirt & pettiskirt:
And her super cute birthday headband:

I made a birthday banner using my Big Shot:
With an ice cream cone in the middle, of course:
I made some of those tissue paper pom-poms to hang up too. They are super easy & look really cute. Here is the ice cream creation center:
I made some chocolate dipped cones which were a huge hit:
Some were plain chocolate, some had nuts & some had sprinkles. We also had all sorts of toppings so people could made their own sundaes too. And we had root beer in case anyone wanted a root beer float.

I tried out these yummy sauces from the Our Best Bites cookbook:
It's the hot fudge sauce, the buttermilk caramel sauce & the strawberry sauce. All were delicious! I'm not sure if these recipes are on their website or not too, but you can check here.

Enjoying her ice cream:
She had a special {pink} ice cream bowl too!

After ice cream, the kids went swimming in the little pool in the backyard. It was an easy, stress-free party & we had a blast!

Happy Birthday, Aidynn!

Thursday, April 7, 2011

Simple Spring Wreath

I jumped on the Spring wreath bandwagon this week & made my own. I've been seeing so many on people's blogs that are just so cute! If it looks off-centered in the photo, that's because it is! I don't know why, but that clear wreath hanger doesn't work well on my front door & made the wreath very crooked. I actually have the wreath hung on a door inside of our house, but the lighting was absolutely horrible in there for taking a photo. Oh well, you get the idea. So I've been on this 3 flower thing for a while & that's what I did on this wreath as well. I wanted my wreath to be very simple, but I'm thinking that maybe it's too simple. Maybe I should add a couple more flowers? I loved using the burlap to wrap around the styrofoam wreath-so fast & easy! And it adds such a nice texture too. I also love these colors in the fabrics-cocoa brown, apricot & ocean blue. Such happy colors! I am so glad that Spring is here!

Thursday, February 17, 2011

New Felt Flower Headbands

Did you notice the cute felt flower headband that my older daughter was wearing in this photo from the other day?

Yep, I've been making some felt flowers again. I love felt! I had seen this technique for making flowers around in the blog world, but Make It and Love It just posted a tutorial last week for knit baby hats that feature this type of darling flower on it. Click here to check out her awesome pictures & tutorial. They are so easy & fun to make & they are so cute that I just want to stick them on everything! And with my Big Shot I can cut out all of the circles I need at once. I love the weight of the felt for attaching onto headbands. And I just fluffed up the layers a little bit for these ones, but they also look super cute when they're not fluffed up & have a button glued in the center.

Here's the light pink one I made:

And the bright pink flower I glued on the bright green headband:
So fun!

Thursday, February 10, 2011

Valentines Mail Pouch

I knew that this year I wanted to make some kind of mail pouch for each person in our family to hang on their chairs. I started looking around online & found lots of cute ideas. I really fell in love with this one from Pottery Barn Kids:
It's adorable, right?
{Isn't everything from Pottery Barn Kids?}

I figured I would try to duplicate it with what I had on hand-lots of felt!

Here is my version:
I just created a very simple pattern to make the pouch. And I made it almost just like a little backpack with straps on the back so that it could hang on the back of a chair. I made a flap that closes with velcro so that they can open up their pouch to get their "mail" out. And there's a slot in the top of the flap so that they can drop "mail" into the pouch. Then I embellished it up! I hand-stitched around the flap & the front of the pouch. I used my Big Shot to cut out the scallop edging & the letters for the names which I then simply glued on with felt glue. I also added a button onto the heart on the flap just because I thought it was so cute!

I made the girls' mail pouches in pink, of course!

Here's a close-up of the slot on the top of the flap:

And here's a shot of the back of the pouch & how it hooks onto a chair:
I made it so that the straps hook with velcro as well so that it's somewhat adjustable & easy to move to different sized chairs.

And I thought Mommy & Daddy needed their own valentines mail pouches too:
I made those in red & I think those are my favorite!

Even though this project took all week to finish, I love how they turned out & I am so excited that we will have these to hang up every year for Valentine's Day!
I can't wait to fill everyone's pouch up with some goodies this year too!

Wednesday, February 9, 2011

Valentines for Preschool...

...check!

A little something sweet for some sweet teachers...
...check!

Tuesday, February 1, 2011

Love Sign

I have a hard time throwing things out. I always think that one day it will come in handy or that one day I will think of something crafty to do with it. I have quite a few photo mats just laying around from frames that I've purchased but didn't need/want the mat for the photos. So what to do with all of these mats?
I decided to create a little Valentine's Day art:
This was so fast & easy to make too! I just took some super cute red heart designer paper & wrapped & glued it around the plain white mat. This turned the mat into its own frame now. Then I tied some pretty pink satin ribbon around the upper left side. I glued a piece of white card stock behind the mat. Then I used my Big Shot to cut out the letters l, v & e from pink card stock & I used my heart punch to punch out a big red heart from some textured card stock & glued them all down in the center of the white card stock to spell "love." I'm thinking about adding a couple small fabric flowers of some sort onto the frame on the bottom right corner, but I'm not sure. Maybe it would be too much? Hmmmm...
In the meantime this frame is pretty darn sturdy & makes a cute addition to my Valentine's Day art collection:
Love it!

Monday, January 31, 2011

Countdown to Valentine's Day Garland

I knew I wanted to make some sort of countdown to Valentine's Day for my family. I was going to make a garland, but then found this cute ribbon one at Michaels & bought it with one of my coupons. I used my Big Shot to cut out the little bags from some pink polka dot paper. I punched out the white hearts & stamped the numbers on them (1-14). I glued the stamped hearts onto the bags, assembled the bags & then attached them to the garland using clothespins. I figure that I can put candy or little love notes in the bags for each day as we count down to Valentine's Day. I hung them up starting with 14 & going to 1 since we are counting down, but when I stand back & look at it now it just looks backwards to me. Maybe I'll flip them around so they're numbered in order the right way?
I needed to hang this up high where little, curious hands wouldn't bother it when they're not supposed to! So I hung it up on one of the walls in our eating area:

I love how easy this was & how festive it looks!

Saturday, January 29, 2011

Felt Heart Wreath

I've seen quite a few of these adorable felt heart wreaths on different blogs & thought I would try one for myself. It was pretty easy, but a little time consuming. I bought a styrofoam heart at JoAnn's with my 40% off coupon, cut out a ton of circles in this bright pink felt with my Big Shot, folded them in half, then in half again & then stuck them into the styrofoam with straight pins. When I had the whole thing covered I stuck some ribbon on the back with pins too so that I could hang it up. I love how it turned out. It really looks so much better in person than in the photos! If you want to make your own I just saw one over at The Idea Room too just click here to see it.
A close-up:
So pretty!