Showing posts with label Spring. Show all posts

Sunday, March 4, 2012

Easter Silhouette Canvases

Last week my girls & I decided that we wanted to put away the Valentines decorations & get out some Spring ones. Well, we realized don't have any decorations for St. Patrick's Day. Maybe I can come up with some next year. And we noticed don't have much for just Spring in general. We don't even really have many decorations for Easter. Yikes! So I decided to make a quick craft for our mantle for Easter. Since we have a newborn & a crazy schedule around here I needed something fast & easy.

Here's what I came up with:


Easter Silhouette Canvases

These were so, so easy! I just bought some 5x7 sized blank canvases & some Spring-colored acrylic paints at JoAnn's. I painted the canvases, I used about 3 coats on each one so they're nice & bright. Then I used my Silhouette machine to cut out the four different Easter silhouettes with some white adhesive vinyl. Then after the paint on my canvases was dry I stuck the vinyl silhouettes on them. And then I set them out on my mantle. They stand up really well by themselves which is perfect.
I love how bright & cheery these make our mantle! And now we have a little Easter decor!

Thursday, March 31, 2011

Embroidery Hoop Art for Spring

I have been seeing all sorts of these cute embroidery hoop art pieces on crafty blogs for a few months. I am so grateful for the Internet & for the inspiration of all of you crafty people out there, by the way! So I've been meaning to shift gears at our house & welcome spring. I thought I'd give one of these embroidery hoops a try. (Of course as I went outside to take the photo I grabbed it wrong & now it puckers over there on the left where my fingers slipped. Oh well, just ignore that!) So I wanted mine to have a vintage feel to it. I used my Silhouette machine to cut out this cute doily shape on some flocked white heat transfer. Then I ironed it onto some muslin fabric which I then put into the embroidery hoop. To embellish it I made the 3 fabric rosettes from some scraps of Stampin' Up! fabric that I had. I had never made rosettes before. To be honest I actually hated these ones at first. I was going to rip them off & try something else, but now that I am getting used to them I am really liking them. Funny how that happens! To finish the rosettes off I simply glued some pearl beads in to the center.
Here's a close-up:
I wish you could see the flocked heat transfer doily in person, it really looks cool! And overall this was a really quick & inexpensive project-which I love!

Wednesday, November 24, 2010

Holiday Blocks

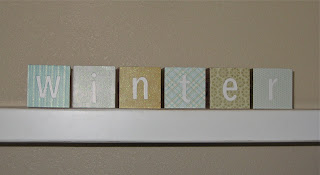
So, yes, two days before Thanksgiving I finally finished my holiday blocks. I have been meaning to get these done all month long! Stampin' Up! now sells these 3" x 3" MDF blocks. They are $9.95 for 4 blocks. I knew that I wanted to make an "autumn" sign for on top of the TV with this super cute Autumn Spice Designer Paper since I don't have a lot of fall themed decorations for our house. Then I decided to just keep flipping the blocks around to make as many signs as I could out of them. So I made the four seasons first: autumn, winter, spring & summer. Now I can leave these up all year long!


I still had 2 other sides to decorate so I wanted to think of holidays that I don't have many decorations for. I decided on Valentine's Day & Easter to finish my blocks off.

They were so easy to make too! I picked cute designer paper then cut it to 3" x 3." Then I applied some Mod Podge to the block & stuck the paper on. Then I cut out the letters with my Big Shot & glued them onto the center of each block. Last, I covered each block in Mod Podge to seal it. So this was my first time using Mod Podge (crazy, I know) & I have to say it is awesome! I now understand the Mod Podge obsession!

Saturday, March 20, 2010

Happy Spring!

Remember the "fall" sign that I made way back when? Well, I finally made a "spring" one last week. This is such a fast project & easy too with the Big Shot. I used it to cut out the scallop circles from chipboard & the designer papers. Also to make the circles that the chipboard letters are glued to. I used, again, the Sweet Pea designer paper & some of the coordinating felt embellishments. Also some stamps & some buttons. And, of course, some ribbon to tie them onto my hooks. I realized that since I get most of my crafting done when the baby is sleeping that I should measure how long a project takes me to make by how many naps it took me to make it. The baby usually naps twice a day for anywhere from 1 hour to 2-1/2 hours. So this project took me about 2 nap times to finish. Sorry the photo isn't great, but you get the idea right?
Here are close-ups of each one:


Happy Spring!